TRENDnet TN-200T1 User's Guide
TRENDnet TN-200T1 Manual
 |
View all TRENDnet TN-200T1 manuals
Add to My Manuals
Save this manual to your list of manuals |
TRENDnet TN-200T1 manual content summary:
- TRENDnet TN-200T1 | User's Guide - Page 1
TRENDnet User's Guide Cover Page - TRENDnet TN-200T1 | User's Guide - Page 2
TRENDnet User's Guide Contents Product Overview 2 Package Contents ...2 Features ...2 Product Hardware Features 3 Server ...30 iTunes Server...33 File/FTP Server 34 Disk ...37 © Copyright 2013 TRENDnet. All Rights Reserved. Table of Contents RAID ...37 S.M.A.R.T...43 Scan Disk ...45 Volume - TRENDnet TN-200T1 | User's Guide - Page 3
TRENDnet User's Guide Download Center...74 Add URL Download 74 Add BT Download...74 FTP/HTTP Download 75 P2P Download ...77 Table of Contents Glossary 79 Technical Specifications 80 © Copyright 2013 TRENDnet. All Rights Reserved. ii - TRENDnet TN-200T1 | User's Guide - Page 4
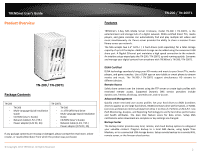
TRENDnet User's Guide Product Overview TN‐200 / TN‐200T1 Package Contents TN‐200 ‐ TN‐200 ‐ Multi‐Language Quick Installation Guide ‐ CD‐ROM (User's Guide) ‐ Network Cable (1.5m / 5ft.) ‐ Power adapter (12V DC, 3A) TN‐200T1 ‐ TN‐200 ‐ 1 x 1TB SATA Hard Drive ‐ Multi‐Language Quick Installation - TRENDnet TN-200T1 | User's Guide - Page 5
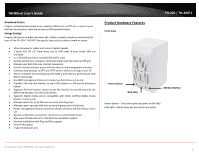
and Play support Smart FAN support 2‐year limited warranty Product Hardware Features Front View TN‐200 / TN‐200T1 Power Button HDD LEDs USB Sync Button Power Button - Press this button to power on the NAS. HDD LEDs - Blinks when the hard drives are active © Copyright 2013 TRENDnet. All - TRENDnet TN-200T1 | User's Guide - Page 6
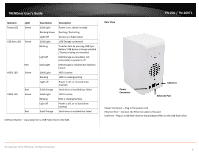
TRENDnet User's Guide Indicator Power LED Light Green USB Sync LED Green HDD1 but failed USB Sync Button - copy data from a USB Flash drive to the NAS. Rear View TN‐200 / TN‐200T1 Power Connector USB Port Ethernet Port Power Connector - Plug in the power cord Ethernet Port - Connect the - TRENDnet TN-200T1 | User's Guide - Page 7
TRENDnet User's Guide Application Diagram TN‐200 / TN‐200T1 Installing Hard Drive(s) 1. Slide and hold the lock and push the top cover towards the back to open the top cover. 2. Insert SATA hard drive(s) and make sure the hard drive is firmly placed into the SATA slots. © Copyright 2013 TRENDnet. - TRENDnet TN-200T1 | User's Guide - Page 8
TRENDnet User's Guide Install NAS Setup Utility 1. Insert the CD‐ROM and click Install NAS Setup. TN‐200 / TN‐200T1 3. The NAS Setup Wizard window will now appear. Click Next to continue. 2. Select your preferred language from the drop‐down list 4. Click Next to store - TRENDnet TN-200T1 | User's Guide - Page 9
TRENDnet User's Guide 5. Select the Start Menu folder location. 6. Click Install to install the utility 7. Click Finish to complete the installation. TN‐200 / TN‐200T1 8. The NAS Setup icon will now appear on your Desktop. © Copyright 2013 TRENDnet. All Rights Reserved. 7 - TRENDnet TN-200T1 | User's Guide - Page 10
TRENDnet User's Guide 9. Windows Firewall might prompt a permission request to access the NAS Setup utility. TN‐200 / TN‐200T1 Configuring with the NAS Setup Utility 1. The login screen will prompt you to enter a User Name and Password. Click the Remember Me checkbox for the - TRENDnet TN-200T1 | User's Guide - Page 11
TRENDnet User's Guide 3. The Wizard automatically generates a Workgroup name, a Name, and a Description. You can edit these fields accordingly. Click Skip to move on to the next step. TN‐200 / TN‐200T1 5. Select either a DHCP or a Static Network. With DHCP, your router automatically generates an IP - TRENDnet TN-200T1 | User's Guide - Page 12
TRENDnet User's Guide 6. The Wizard allows four RAID options, Stand‐Alone, JBOD, RAID 0, and RAID 1. TN‐200 / TN‐200T1 Stand‐Alone ‐ Creates two separate volumes from the two hard drives. JBOD RAID ‐ Makes the disks appear to be a single storage disk RAID 0 ‐ Striped RAID - TRENDnet TN-200T1 | User's Guide - Page 13
TRENDnet User's Guide 8. The formatting process is now complete. Click OK to continue. Interface TN‐200 / TN‐200T1 9. In the Drive wizard or click Exit to exit the wizard without saving settings. © Copyright 2013 TRENDnet. All Rights Reserved. NAS List - displays a list of NAS devices found on - TRENDnet TN-200T1 | User's Guide - Page 14
TRENDnet User's Guide Subnet - shows the subnet mask of the connected NAS Gateway - shows click to minimize the window Close - click to close the utility © Copyright 2013 TRENDnet. All Rights Reserved. TN‐200 / TN‐200T1 Panel Features 1. Wizard - use the setup wizard to configure your NAS 2. Folder - TRENDnet TN-200T1 | User's Guide - Page 15
TRENDnet User's Guide 3. Management Center (Web browser)-manage users, hard drives, and system and network information here TN‐200 / TN‐200T1 5. Backup Center (Web browser) ‐ allows users to backup data to local, remote, or cloud based storage 4. Download Center (Web browser) ‐ allows users to - TRENDnet TN-200T1 | User's Guide - Page 16
TRENDnet User's Guide Configuring with a Web Browser Open a web browser and type in http://TN‐200 or the IP address of the TN‐200 / TN‐ 200T1 in the address field and press Enter. This opens the TN‐200 / TN‐200T1 Home Screen in the browser. TN‐200 / TN‐200T1 The Main Screen The Main Screen consists - TRENDnet TN-200T1 | User's Guide - Page 17
TRENDnet User's Guide Management Center Wizard The browser‐based Management Center / TN‐200T1 Step 3 - To set the LAN Connection Type, select the DHCP or Static Client option. With DHCP, the router designates an IP Address for the NAS. With Static IP, you must set an IP Address manually. Select your - TRENDnet TN-200T1 | User's Guide - Page 18
TRENDnet User's Guide TN‐200 / TN‐200T1 Step 5 - Wizard setup is now complete. Click the Finish button. Static Settings Step 4 - To Set Device Information, enter a Modify. To delete a user, select the user from the list and click on Delete. © Copyright 2013 TRENDnet. All Rights Reserved. 16 - TRENDnet TN-200T1 | User's Guide - Page 19
TRENDnet User's Guide TN‐200 / TN‐200T1 Under Share, select the Volume you want the account to fall under and then select "Read Only", "Read/ Center, Backup Center, Management Center, and Surveillance Center. Click Save to create the user account. © Copyright 2013 TRENDnet. All Rights Reserved. 17 - TRENDnet TN-200T1 | User's Guide - Page 20
TRENDnet User's Guide Click the OK button when finished. The user is added and saved to the User List. © Copyright 2013 TRENDnet. All Rights Reserved. TN‐200 / TN‐200T1 Group List Groups are used to add one or more users to an aggregation. To create a Group, click Group List from the User Main Menu - TRENDnet TN-200T1 | User's Guide - Page 21
TRENDnet User's Guide The new Group appears under the Group List Table. The system will update with the modifications. TN‐200 / TN‐200T1 Modifying a User/Group Under the User/Group List, select the User/Group you want to modify. The User/Group changes to a bright blue. Click the - TRENDnet TN-200T1 | User's Guide - Page 22
TRENDnet User's Guide Deleting a User/Group Under the User/Group List, select the User/Group you want to delete. The User/Group will change color. Click the Delete button. You will be prompted to verify your selection. Click OK to continue or Cancel to exit without saving changes. TN‐200 / TN‐200T1 - TRENDnet TN-200T1 | User's Guide - Page 23
TRENDnet User's Guide Share List The Share List is created by default and is organized by and its permissions (CIFS/FTP/NFS/WebDAV). To create a new Share List, click the Create button. TN‐200 / TN‐200T1 Note: Clicking the FTP brings up further options (None, Read Only, and Read/Write). Select the - TRENDnet TN-200T1 | User's Guide - Page 24
TRENDnet User's Guide TN‐200 / TN‐200T1 To Modify a share, select the Volume and click the Modify button. The system will update with the modifications. Under the Modification List, you have three - TRENDnet TN-200T1 | User's Guide - Page 25
TRENDnet User's Guide Music Player TN‐200 / TN‐200T1 NAS Scroll through the menu bar at the top of the screen until you come across Nearby Devices. Select Nearby Devices and you should find - TRENDnet TN-200T1 | User's Guide - Page 26
TRENDnet User's Guide Alternatively, you may use one of the many file manager apps available from the Google Play store. In this example, we are using the ES File Explorer app. Open the app. TN‐200 / TN‐200T1 At the top left‐hand corner, select the View option to change the view. Tap on the TN‐ - TRENDnet TN-200T1 | User's Guide - Page 27
TRENDnet User's Guide TN‐200 / TN‐200T1 Another method is to use WebDAV. The app used in this example is WebDAV Nav Lite. You can download this ; however, be sure to follow the exact layout of the network address in order to connect to it. © Copyright 2013 TRENDnet. All Rights Reserved. 25 - TRENDnet TN-200T1 | User's Guide - Page 28
TRENDnet User's Guide Enter NAS name - TN‐200 / TN‐200T1 (in the example). Enter the Server URL NAS. Once you have entered all the details correctly, tap the folder that you wish to access. TN‐200 / TN‐200T1 Deleting a Share To delete a Share, select the Volume and click the Delete button. A pop‐up - TRENDnet TN-200T1 | User's Guide - Page 29
TRENDnet User's Guide ISO Mount To use the ISO Mount feature, click ISO Mount on the top panel. TN‐200 / TN‐200T1 Select the ISO file(s) from one of the Volumes. For Public Access, select between Read Only and Deny Access. Select an Access Method from CIFS, - TRENDnet TN-200T1 | User's Guide - Page 30
TRENDnet User's Guide TN‐200 / TN‐200T1 Modify the ISO Mount To Modify the mount, select the Volume and click the Modify button. The ISO Mount NFS, the NFS Settings Host field will appear. Fill in the relevant information in the Host field. © Copyright 2013 TRENDnet. All Rights Reserved. 28 - TRENDnet TN-200T1 | User's Guide - Page 31
TRENDnet User's Guide Deleting an ISO File To delete an ISO File, select the .iso file and click the Delete button. The ISO file will turn blue. TN‐200 / TN‐200T1 Quota Click the Quota icon under the Toolbar to Enable/Disable Quota. User or Group quotas settings will only take affect if the Quota - TRENDnet TN-200T1 | User's Guide - Page 32
TRENDnet User's Guide Application Under Application there are three main parameters: DLNA Server, iTunes Server, and File/FTP Server. DLNA Server DLNA Server is a media server that works with MAC, Windows, and Linux the checkbox next to DLNA server. TN‐200 / TN‐200T1 To add devices (or shared - TRENDnet TN-200T1 | User's Guide - Page 33
TRENDnet User's Guide The system will initialize and save your settings. TN‐200 / TN‐200T1 To delete a Shared Folder from the DLNA Server, select it (it turns blue) it is working. Deleting the Shared Folder in the DLNA Server © Copyright 2013 TRENDnet. All Rights Reserved. Click OK to Delete 31 - TRENDnet TN-200T1 | User's Guide - Page 34
TRENDnet User's Guide To Refresh the Shared List, click the Refresh button. Items in the Share Folder are refreshed. TN‐200 / TN‐200T1 Click Refresh The Media Library is built © Copyright 2013 TRENDnet. All Rights Reserved. DLNA Server is working Accessing NAS data using a DLNA player Once the - TRENDnet TN-200T1 | User's Guide - Page 35
TRENDnet User's Guide iTunes Server The iTunes Server application allows you to integrate the NAS with iTunes. This allows you to add your iTunes Playlist to the TN‐200 / TN‐200T1. Click the iTunes Server checkbox to enable it. TN‐200 / TN‐200T1 Select the Volume you wish to use for this - TRENDnet TN-200T1 | User's Guide - Page 36
TRENDnet User's Guide File/FTP Server The TN‐200 / TN‐200T1 becomes a File Server with one click. Go to NFS will disable Oplocks". Please pay attention to this message if it applies to you. TN‐200 / TN‐200T1 The FTP server has many parameters for you to configure. You can limit the amount of - TRENDnet TN-200T1 | User's Guide - Page 37
TRENDnet User's Guide The default port is 21. Click on the corresponding field to change the port number. TN‐200 / TN‐200T1 SSL/TLS - entering a specific IP address that adheres to Passive Mode restrictions. The TN‐200 / TN‐200T1 supports IPv4 and IPv6. Once you click the Add button, the FTP Server - TRENDnet TN-200T1 | User's Guide - Page 38
TRENDnet User's Guide TN‐200 / TN‐200T1 Permanent Block IP settings Click Apply. The settings are configured. A pop‐up screen will display the updates. To Delete of the Blocked IP. The Blocked IP is will be now displayed under the Block IP table. © Copyright 2013 TRENDnet. All Rights Reserved. 36 - TRENDnet TN-200T1 | User's Guide - Page 39
TRENDnet User's Guide Disk The TN‐200 / TN‐200T1 has four RAID types to select from - Stand‐Alone, JBOD, RAID 0, and RAID 1. For details on each RAID type, read the short description on each - TRENDnet TN-200T1 | User's Guide - Page 40
TRENDnet User's Guide The Wizard will build or rebuild the Stand‐Alone RAID. TN‐200 / TN‐200T1 JBOD JBOD makes disks appear as a single drive, no fault tolerance. The formatting The hard disk drive details are displayed. Click Next to continue. © Copyright 2013 TRENDnet. All Rights Reserved. 38 - TRENDnet TN-200T1 | User's Guide - Page 41
TRENDnet User's Guide The RAID Settings are displayed. Click Format to continue. The drives are Formatted, initialization will begin. TN‐200 / TN‐200T1 The rebuild warning asks you to verify your choice. Click OK to continue. Once JBOD is configured, it will be displayed under Volume Info. © - TRENDnet TN-200T1 | User's Guide - Page 42
TRENDnet User's Guide RAID 0 RAID 0 improves performance and additional storage but no fault tolerance. TN‐200 / TN‐200T1 Click the radio button next to RAID 0 and click Next to continue. The hard disk drive details will be displayed. Click Next to continue. The - TRENDnet TN-200T1 | User's Guide - Page 43
TRENDnet User's Guide The rebuild warning will ask you to verify your choice. Click OK to continue. TN‐200 / TN‐200T1 RAID 1 RAID 1, data is written identically to two separate drives. Once RAID 0 is configured, it will be displayed under Volume Info. Click the radio button - TRENDnet TN-200T1 | User's Guide - Page 44
TRENDnet User's Guide The disks are displayed for RAID 1. Click Next to continue. TN‐200 / TN‐200T1 The rebuild warning will ask you to verify your choice. Click OK to continue. Check the RAID settings to confirm. Click Format to continue. Once - TRENDnet TN-200T1 | User's Guide - Page 45
TRENDnet User's Guide S.M.A.R.T. S.M.A.R.T. allows a user to test the functionality of the NAS. Go to the Management Center > Disk > S.M.A.R.T.. TN‐200 / TN‐200T1 Click on the disk you wish to test. Select whether you want a Quick test or an Extended test and click the Start button. During the - TRENDnet TN-200T1 | User's Guide - Page 46
TRENDnet User's Guide Once the test is completed the result is shown in the Results column. TN‐200 / TN‐200T1 Select a Time and Period Click the Create button to create a schedule. Under the S.M.A.R.T. Test Schedule, click the checkbox to Enable it. Select either a Quick or - TRENDnet TN-200T1 | User's Guide - Page 47
TRENDnet User's Guide Scan Disk Scan Disk allows the user to scan the disk for any errors. Go to Management Center > Disk > Scan Disk. Select the Volume you wish to scan and click Start. Scan Disk will be initialized. TN‐200 / TN‐200T1 Scan Disk requires that you stop all NAS activity. Suspend - TRENDnet TN-200T1 | User's Guide - Page 48
TRENDnet User's Guide Once the scan is complete, the results are shown in a tabulated format. Click Exit to continue. TN‐200 / TN‐200T1 Network There are two types of Network Settings, DHCP and Static IP. Volume Information To view the Volume Information, go to Management Center > Disk > Volume - TRENDnet TN-200T1 | User's Guide - Page 49
TRENDnet User's Guide configuration matches the IP set on your router before clicking Save. TN‐200 / TN‐200T1 IPv6 IPv6 is the upgrade to IPv4. It is designed to to provide the system with an IP address. If manual or DHCP settings aren't configured, Auto determines the best IP for the NAS - TRENDnet TN-200T1 | User's Guide - Page 50
TRENDnet User's Guide LLTD/DDNS The TN‐200 / TN‐200T1 supports LLTD (Link Layer Topology Discovery) and is used by the Network Application that is included in Windows 7 & 8. To enable it, click the checkbox next to LLTD. TN‐200 / TN‐200T1 To activate DDNS sign up for one of the many DDNS accounts - TRENDnet TN-200T1 | User's Guide - Page 51
TRENDnet User's Guide Enter the Hostname, Username, Password, and Confirmed Password for your DDNS Service Provider and click Save. TN‐200 / TN‐200T1 System System contains six main feature sets: Language/Time, Device, System, Power, Notification, Syslog, and USB Devices. All of these features - TRENDnet TN-200T1 | User's Guide - Page 52
TRENDnet User's Guide For the Time and Date, select a time zone from the drop‐down . There is also an option to set the time using the NTP server. Click Save to continue. TN‐200 / TN‐200T1 System System handles all hardware and software functions of the NAS. If you have configured options on the - TRENDnet TN-200T1 | User's Guide - Page 53
TRENDnet User's Guide System Shutdown allows you to shut down the system within the Management Center Panel. This is safer and more secure than pressing the Power button. Click Apply. A pop‐ up window appears to confirm your request. Click OK to accept or Cancel to exit. TN‐200 / TN‐200T1 - TRENDnet TN-200T1 | User's Guide - Page 54
TRENDnet User's Guide TN‐200 / TN‐200T1 Power Configure the Disk Hibernation, Fan Control, Power . The NAS will remain active for the duration of your settings. Power Recovery Should the TN‐200 / TN‐200T1 fail for any reason, this feature allows it to recover some power. Click the checkbox - TRENDnet TN-200T1 | User's Guide - Page 55
TRENDnet User's Guide Power On/Off Scheduling Click the checkbox to Enable this feature. Then click the checkboxes for the day(s) that you wish to use Power On/Off Scheduling and use the drop‐down time menus to set the time. Click Save to continue. TN‐200 / TN‐200T1 Notifications To receive - TRENDnet TN-200T1 | User's Guide - Page 56
services. To back up the Log File, click the Backup button. This will download a text file of the log. Within the logs menu, you can setup the TN‐200 / TN‐200T1 to receive Log Events from other NAS devices or send event logs to another TN‐200 / TN‐200T1 or SysLog Server. © Copyright 2013 TRENDnet - TRENDnet TN-200T1 | User's Guide - Page 57
TRENDnet User's Guide To clear the Log, click the Clear button. TN‐200 / TN‐200T1 UBS Devices To activate UPS Settings, go to The UPS Status will display the current status of the UPS. Note: Make sure the TN‐200 / TN‐200T1 is on the same network as the network UPS master. If the UPS device is - TRENDnet TN-200T1 | User's Guide - Page 58
TRENDnet User's Guide To detect a USB storage device, insert a USB flash drive in the USB port in the back of the TN‐200 / TN‐200T1. The System Up time, the Protocol supported, and the Peripheral Devices. Printer information: Attach a printer to the TN‐200 / TN‐200T1 so users on your network can - TRENDnet TN-200T1 | User's Guide - Page 59
TRENDnet User's Guide Network The Network Information tab provides information on the TN‐200 / TN‐200T1's IP Address, Subnet Mask, Gateway IP, DNS 1 and DNS 2 settings, the MAC address, and the Read/Write Speeds. TN‐200 / TN‐200T1 File Center The File Center is the main control hub for viewing and - TRENDnet TN-200T1 | User's Guide - Page 60
TRENDnet User's Guide The browser view can be navigated by using the Back button or the Refresh button. Back Button Refresh Button The browser panel also has a search function. Enter the search details in the field provided. TN‐200 / TN‐200T1 The TN‐200 / TN‐200T1 provides all these services in - TRENDnet TN-200T1 | User's Guide - Page 61
TRENDnet User's Guide Remote Backup Backup data to another NAS TN‐200 / TN‐200T1 Click the checkbox next to Enable the remote backup service and then enter a service password. Enable - Click this button to enable Remote Backup Create - Click this button to create a new Remote Backup configuration - TRENDnet TN-200T1 | User's Guide - Page 62
TRENDnet User's Guide Create Create a Remote Backup setting, click the Create button TN‐200 / TN‐200T1 Manual Linux remote backup, you need to enter the user name and password. 3. When backing up data, the source or destination NAS doesn't have to be a TN‐ 200 / TN‐200T1. © Copyright 2013 TRENDnet - TRENDnet TN-200T1 | User's Guide - Page 63
TRENDnet User's Guide Click the Browse button to select the path TN‐200 / TN‐200T1 Click the Test button to verify the remote path; only do this to establish a backup at the source and the amount of free space available at the destination drive. © Copyright 2013 TRENDnet. All Rights Reserved. 61 - TRENDnet TN-200T1 | User's Guide - Page 64
TRENDnet User's Guide An error message will appear if the existing free space on the source Path exceeds the capacity on the target device. TN‐200 / TN‐200T1 After all configurations are completed and you have saved your data, all backup information will be shown in the Remote Backup table. The - TRENDnet TN-200T1 | User's Guide - Page 65
TRENDnet User's Guide Recovery - Click on the backed up title and click the Recovery button. Recovery shows a complete list of backed up information. TN‐200 / TN‐200T1 Modify Remote Backup To modify a remote backup, select it (it turns blue) and click the Modify button. If you select none of the - TRENDnet TN-200T1 | User's Guide - Page 66
TRENDnet User's Guide Local Backup Local Backup Backup data to another section of the NAS TN‐200 / TN‐200T1 Create - Click this button to create a new Remote Backup configuration Modify - Click this button to modify a current Remote Backup configuration Delete - Click this button to - TRENDnet TN-200T1 | User's Guide - Page 67
TRENDnet User's Guide backups backup data automatically as new data is made. This saves time and storage space. TN‐200 / TN‐200T1 Local - folder name). Entering the wrong URL data will bring up a pop‐up window to guide you with the right URL. Click OK to continue and enter the correct details. - TRENDnet TN-200T1 | User's Guide - Page 68
TRENDnet User's Guide TN‐200 / TN‐200T1 The successful configuration is now saved in the Local Backup table. Modify the Local Backup To modify the Local the Type, Period, and Time settings. You must also change the User Name and Password settings. © Copyright 2013 TRENDnet. All Rights Reserved. 66 - TRENDnet TN-200T1 | User's Guide - Page 69
/ TN‐200T1 Time Machine Time Machine is a backup utility created by Apple. It is used on most Apple Macintosh computers to back up data to USB or NAS devices. Click the tab to access Time Machine backup on your TN‐200 / TN‐200T1. Enable the check box to start the service. © Copyright 2013 TRENDnet - TRENDnet TN-200T1 | User's Guide - Page 70
TRENDnet User's Guide Click the Create button. TN‐200 / TN‐200T1 Select a Volume to back up data to. Click Next to continue. The setting appears in the Time Machine table. A success message will indicate that the Time Machine back up configuration was successful. © Copyright 2013 TRENDnet. All - TRENDnet TN-200T1 | User's Guide - Page 71
TRENDnet User's Guide Delete Time Machine Highlight the Volume or Share Name then click the Delete button. TN‐200 / TN‐200T1 USB Backup Click the USB Backup tab. Alternatively, deselect this setting and select Copy or Synchronize from the Type drop‐ down menu. Click the checkbox - TRENDnet TN-200T1 | User's Guide - Page 72
TRENDnet User's Guide Click the Browse button to locate the path where you want to copy the data to. TN‐200 / TN‐200T1 Select the direction of the Copy or Synchronization and click Save to continue. In this configuration, you can select to copy Local to Remote or - TRENDnet TN-200T1 | User's Guide - Page 73
TRENDnet User's Guide Cloud Backup Cloud backup is another method to store data remotely. Let's take a closer look at how cloud storage integrates with the TN‐200 / TN‐200T1. The cloud backup only supports Amazon storage services. Please see http://aws.amazon.com/s3/ for services details, additional - TRENDnet TN-200T1 | User's Guide - Page 74
TRENDnet User's Guide TN‐200 / TN‐200T1 Select the Direction (Local to Remote or Remote to Local), and finally use Amazon S3 (Amazon Web Services / S3) cloud service to setup the Cloud service. Make sure you are in a region that supports Amazon Cloud Services. Also, make sure you have the Access - TRENDnet TN-200T1 | User's Guide - Page 75
TRENDnet User's Guide TN‐200 / TN‐200T1 Click OK to continue. Modify Cloud Backup To modify the Local Backup configuration, select the Cloud storage. You are prompted to confirm you want to delete the Cloud storage service. Click OK to continue. © Copyright 2013 TRENDnet. All Rights Reserved. 73 - TRENDnet TN-200T1 | User's Guide - Page 76
TRENDnet User's Guide Download Center The Download Center consists of four main areas - Add a language from the drop‐down list URL - Enter the URL in the list provided Click Save. TN‐200 / TN‐200T1 Add BT Download This is a Torrent application which integrates into your NAS. If you want to download - TRENDnet TN-200T1 | User's Guide - Page 77
TRENDnet User's Guide FTP/HTTP Download Use this tool to download FTP and HTTP files from various locations. Go to Download center and click FTP /HTTP Download. Setup icon Click this icon to setup the downloads TN‐200 / TN‐200T1 The Interface The FTP/HTTP interface has a few navigational icons - TRENDnet TN-200T1 | User's Guide - Page 78
TRENDnet User's Guide Under FTP, click Add. These are the FTP settings. TN‐200 / TN‐200T1 Host name - enter the FTP hostname Login Method - select between Account and Anonymous Username - Click Save. The file is saved The Host appears in the table. © Copyright 2013 TRENDnet. All Rights Reserved. 76 - TRENDnet TN-200T1 | User's Guide - Page 79
TRENDnet User's Guide Modify the Host Click the Host you want to modify (it will turn blue) and then click Modify. TN‐200 / TN‐200T1 Upon returning back to the Settings file, make the changes you want and click Save. Delete a Host To delete a Host, click it (it will turn - TRENDnet TN-200T1 | User's Guide - Page 80
TRENDnet User's Guide the P2P download process Setup icon Click this icon to setup P2P TN‐200 / TN‐200T1 Go to Download Center. Select P2P Download and click on the - click the checkbox next to Enable to activate this service Bandwidth Control - Select a Maximum Download speed (‐1 = unlimited - TRENDnet TN-200T1 | User's Guide - Page 81
TRENDnet User's Guide Glossary Username - a name you select as your identity Password - a Protocol - the engine for your mail SMS - a text messaging service for mobile devices Syslog - keeping records of the TN‐200 / TN‐200T1's actions UPS - Uninterrupted Power Supply - a backup battery solution - TRENDnet TN-200T1 | User's Guide - Page 82
‐20C ~ 70C (‐4F ~ 158F) Humidity 90% (non‐condensing) Certification CE, FCC © Copyright 2013 TRENDnet. All Rights Reserved. TN‐200 / TN‐200T1 Software Network File Protocols Network Service Protocols File System Type File Management Disk Management Device Management Power Management HTTP - TRENDnet TN-200T1 | User's Guide - Page 83
TRENDnet User's Guide not installed and used in accordance with the instructions, may cause harmful interference to radio communications. However have a standby mode or use a power management mode." TN‐200 / TN‐200T1 The availability of some specific channels and/or operational frequency bands - TRENDnet TN-200T1 | User's Guide - Page 84
TRENDnet User's Guide Limited Warranty TRENDnet warrants its products against defects in material and workmanship, under normal use and service, for the following lengths of time from the date of purchase. TN‐200 / TN‐200T1 - 2 Years Warranty AC/DC Power Adapter, Cooling Fan, and Power Supply carry - TRENDnet TN-200T1 | User's Guide - Page 85
-
 1
1 -
 2
2 -
 3
3 -
 4
4 -
 5
5 -
 6
6 -
 7
7 -
8
-
9
-
10
-
11
-
12
-
13
-
14
-
15
-
16
-
17
-
18
-
19
-
20
-
21
-
22
-
23
-
24
-
25
-
26
-
27
-
28
-
29
-
30
-
31
-
32
-
33
-
34
-
35
-
36
-
37
-
38
-
39
-
40
-
41
-
42
-
43
-
44
-
45
-
46
-
47
-
48
-
49
-
50
-
51
-
52
-
53
-
54
-
55
-
56
-
57
-
58
-
59
-
60
-
61
-
62
-
63
-
64
-
65
-
66
-
67
-
68
-
69
-
70
-
71
-
72
-
73
-
74
-
75
-
76
-
77
-
78
-
79
-
80
-
81
-
82
-
83
-
84
-
85
 |
 |

TRENDnet User’s Guide
Cover Page