TRENDnet TS-U100 Quick Installation Guide
TRENDnet TS-U100 - NAS Server - USB Manual
 |
UPC - 710931503043
View all TRENDnet TS-U100 manuals
Add to My Manuals
Save this manual to your list of manuals |
TRENDnet TS-U100 manual content summary:
- TRENDnet TS-U100 | Quick Installation Guide - Page 1
TS-U100/ TS-U200 2-port USB 2.0 Network Storage Server USB 2.0 Network Storage Server with All-in-1 Memory Card Reader/Writer Quick Installation Guide Guide d'installation rapide du Serveur de stockage réseau à 2 ports USB 2.0/ Serveur de stockage réseau USB 2.0 avec lecteur/ enregistreur de carte - TRENDnet TS-U100 | Quick Installation Guide - Page 2
Table of Contents English ...1 1. Prepare for Installation 1 2. Product Detail 2 3. Hardware Installation 4 4. Storage Server Setup 5 5. Accessing Storage Devices on TS-U100/TS-U200 7 Troubleshooting 9 - TRENDnet TS-U100 | Quick Installation Guide - Page 3
guide will help you set up your USB 2.0 Network Storage Server. Following the installation instructions should be quick and easy, but if you run into any problems, please refer to the Troubleshooting section. If you need further assistance, please visit www.TRENDNET.com or call technical support - TRENDnet TS-U100 | Quick Installation Guide - Page 4
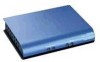
2. Product Detail TS-U100 The USB 2.0 Network Storage Server has 3 LEDs that indicate power, network activity, and storage devices. USB Storage LED Power LED Network LED 2 English - TRENDnet TS-U100 | Quick Installation Guide - Page 5
TS-U200 The USB 2.0 Network Storage Server with All-in-1 Memory Card Reader/Writer has 3 LEDs and 4 Memory Card Reader/Writer slots. The LEDs indicate power, network activity, and storage devices. The Memory Card Reader/Writer slots indicate SM, SD/MMC, CF and MS slots. Power LED USB Storage LED - TRENDnet TS-U100 | Quick Installation Guide - Page 6
3. Hardware Installation 1. Connect the power adapter to the TS-U100/TS-U200. 2. Connect the TS-U100/TS-U200 to your switch or computer by using a CAT 5 cable. 3. Connect your USB 2.0 Storage Device into a USB slot. 3 1 2 4. (For TS-U200 Only) Insert SmartMedia, Memory Stick, SecureDigital or - TRENDnet TS-U100 | Quick Installation Guide - Page 7
4. Storage Server Setup For Windows Users 1. Insert the TS-U100/TS-U200 CD-ROM into your computer's CD-ROM drive. 2. Click "Run Utility" 3. Click Search Device and Click TS-U100/TS-U200. Take note and write down the name of the TS-U100/TS-U200. 5 English - TRENDnet TS-U100 | Quick Installation Guide - Page 8
4. Change the IP address in the LAN section and Click Modify. Take note and write down the IP address of TS-U100/TS-U200. 6 English - TRENDnet TS-U100 | Quick Installation Guide - Page 9
5. Accessing Storage Devices on TS-U100/TS-U200 1. Go to the Static section and click the storage device you want to access. Click Mount and click OK. Repeat this step to add more than one storage device. 2. Double click My Computer and double click on any mounted storage device in Network Drives. - TRENDnet TS-U100 | Quick Installation Guide - Page 10
3. Your storage device is ready for access. 8 English - TRENDnet TS-U100 | Quick Installation Guide - Page 11
TS-U100/TSU200 is on? A1: Yes, you can connect or disconnect any external USB device while the computer is on, because the USB interfaces are Plug-and-Play and hot-pluggable. Please DO NOT disconnect any USB storage device while the MODE LED is red or when TS-U100/TS-U200 is saving a file into a USB - TRENDnet TS-U100 | Quick Installation Guide - Page 12
cannot mount a storage device, press the reset button at the back of the TS-U100/U200. Refer to the User's Guide to reset the TS-U100/U200. If you have any questions regarding the TS-U100/TS-U200 USB 2.0 Network Storage Server, please contact Trendware Technical Support Department. Certifications - TRENDnet TS-U100 | Quick Installation Guide - Page 13
, USA What's Next in Networking @ Product Warranty Registration Please take a moment to register your product online. Go to TRENDware's website at http://www.TRENDNET.com TRENDnet Technical Support US/Canada Support Center European Support Center Contact Telephone: 1(310) 626-6252 Fax: 1(310
-
 1
1 -
 2
2 -
 3
3 -
 4
4 -
 5
5 -
 6
6 -
 7
7 -
8
-
9
-
10
-
11
-
12
-
13
 |
 |
