Toshiba 40E200U User Manual
Toshiba 40E200U Manual
 |
View all Toshiba 40E200U manuals
Add to My Manuals
Save this manual to your list of manuals |
Toshiba 40E200U manual content summary:
- Toshiba 40E200U | User Manual - Page 1
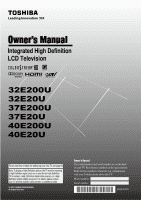
Owner's Manual Integrated High Definition LCD Television HIGH-DEFINITION TELEVISION 32E200U 32E20U 37E200U 37E20U 40E200U 40E20U For an overview of steps for setting up your new TV, see page10. Note: To display a High Definition picture, the TV must be receiving a High Definition signal (such as an - Toshiba 40E200U | User Manual - Page 2
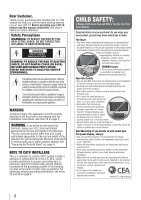
Toshiba LCD TV. This manual will help you use the many exciting features of your new LCD TV. Before operating your LCD TV, please read this manual USER-SERVICEABLE PARTS INSIDE. REFER SERVICING TO QUALIFIED SERVICE supported on the proper stands instructions supplied by the display and wall mount - Toshiba 40E200U | User Manual - Page 3
. The LCD panel inside the TV contains glass and a toxic liquid. If the liquid comes in contact with your mouth or eyes, or your skin is cut by broken glass, rinse the affected area thoroughly with water and consult your doctor. • ALWAYS contact a service technician to inspect the TV any time it has - Toshiba 40E200U | User Manual - Page 4
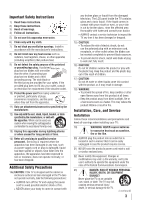
) Always place the back of the television at least four (4) inches away from any vertical surface (such as a wall) to allow proper ventilation. 29) Never allow anything to rest on or roll over the power cord, and never place the TV where the power cord is subject to wear or abuse. 30) Never overload - Toshiba 40E200U | User Manual - Page 5
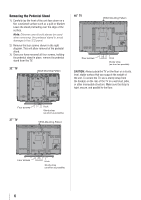
the back of the TV as described in the instructions provided with the wall bracket. 6) After attaching the appropriate bracket(s) to the wall and the back of the TV, remove the pedestal stand from the TV as described below. 7) VESA Mounting Pattern TV Size 32" 37" 40" Hole Pattern(HxV) 200x200 mm - Toshiba 40E200U | User Manual - Page 6
sturdy strap from the hook(s) on the rear of the TV to a wall stud, pillar, or other immovable structure. Make sure the strap is tight, secure, and parallel to the floor. Four screws 37" TV Hook Sturdy strap (as short as possible) VESA Mounting Pattern Four screws Hook Sturdy strap (as short as - Toshiba 40E200U | User Manual - Page 7
expressly approved by Toshiba could void the user's authority to operate this equipment. Important notes about your LCD TV The following symptoms are technical limitations of LCD Display technology and are not an indication of malfunction; therefore, Toshiba is not responsible for perceived issues - Toshiba 40E200U | User Manual - Page 8
MPEG noise reduction 52 Using 1080p PC Mode 52 Using the Game Mode feature 52 Using the advanced audio settings features 53 Using the QSound® sound feature 53 Chapter 8: Troubleshooting 54 General troubleshooting 54 Chapter 9: Appendix 56 Specifications 56 Acceptable signal formats for - Toshiba 40E200U | User Manual - Page 9
your new Toshiba widescreen, integrated HD, LCD TV: • Integrated digital tuning (8VSB ATSC and QAM) eliminates the need for a separate digital converter set-top box (in most cases). • 1080p output resolution. • Four HDMI® digital, high-definition multimedia interfaces 1080p input support ( page 16 - Toshiba 40E200U | User Manual - Page 10
about your LCD TV" ( page 7). • Place the TV on the floor or a sturdy, level, stable surface that can support the weight of the unit. Secure the TV to a wall, pillar, or other immovable structure ( page 4). • Place the TV in a location where light does not reflect on the screen. • Place the TV far - Toshiba 40E200U | User Manual - Page 11
Model 32E200U is used in this manual for illustration purposes. Left side panel TV front 3 7 4 8 5 6 9 10 TV top 11 12 2 Control panel 1無 Green LED and TOSHIBA Logo LED Power LED(Green) = Power indicator TOSHIBA Logo LED= On or Off ( page 24). 2無 Remote sensor - Point the remote - Toshiba 40E200U | User Manual - Page 12
cables are required for a complete connection. 7無 ColorStream® HD - ColorStream® highdefinition component video input (with standard stereo audio inputs) for connecting devices with component video output, such as a Toshiba DVD player with ColorStream®. Note: Component video cables carry only video - Toshiba 40E200U | User Manual - Page 13
specific devices, refer to each device's owner's manual. Component video cables come in sets of three and are for use with video devices with component video output. (ColorStream® is Toshiba's brand of component video.) These cables are typically color-coded red, green, and blue. Separate audio - Toshiba 40E200U | User Manual - Page 14
output is set to). Use the Cable box controls to change channels. To view the VCR: Turn ON the VCR. Select the VIDEO 1 video input source on the TV.* To view the camcorder video: Select the VIDEO 2 video input source on the TV.* ** To select the video input source, press INPUT on the remote control - Toshiba 40E200U | User Manual - Page 15
the VIDEO 1 video input source on the TV.* To record a TV program while watching a DVD: Turn ON the VCR. Tune the VCR to the channel to record. Select the ColorStream HD video input source on the TV* to view the DVD. ** To select the video input source, press INPUT on the remote control ( page 21 - Toshiba 40E200U | User Manual - Page 16
illustration). −− See "Setting the HDMI® audio mode" ( page 27). TV back panel Control panel HDMI device To view the HDMI device video: Select the HDMI 1, HDMI 2, HDMI 3 or HDMI 4 video input source on the TV.* ** To select the video input source, press INPUT on the remote control ( page 21). To - Toshiba 40E200U | User Manual - Page 17
technology as regulated by the HDMI standard. • This feature is limited to models incorporating Toshiba's REGZA-LINK. However, Toshiba is not liable for those operations. Refer to the individual instruction manuals for compatibility information. Note: This feature may not work properly depending on - Toshiba 40E200U | User Manual - Page 18
.) Dolby Digital decoder or other digital audio system TV back panel To control the audio: 1無 Turn on the TV and the digital audio device. 2無 Press on the TV's remote control and open the Sound menu. 3無 Highlight Audio Setup and press . Note: •• Some audio systems may not be compatible with Dolby - Toshiba 40E200U | User Manual - Page 19
receiving a 480i (HDMI), 480p (HDMI), 720p, 1080i, or 1080p signal program, Native mode scales the video to display the entire picture within the borders of the screen (i.e. no overscanning). Computer PC audio cable PC audio output The HDMI input can accept and display VGA, SVGA, XGA, WXGA, SXGA - Toshiba 40E200U | User Manual - Page 20
batteries in the remote control, always replace both batteries with new ones. Never mix battery types or use new and used batteries in combination. •• Always remove batteries from the remote control if they are dead or if the remote control is not to be used for an extended period of time. This will - Toshiba 40E200U | User Manual - Page 21
. 1無 POWER turns the TV on and off. When the TV is on, the green LED indicator on the TV front will be illuminated. 2無 PIC SIZE cycles through the picture sizes: Natural, TheaterWide 1/2/3, Full, 4:3 HD, Native and Dot by Dot ( page 34). 3無 PIC MODE selects the picture mode ( page 36). 4無 INPUT - Toshiba 40E200U | User Manual - Page 22
on the remote control or TV control panel. Icon Picture Sound Preferences Locks Setup Item Mode Picture Settings Noise Reduction Game Mode Theater Settings Digital Audio Selector Audio Settings Advanced Audio Settings Audio Setup CC Selector Base CC Mode Digital CC Settings Input Labeling Channel - Toshiba 40E200U | User Manual - Page 23
Setup menu, select Installation, and press . on the remote control or TV control panel, open the Icon Terrestrial Item Input Configuration Channel Program Channel Options Channel Tuning Mode Time Zone Signal Meter Option [Opens the Input Configuration menu] [Start] [Scans for new channels - Toshiba 40E200U | User Manual - Page 24
the entire Initial Setup process, the Initial Setup window will appear every time you turn on the TV. Selecting the menu language You can choose from three different languages (English, French and Spanish) for the on-screen display of menus and messages. To select the menu language: 1無 Press and - Toshiba 40E200U | User Manual - Page 25
Chapter 5: Setting up your TV Programming channels into the TV's channel memory When you press or on the remote control or TV control panel, your TV will stop only on the channels you programmed into the TV's channel memory. Follow the steps below to program channels into the TV's channel memory. - Toshiba 40E200U | User Manual - Page 26
Chapter 5: Setting up your TV To add a channel to the channel memory: Highlight the checked box next to the channel number you want to add, and then press to remove the tick. To manually add digital subchannels on a physical channel: Use the Channel Numbers and the Dash ( ) on the remote control to - Toshiba 40E200U | User Manual - Page 27
If not, the TV will automatically detect and output analog audio from the PC Audio input. When viewing the HDMI 1 input, digital audio from the HDMI input will be output. When viewing the HDMI 1 input, analog audio from the PC Audio input will be output. 4無 To save your settings, highlight Done and - Toshiba 40E200U | User Manual - Page 28
5無 Highlight Yes and press . 6無 (If PIN code has been set, enter your PIN code. Press t or u to select Done and press .) A warning message will appear, select Yes and press , the TV will turn off automatically after a few seconds. After the TV turns off, unplug the TV power cord and then plug it in - Toshiba 40E200U | User Manual - Page 29
the screen if no signal is received in video input mode. ••If CEC device is connected to a HDMI input, the REGZA-LINK icon will appear. If a REGZA-LINK device with HDMI switching capability (e.g. Audio Receiver) is connected to the HDMI input: Press on the remote or TV control panel repeatedly - Toshiba 40E200U | User Manual - Page 30
below left shows the default Input Selection screen (with none of the inputs labeled as a specific device). The screen below right is an example of how you could label the inputs if you connected a VCR to VIDEO 1, Cable TV to VIDEO 2, a video recorder to ColorStream HD, a DTV set-top box to HDMI - Toshiba 40E200U | User Manual - Page 31
you prefer: either On, or Off. Note: History List will be cleared every time the TV is powered off. 4無 Press to highlight ANT/CABLE List, and then press or to select On or Off. 5無 Press to highlight Inputs List, and then press or to select On or Off. 6無 Press to highlight Favorites - Toshiba 40E200U | User Manual - Page 32
stored in the History List, the oldest item will be removed from the list when a new channel or input is tuned. • Turning off the TV will clear the History List. Setting the Channel Tuning Mode This feature allows you to choose how tuning will be handled for analog and digital channels when the - Toshiba 40E200U | User Manual - Page 33
size that displays the current program the way that looks best to you. You can save separate picture size preferences for each input on your TV. To select the picture size using the remote control: 1無 Press on the remote control. 2無 While the Picture Size screen is open, you can do one of the - Toshiba 40E200U | User Manual - Page 34
is stretched wider to fill the width of the screen, but not stretched taller. • None of the picture is hidden. 4:3 HD (for 720p, 1080i, and 1080p program sources only) The center of the picture remains close to its original proportion, but the left and right edges are stretched wider to fill - Toshiba 40E200U | User Manual - Page 35
scales the video to display the entire picture within the borders of the screen (i.e. no overscanning). • This is especially useful for external HD sources such as DVHS movies, or PC graphics. Note: ••This mode is supported only for HDMI (1080p,1080i, 720p, 480p, and 480i), ColorStream (1080i and - Toshiba 40E200U | User Manual - Page 36
turn off the auto aspect ratio feature: Select Off in step 3 above. Selecting the cinema mode When you view a DVD (3:2 pulldown processed) from a DVD player connected to the VIDEO 1, VIDEO 2, ColorStream HD (component video), or HDMI inputs on the TV, smoother motion can be obtained by setting the - Toshiba 40E200U | User Manual - Page 37
saved in the Preference mode ( "Selecting the picture mode") until Reset is selected. Using the closed caption mode Base closed captions The closed caption mode has two options: • Captions-An on-screen display of the dialogue, narration, and sound effects of TV programs and videos that - Toshiba 40E200U | User Manual - Page 38
Caption, and then press or to select the desired service. 4無 Press . Adjusting the audio Muting the sound Press on the remote control to partially reduce (1/2 MUTE) or turn off (MUTE) the sound. Each time you press , the mute mode will change in the following order: 1/2 Mute Mute Volume - Toshiba 40E200U | User Manual - Page 39
the screen but hear the other language instead of the program's normal audio. ••If you have SAP on and the station you are watching is not broadcasting a second audio program, the station's normal audio will be output. However, occasionally there is no sound at all in SAP mode. If this happens, set - Toshiba 40E200U | User Manual - Page 40
, and PC inputs. ••The Dolby Digital Dynamic Range Control will function in relation to Optical Output Format (PCM mode). Using the Locks menu The Locks menu includes the Enable Rating Blocking, Edit Rating Limits, Input Lock, Front (Control) Panel Lock, GameTimer, and New PIN Code features. You - Toshiba 40E200U | User Manual - Page 41
Limits screen, highlight Done and press . Note: ••The additional rating system can only be downloaded one time. You will not be able to download any updates to the rating system should such updates become available. ••The additional rating system is not designed, transmitted, or controlled by the TV - Toshiba 40E200U | User Manual - Page 42
, press on the remote control. If it is rated "None," the word "NONE" appears in the RECALL screen (as shown below right). If rating information is not provided, no rating will appear in the RECALL screen. Locking channels With the Lock feature, you can lock specific channels. The locked - Toshiba 40E200U | User Manual - Page 43
GameTimer to set a time limit for playing a video game (30-120 minutes). When the GameTimer expires, the TV enters Input Lock mode and locks out the input source for the video game device. To set the GameTimer®: 1無 From the Locks menu, press to display the PIN code entering screen. 2無 Enter your - Toshiba 40E200U | User Manual - Page 44
the screen. The adjustment range is within ±10 from center.* Auto Adjust Highlight this item then press to get an optimum adjustment automatically. ** The default settings may vary depending on the input signal format. Setting the PC Audio This function allows you to output or mute the sound from - Toshiba 40E200U | User Manual - Page 45
the menu. (Also see item 3 on page 12 and "Setting the HDMI® Audio mode" on page 27.) Using the Media Player Using the Media Player with USB You can enjoy photos or music contents stored on a USB storage device. Photo Viewer specifications: Data type: JPEG Exif ver2.1 File format: JPEG Maximum photo - Toshiba 40E200U | User Manual - Page 46
are three types of view modes. Multi View: This view allows you to search for photos in a grid format. These pictures are displayed using thumbnail data in each image file. 1無 Press to move the highlight in one window. If all of the photos will not fit in one screen, when pressing at the - Toshiba 40E200U | User Manual - Page 47
Using the TV's features During playback • Press to pause. • To resume normal playback, press . • To locate a specific file, press or repeatedly. • To adjust volume , press / Note: During playback, you can adjust the SOUND menu functions from the QUICK menu. To set the repeat mode: 1無 Press - Toshiba 40E200U | User Manual - Page 48
control: Press on the remote control to set the length of time until the TV turns off. Repeatedly press to increase the time in 10-minute increments, or press or to increase or decrease the time in 10-minute increments, to a maximum of 180 minutes. To set the sleep timer using the on-screen - Toshiba 40E200U | User Manual - Page 49
the TV's INPUT button. See page 29 for details. VOLUME and MUTE controls of Audio Receiver With your TV's remote control, you can adjust or mute the sound volume of the Audio Receiver. • adjust the volume level. • turns off the sound. Note: ••To use this function: −− Set Speaker Preference - Toshiba 40E200U | User Manual - Page 50
SAP audio status (when HDMI input mode, Dolby Digital or PCM) • Video resolution • Aspect ratio of incoming video signal (4:3 or 16:9) • V-Chip rating status • Game Timer (if set) Note: The location of the banner can be moved to the top or bottom of the screen by pressing or while the RECALL or - Toshiba 40E200U | User Manual - Page 51
7: Using the TV's advanced features Using the advanced picture settings features Using Dynamic Contrast Dynamic Contrast detects changes in picture quality that affect the appearance of your contrast settings and then automatically adjusts the video. To select Dynamic Contrast preference: 1無 From - Toshiba 40E200U | User Manual - Page 52
turn on Game Mode: 1無 Press and open the Picture menu, highlight the Game Mode. 2無 Press or to select On. To turn off Game Mode: Select Off in step 2 above, change the video input, or turn the TV off and then on again. Note: You can change the video input by pressing on the remote control - Toshiba 40E200U | User Manual - Page 53
. To adjust the QSound® settings: 1無 Put the TV in STEREO mode ( "Selecting stereo/SAP broadcasts" on page 39). 2無 Press and open the Sound menu. 3無 Highlight Advanced Audio Settings and press . 4無 Press or to highlight the QSound feature, and then press or to turn the QSound effect On or - Toshiba 40E200U | User Manual - Page 54
box on-screen •• The closed caption feature is set to one of the Text modes (T1, T2, T3, or T4). Set the closed caption feature to Off ( page 37). TV stops responding to controls •• If the TV stops responding to the controls on the remote control or TV control panel and you cannot turn off the - Toshiba 40E200U | User Manual - Page 55
or a foreign language), the SAP mode may be on. Set the MTS feature to Stereo mode ( page 39). Remote control problems •• Remove all obstructions between the remote control and the TV. •• The remote control batteries may be dead. Replace the batteries ( page 20). •• If the TV still does not act as - Toshiba 40E200U | User Manual - Page 56
/20/24 bits per sample DIGITAL AUDIO OUTPUT: Optical type PC INPUT: 15-Pin D-sub Analog RGB Dimensions 32E200U/32E20U: Width: 2'7-1/2 inches (801.68mm) Height: 1'10-3/4 inches (577.05mm) Depth: 9-5/8 inches (245mm) 37E200U/37E20U: Width: 3'-3/8 inches (924.5mm) Height: 2'2 inches (660.3mm) Depth: 11 - Toshiba 40E200U | User Manual - Page 57
formats Note: Depending on the connected PC, the following status may occur; incorrect display, false format detection, picture position failure, blur, or judder. But this is not a malfunction of your TV. Format VGA SVGA XGA WXGA SXGA Resolution 640 × 480 800 × 600 1024 × 768 1280 × 768 1360 × 768 - Toshiba 40E200U | User Manual - Page 58
If, after following all of the operating instructions in this manual, review the section entitled "Concierge" located on our Customer Support Web site "www.tacp.toshiba. com/customersupport". If you find that service is needed, follow the instructions provided on the web site or please contact - Toshiba 40E200U | User Manual - Page 59
under these warranties. This includes wall mounts, custom cabinets and other installation methods that do not provide for direct and immediate access to the product for service purposes. Labour charges for set installation, setup, adjustment of customer controls, and installation or repair of - Toshiba 40E200U | User Manual - Page 60
on which the TOSHIBA label or logo, rating label or serial number have been defaced or removed; i. Damage to the Television caused by failure to follow the specifications, User manuals or guides as to usage and/or storage. j. Firmware updates that are posted to the Toshiba Support website and can - Toshiba 40E200U | User Manual - Page 61
all of the operating instructions in this manual, checked the "Troubleshooting" section, and have visited www.toshiba.ca/support for additional information, you find that service is needed, please contact TCL Customer Support toll free at 1 800 2683404. A copy of the GPL source code in this product - Toshiba 40E200U | User Manual - Page 62
: 82 TOTOWA ROAD, WAYNE, NJ 07470, U.S.A. NATIONAL SERVICE DIVISION: 1420-B TOSHIBA DRIVE, LEBANON, TN 37087, U.S.A. TOSHIBA OF CANADA LTD. HEAD OFFICE: 191 McNABB STREET, MARKHAM, ONTARIO, L3R 8H2, CANADA - TEL: (905) 470-5400 SERVICE CENTERS: TORONTO: 191 McNABB STREET, MARKHAM, ONTARIO L3R
-
 1
1 -
 2
2 -
 3
3 -
 4
4 -
 5
5 -
 6
6 -
 7
7 -
8
-
9
-
10
-
11
-
12
-
13
-
14
-
15
-
16
-
17
-
18
-
19
-
20
-
21
-
22
-
23
-
24
-
25
-
26
-
27
-
28
-
29
-
30
-
31
-
32
-
33
-
34
-
35
-
36
-
37
-
38
-
39
-
40
-
41
-
42
-
43
-
44
-
45
-
46
-
47
-
48
-
49
-
50
-
51
-
52
-
53
-
54
-
55
-
56
-
57
-
58
-
59
-
60
-
61
-
62
 |
 |
For an overview of steps for setting up your new TV, see page10.
Note: To display a High Definition picture, the TV must be receiving
a High Definition signal (such as an over-the-air High Definition
TV broadcast, a High Definition digital cable program, or a High
Definition digital satellite program). For details, please contact
your TV antenna installer, cable provider, or satellite provider.
© 2010 TOSHIBA CORPORATION
All Rights Reserved
Owner’s Record
The model number and serial number are on the back
of your TV. Record these numbers in the spaces below.
Refer to these numbers whenever you communicate
with your Toshiba dealer about this TV.
Model number:
Serial number:
HDA51C3701I
Owner’s Manual
Integrated High Definition
HIGH
-DEFINITION TELEVISION
LCD Television
32E200U
32E20U
37E200U
37E20U
40E200U
40E20U