Toshiba 50HM66 Owner's Manual - English
Toshiba 50HM66 - 50" Rear Projection TV Manual
 |
UPC - 022265251409
View all Toshiba 50HM66 manuals
Add to My Manuals
Save this manual to your list of manuals |
Toshiba 50HM66 manual content summary:
- Toshiba 50HM66 | Owner's Manual - English - Page 1
picture to appear on-screen. This is a property of DLPTM TV lamp technology and is NOT a sign of malfunction. For details, see "IMPORTANT NOTICE ABOUT HOT LAMP RESTART" on page 2. © 2006 TOSHIBA CORPORATION All Rights Reserved RICA CONSUMER PR O 14001 FILE No. A96 Owner's Record The model number - Toshiba 50HM66 | Owner's Manual - English - Page 2
the TV while the LEDs are blinking. Important notes about your DLP™ projection TV 1) The light source for this TV is a projection lamp unit with a limited service life. When the lamp wears out, the picture may become dark or black or the lamp may fail, at which time you must replace the lamp unit - Toshiba 50HM66 | Owner's Manual - English - Page 3
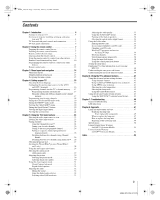
Changing your PIN code 35 Blocking TV programs and movies by rating (V-Chip 36 Blocking channels 37 Unlocking programs temporarily 38 Using the input lock feature 38 Using the control panel lock feature 39 Setting the sleep timer 39 Displaying TV setting information on-screen using RECALL 40 - Toshiba 50HM66 | Owner's Manual - English - Page 4
details on using the TV's features, see Chapters 5 and 6. 14 For help, refer to the Troubleshooting Guide (- Chapter 7). 15 For lamp unit replacement instructions, see Chapter 8. 16 For technical specifications and warranty information, see Chapter 8. 17 Enjoy your new TV! 4 HM66 (E/F) Web 213:276 - Toshiba 50HM66 | Owner's Manual - English - Page 5
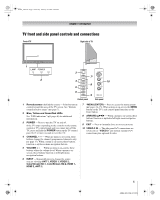
area of the TV screen. See "Remote control effective range" (- page 7). 2 Blue, Yellow and Green/Red LEDs See "LED indications" (- page 46) for additional information. 3 POWER - Press to turn the TV on and off. If the TV stops responding to the controls on the remote control or TV control panel and - Toshiba 50HM66 | Owner's Manual - English - Page 6
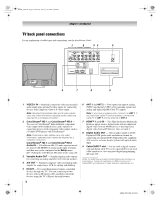
Toshiba infrared remote-controlled devices through the TV. You code modulation) format for connecting an external Dolby Digital decoder, amplifier, A/V receiver, or home theater system with optical audio input. 9 CableCARD™ slot - For use with a digital security card and digital cable TV service - Toshiba 50HM66 | Owner's Manual - English - Page 7
not operate correctly, or if the operating range becomes reduced, replace batteries with new ones. • When necessary to replace batteries in the remote control, always replace both batteries with new ones. Never mix battery types or use new and used batteries in combination. 7 HM66 (E/F) Web 213:276 - Toshiba 50HM66 | Owner's Manual - English - Page 8
list of the remote control's functions, see the remote control functional key chart (- page 10). Note: The error message "NOT AVAILABLE" may appear if you press a key for a function that is not available. 1 POWER turns the TV on and off. Press p to turn on the TV. The blue LED indicator on the TV - Toshiba 50HM66 | Owner's Manual - English - Page 9
memory only). 5 GUIDE Displays channel guide. 6 INFO Displays TV status information on-screen. 7 BbC c Press to navigate DVD menus (may not work on some DVD players). 8 ENTER Required by some satellite receivers and DVD players. 9 DVD CLEAR Press to reset the title and chapter number. 10 PLAY Begins - Toshiba 50HM66 | Owner's Manual - English - Page 10
in the "TV" device mode. REMOTE CONTROL KEY POWER SLEEP INPUT 1-9 0 100/-/+10 RECALL CH RTN INFO MENU Bb/FAVBb C 3 c # ENTER EXIT/DVD CLEAR VOL + - CHBb PIC SIZE MUTE GUIDE FF PAUSE/STEP PLAY REW HOME STOP FREEZE SKIP Z SKIP z TV/VCR REC SET UP TOP MENU Toshiba TV (TV) Power Sleep timer TV/Video - Toshiba 50HM66 | Owner's Manual - English - Page 11
, write down the code(s) you used: DEVICE CODE DEVICE CODE Notes: • In addition to POWER, confirm that all necessary keys on the TV remote control operate your device. If some keys are not operational, repeat the device code setup using another code (if other codes are listed for your device - Toshiba 50HM66 | Owner's Manual - English - Page 12
TV remote control. Your other device may use a code that is not recognized by the TV remote control. If this happens, use the device's remote Pansat Primestar Proscan Radio Shack RCA Realistic Samsung Sony Star Choice Star Trak STS Toshiba Uniden Zenith 020, 040, 044, 046, 050, 053 018, 041, 051 - Toshiba 50HM66 | Owner's Manual - English - Page 13
, 2006 2:49 PM Chapter 2: Using the remote control Curtis Mathes Daewoo Daytron Denon Dimensia Electrohome Signature Signature 2000 Singer Sony STS Sylvania Symphonic Tandy Tashiko Tatung Teac Technics Teknika Toshiba Totevision Unitec Unitech Vector Research Video Concepts 036, 045, 046, 057, - Toshiba 50HM66 | Owner's Manual - English - Page 14
remote control or TV control panel. Icon Applications Video Item Channel Browser Digital CC/Audio Selector CableCARD™ Picture Settings Advanced Picture Off/Video/Video+ S Off/On S [New PIN Code entry window] S [Opens the Installation menu (- page 15)] S [Sleep Timer edit window] S No/Yes S Auto / - Toshiba 50HM66 | Owner's Manual - English - Page 15
Configuration window] S ANT1 S [Scans for new channels on desired Antenna] S ANT2 S [Scans for new channels on desired Antenna] S [Channel menu system You can use the buttons on the remote control or TV control panel to access and navigate your TV's on-screen menu system. • Press Y to open the menu - Toshiba 50HM66 | Owner's Manual - English - Page 16
press T. (A new set of Installation menu icons will appear on-screen, as shown in the Preferences menu. Setup Installation Sleep Timer ColorStream HD1 Audio HDMI 1 Audio ColorStream source (Cable or Antenna) for the ANT 2 input on the TV, if applicable. If you have not connected anything to the - Toshiba 50HM66 | Owner's Manual - English - Page 17
process again unless your Cable TV service lineup changes significantly. • If you have a CableCARD™ inserted, channel programming for ANT 1 is disabled because the CableCARD™ automatically loads the Cable channel list into the TV's channel memory. See Installation Guide for details on CableCARD™. To - Toshiba 50HM66 | Owner's Manual - English - Page 18
then press T to check the box. To manually add digital subchannels on a physical channel: Use the Channel Numbers and the Dash (=) on the remote control to enter the channel number (for example, 56-1). If the channel is found, the number will be added to the list and the box will be checked. If the - Toshiba 50HM66 | Owner's Manual - English - Page 19
. (This will not change the TV's current input.) • Or... Press Reset Cancel Done To tune your favorite channels for the current ANT input: Press M / m. To tune your favorite channels using the favorite channel list: 1 Press = to display the favorite channel list. 2 Press the corresponding number - Toshiba 50HM66 | Owner's Manual - English - Page 20
information. Setup Installation No Sleep Timer Yes ColorStream HD1 Audio No HDMI Guide) for connection and subscription information. Note: Connecting your TV directly to the Audio/Video output of your Set-Top-Box will assure a more vivid picture CableCARD IP Service Conditional Access - Toshiba 50HM66 | Owner's Manual - English - Page 21
power within a few minutes. This is a property of DLP™ TV lamp technology and is NOT a sign of malfunction. If this occurs, the yellow LED on the TV front panel will blink (and the blue LED will be lit solid) until the TV is finished restarting the lamp and the normal picture appears. If both LEDs - Toshiba 50HM66 | Owner's Manual - English - Page 22
and press T. A new set of Installation menu icons will appear on-screen, as shown below right. To cancel the reset: Highlight No and press T. Note: If you have previously set the TV to High Bright mode, and have restored Factory Defaults, the TV will default to Low Power mode. To set the TV back to - Toshiba 50HM66 | Owner's Manual - English - Page 23
label, which will cause that input to be "grayed out" in the input list and skipped over when you press + on the remote control. 5 To save the new input labels, highlight Done and press T. To revert to the factory default labels, highlight Reset and press T. (continued) 23 HM66 (E/F) Web 213:276 - Toshiba 50HM66 | Owner's Manual - English - Page 24
TV's basic features Input labeling example: The screen below left shows the default Input Selection screen (with none of the inputs labeled). The screen History List ANT1 List ANT2 List Inputs List Reset Select Mode Power Off Clear(On) On On On Done 4 Press b to highlight History List field, - Toshiba 50HM66 | Owner's Manual - English - Page 25
in the channel history 4 Home instructions (this will be replaced once there are at least 6 items in the History, ANT 1 or Inputs lists) 5 Current list (History, ANT 1, ANT 2 or Inputs) 6 Current input 7 Current antenna type (cable or TV) 8 Active channel number 9 Channel call letters (if - Toshiba 50HM66 | Owner's Manual - English - Page 26
as Home: 1 Tune the TV to the channel or input you would like to set as the Home source. 2 Press and hold i on the remote control for 3 seconds. When HOME is saved, the Channel Browser™ banner will appear at the bottom of the screen and the HOME icon will flash green. To tune to - Toshiba 50HM66 | Owner's Manual - English - Page 27
saved for each input on your TV. To select the picture size: 1 Press I on the remote control. 2 While the Picture Size screen is on-screen, press the corresponding number button (0-4) to select the desired picture size. Picture Size 0 Natural 1 TheaterWide 1 2 TheaterWide 2 3 TheaterWide 3 4 Full - Toshiba 50HM66 | Owner's Manual - English - Page 28
.book Page 28 Thursday, February 23, 2006 2:49 PM Chapter 5: Using the TV's basic features TheaterWide 3 picture size (for letter box programs with subtitles) • The picture is stretched wider to fill the width of the screen, but only slightly stretched taller. • The top and bottom edges are hidden - Toshiba 50HM66 | Owner's Manual - English - Page 29
Settings Picture Size Picture Scroll -1 Cinema Mode Auto Aspect Ratio Natural Film On Reset Done 4 To save the new settings, VIDEO 1, VIDEO 2, ColorStream HD-1/HD-2 (component video), or HDMI inputs on the TV, smoother motion can be obtained by setting the Cinema Mode to Film. To set - Toshiba 50HM66 | Owner's Manual - English - Page 30
to High Bright mode, and have chosen Reset in item 4 above, the TV will default to Low Power mode. To set the TV back to High Bright mode, see page 42. Adjusting the picture quality You can adjust the picture quality (contrast, brightness, color, tint, and sharpness) to your personal preferences - Toshiba 50HM66 | Owner's Manual - English - Page 31
The closed caption mode has two options: • Captions-An on-screen display of the dialogue, narration, and sound effects of TV programs and videos that are closed captioned (usually marked "CC" in program guides). • Text-An on-screen display of information not related to the current program, such as - Toshiba 50HM66 | Owner's Manual - English - Page 32
Using the TV's basic features Digital closed captions You can use the Digital CC/Audio Selector to select digital closed caption services (if services are not available, the Digital CC/Audio Selector presents a default list of services. If the selected service is not available, the next best service - Toshiba 50HM66 | Owner's Manual - English - Page 33
Optical Output Format Stereo English On Dolby Digital Reset Done 4 To save the new settings, highlight Done and press T. To reset the settings to the factory defaults, highlight Reset and press T. Notes: • If you leave the TV see the current program on the screen but hear the other language - Toshiba 50HM66 | Owner's Manual - English - Page 34
Installation Guide). To turn off the built-in speakers: 1 Press Y and open the Audio menu. 2 Highlight Audio Setup and press T. 3 In the Speakers field, select Off. Audio Setup MTS Language Speakers Optical Output Format Stereo English Off Dolby Digital Reset Done 4 To save the new settings - Toshiba 50HM66 | Owner's Manual - English - Page 35
CH RTN Back EXIT Exit 2 Press b, which displays the PIN code entry screen. • The Lock System screen (below) appears if a PIN code has not been stored. Press the Channel Number buttons to enter a new four-digit code, enter the code a second time to confirm, and press T. Lock System Please enter - Toshiba 50HM66 | Owner's Manual - English - Page 36
blocking is a function of the V-Chip feature in this TV, which supports the U.S. V-Chip system only. To block and unblock TV programs and movies: 1 Press Y and highlight the Locks menu icon. 2 Press b to display the PIN code entering screen. 3 Enter your four-digit PIN code and press T. 4 Press b to - Toshiba 50HM66 | Owner's Manual - English - Page 37
remote control. If it is rated "None," the word "NONE"appears in the RECALL screen (as shown below right). If rating information is not provided, no rating will appear in the RECALL screen. TV Block Input Lock Front Panel Lock New PIN Code Off Off Off Navigate ENTER Select MENU Back EXIT Exit - Toshiba 50HM66 | Owner's Manual - English - Page 38
picture appears. All locking is disabled until the TV is turned off, and will be enabled when the TV is turned on again. Locks Active Enter PIN code to display the PIN code entering screen. 3 Enter your four-digit PIN code and press T. 4 Front Panel Lock Off New PIN Code Off Video Video + - Toshiba 50HM66 | Owner's Manual - English - Page 39
Front Panel Lock Off New PIN Code Navigate ENTER Select MENU Back EXIT Exit To unlock the control panel: Highlight Off in step 5 above, or press and hold the VOLUME - button on the TV control panel for about 10 seconds until the volume icon appears on-screen. Setting the sleep timer You can set - Toshiba 50HM66 | Owner's Manual - English - Page 40
time on sleep timer (if set) • Stereo or SAP audio status • V-Chip rating status • Picture size • Video resolution • Lamp mode (appears only if the TV is in High Bright mode) To close the RECALL screen: Press E again. The TV will automatically turn itself off after approximately 15 minutes if it - Toshiba 50HM66 | Owner's Manual - English - Page 41
reduction feature allows you to reduce visible interference in your TV picture. This may be useful when receiving a broadcast with setting. Advanced Picture Settings Dynamic Contrast CableClear MPEG Noise Reduction Color Temperature Lamp Mode Game Mode Reset On Auto Low Cool Low Power Off Done - Toshiba 50HM66 | Owner's Manual - English - Page 42
select the mode you prefer (Cool, Medium, or Warm). Advanced Picture Settings Dynamic Contrast CableClear MPEG Noise Reduction Color Temperature Lamp Mode Game Mode On Auto Low Cool Low Power Off ANT 1 Reset Done 4 To save the new settings, highlight Done and press T. To revert to the factory - Toshiba 50HM66 | Owner's Manual - English - Page 43
b to highlight the Game Mode field, and then press C or c to select On. Advanced Picture Settings Dynamic Contrast CableClear MPEG Noise Reduction Color Temperature Lamp Mode Game Mode Reset Video 1 On Auto Low Cool Low Power On Done To turn off Game Mode: Select Off in step 3 above or change the - Toshiba 50HM66 | Owner's Manual - English - Page 44
and lamp unit door are installed properly (- pages 47-49). • The lamp unit may need to be replaced (- pages 47-49). Also see "LED indications" (- page 46). • If the TV is powered off and then quickly on again when the lamp unit is hot, it may take several minutes for the picture to appear on-screen - Toshiba 50HM66 | Owner's Manual - English - Page 45
9-10). • Remove all obstructions between the remote control and the TV. • The remote control batteries may be dead. Replace the batteries (- page 7). • Your TV remote control may not operate certain features on your external device. Refer to the owner's manual for your other device to determine its - Toshiba 50HM66 | Owner's Manual - English - Page 46
. Yellow blinks. Red blinks. Condition The TV is operating properly. In LPS mode (standby with Quick Restart ON). The lamp is not working properly. The lamp is not working properly after the eighth automatic restart (see item #3). The lamp unit door is not seated properly. Fan stopped (light engine - Toshiba 50HM66 | Owner's Manual - English - Page 47
or colors fade; • if the screen (lamp) does not light (LED indication #4, - page 46); or • if you hear a loud noise and the picture goes black, which may indicate a lamp rupture (LED indication #4, - page 46). To obtain a replacement lamp unit: In the U.S. In warranty: Visit www.tacp.toshiba.com - Toshiba 50HM66 | Owner's Manual - English - Page 48
damage may result from directly viewing the light produced by this lamp. Always turn off the TV and unplug the power cord before opening the lamp unit door. 2 STOP! Allow the lamp to cool for at least one (1) hour before replacing it. 4 Using a manual Phillips screwdriver, loosen the two screws on - Toshiba 50HM66 | Owner's Manual - English - Page 49
that the lamp unit and lamp unit door are installed correctly: • No picture • Dark picture • TV will not turn on If, after repeating steps 1-9, the problem still exists: • In the U.S., call TACP consumer solutions at 1-800- 631-3811. • In Canada, locate the nearest Toshiba authorized service depot - Toshiba 50HM66 | Owner's Manual - English - Page 50
: 41ºF-95ºF (5ºC-35ºC) Humidity: 20-80% (no moisture condition) Supplied Accessories • Remote control with two size "AAA" batteries • Dual-wand IR blaster cable • Installation Guide • Operating Guide (this book) Optional Stands 50HM66:ST 5066 56HM66:ST 5666 * Encrypted channels can be viewed on this - Toshiba 50HM66 | Owner's Manual - English - Page 51
THIS PERIOD, TACP WILL, AT TACP'S OPTION, REPAIR OR REPLACE A DEFECTIVE PART WITH A NEW OR REFURBISHED PART WITHOUT CHARGE TO YOU. Owner's Manual and Product Registration Read this owner's manual thoroughly before operating this DLP™ television. Complete and mail the enclosed product registration - Toshiba 50HM66 | Owner's Manual - English - Page 52
'S OPTION, REPAIR OR REPLACE A DEFECTIVE PART WITH A NEW OR REFURBISHED PART WITHOUT CHARGE TO YOU. ON-SITE SERVICE ONLY APPLIES WITHIN 100 KILOMETERS OF AN AUTHORIZED TCL SERVICE DEPOT. Owner's Manual and Product Registration Read this owner's manual thoroughly before operating this DLP™ television - Toshiba 50HM66 | Owner's Manual - English - Page 53
the source code. A copy of the LGPL source code in this product may be obtained by contacting Toshiba Consumer TO, PROCUREMENT OF SUBSTITUTE GOODS OR SERVICES; LOSS OF USE, DATA, OR notice, this list of conditions and be given attribution as the author of the parts of the library used. This can be - Toshiba 50HM66 | Owner's Manual - English - Page 54
33 MUTE button 32 O Optical audio output format 34 P Picture adjustment 30 Picture mode 30 Picture quality 30 Picture scroll 28 Picture size selection 27 POWER button 5 Q Quick Restart 20 R RECALL button 40 Remote control Battery installation 7 Device code table 12 Effective range - Toshiba 50HM66 | Owner's Manual - English - Page 55
HM66_EN.book Page 55 Thursday, February 23, 2006 2:49 PM Notes 55 HM66 (E/F) Web 213:276 - Toshiba 50HM66 | Owner's Manual - English - Page 56
PM Corporate Headquarters: 82 TOTOWA ROAD, WAYNE, NJ 07470, U.S.A. NATIONAL SERVICE DIVISION: 1420-B TOSHIBA DRIVE, LEBANON, TN 37087, U.S.A. HEAD OFFICE: 191 McNABB STREET, MARKHAM, ONTARIO, L3R 8H2, CANADA - TEL: (905) 470-5400 SERVICE CENTERS: TORONTO: 191 McNABB STREET, MARKHAM, ONTARIO L3R 8H2
-
 1
1 -
 2
2 -
 3
3 -
 4
4 -
 5
5 -
 6
6 -
 7
7 -
8
-
9
-
10
-
11
-
12
-
13
-
14
-
15
-
16
-
17
-
18
-
19
-
20
-
21
-
22
-
23
-
24
-
25
-
26
-
27
-
28
-
29
-
30
-
31
-
32
-
33
-
34
-
35
-
36
-
37
-
38
-
39
-
40
-
41
-
42
-
43
-
44
-
45
-
46
-
47
-
48
-
49
-
50
-
51
-
52
-
53
-
54
-
55
-
56
 |
 |
HIGH
-DEFINITION TELEVISION
50HM66
56HM66
I
S
O
1
4
0
0
1
F
I
L
E
N
o
.
A
9
6
4
5
T
O
S
H
I
B
A
A
M
E
R
I
C
A
C
O
N
S
U
M
E
R
P
R
O
D
U
C
T
S
,
L
.
L
.
C
.
YC/N
VX1A00001000
Integrated High Definition
DLP
™
Projection Television
© 2006 TOSHIBA CORPORATION
All Rights Reserved
Owner’s Record
The model number and serial number are on the back of
your TV. Record these numbers in the spaces below.
Refer to these numbers whenever you communicate
with your Toshiba dealer about this TV.
Model number:
Serial number:
For an overview of steps for setting up your new TV, see page 4.
Note: If the TV is powered off and then quickly on again when the
lamp unit is hot, it may take several minutes for the picture to appear
on-screen. This is a property of DLP
TM
TV lamp technology and is NOT
a sign of malfunction. For details, see "IMPORTANT NOTICE ABOUT
HOT LAMP RESTART" on page 2.
Note: To display a High Definition picture, the TV must be receiving a
High Definition signal (such as an over-the-air High Definition TV
broadcast, a High Definition digital cable program, or a High Definition
digital satellite program). For details, please contact your TV antenna
installer, cable provider, or satellite provider.
IMPORTANT NOTE
Before connecting, operating, or adjusting this product, carefully
read the Important Safety, Installation, Care, and Service
information in the
Installation Guide
.
HM66_EN.book
Page 1
Thursday, February 23, 2006
2:49 PM