Toshiba 50L4300U User's Guide for Model Series L4300U and L7300U TV - Page 125
Changing the Intel, WiDi Device Name, Device List
 |
View all Toshiba 50L4300U manuals
Add to My Manuals
Save this manual to your list of manuals |
Page 125 highlights
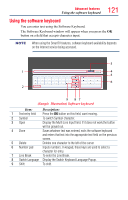
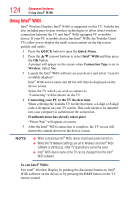
125 Advanced features Using Intel® WiDi NOTE If the device has been inactive for some time, the Intel® WiDi connection will be disconnected automatically. Changing the Intel® WiDi Device Name The TV's Intel® WiDi device name can be changed. 1 Press the SETUP button. 2 Select Network > Network Device Setup > Intel® WiDi Setup and press the OK button. 3 Press the p/q (arrow) buttons to select Intel® WiDi Device Name and press the OK button. 4 Select the Intel® WiDi Device Name and press the OK button. The Software Keyboard window will appear. 5 Input the Intel® WiDi device name by using the software keyboard. Press the GREEN button. 6 Select Done and press the OK button to save your setting. Device List Device List displays a list of MAC addresses for previously connected device that have been connected before. The maximum number that can be stored is 20. If the list run out of space, the least-recently-used MAC address will be deleted and the new MAC address added automatically. 1 Press the SETUP button. 2 Select Network > Network Device Setup > Intel® WiDi Setup and press the OK button. 3 Press the p/q (arrow) buttons to select Device List and press the OK button. Device List will appear. The registered device can be deleted one by one by pressing Red button in the List. When doing so the following text can be seen "Do you want to unregister this device? Yes/No" (default cursor is "No").
-
 1
1 -
2
-
3
-
4
-
5
-
6
-
7
-
8
-
9
-
10
-
11
-
12
-
13
-
14
-
15
-
16
-
17
-
18
-
19
-
20
-
21
-
22
-
23
-
24
-
25
-
26
-
27
-
28
-
29
-
30
-
31
-
32
-
33
-
34
-
35
-
36
-
37
-
38
-
39
-
40
-
41
-
42
-
43
-
44
-
45
-
46
-
47
-
48
-
49
-
50
-
51
-
52
-
53
-
54
-
55
-
56
-
57
-
58
-
59
-
60
-
61
-
62
-
63
-
64
-
65
-
66
-
67
-
68
-
69
-
70
-
71
-
72
-
73
-
74
-
75
-
76
-
77
-
78
-
79
-
80
-
81
-
82
-
83
-
84
-
85
-
86
-
87
-
88
-
89
-
90
-
91
-
92
-
93
-
94
-
95
-
96
-
97
-
98
-
99
-
100
-
101
-
102
-
103
-
104
-
105
-
106
-
107
-
108
-
109
-
110
-
111
-
112
-
113
-
114
-
115
-
116
-
117
-
118
-
119
-
 120
120 -
 121
121 -
 122
122 -
 123
123 -
 124
124 -
 125
125 -
 126
126 -
 127
127 -
 128
128 -
 129
129 -
 130
130 -
131
-
132
-
133
-
134
-
135
-
136
-
137
-
138
-
139
-
140
-
141
-
142
-
143
-
144
-
145
-
146
-
147
-
148
-
149
-
150
-
151
-
152
-
153
-
154
-
155
-
156
-
157
-
158
-
159
-
160
-
161
-
162
-
163
-
164
-
165
-
166
-
167
-
168
-
169
-
170
-
171
-
172
-
173
-
174
-
175
-
176
-
177
-
178
-
179
-
180
-
181
-
182
-
183
-
184
-
185
-
186
 |
 |
