Toshiba 50L4300U User's Guide for Model Series L4300U and L7300U TV - Page 37
Connecting an HDMI, or DVI device to the HDMI, input
 |
View all Toshiba 50L4300U manuals
Add to My Manuals
Save this manual to your list of manuals |
Page 37 highlights
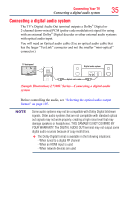
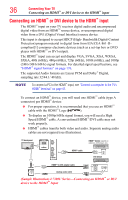
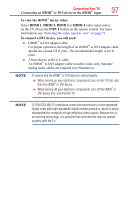
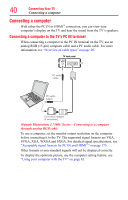
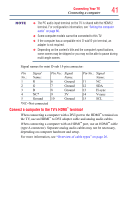
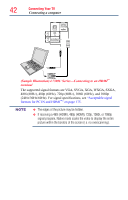
Connecting Your TV Connecting an HDMI™ or DVI device to the HDMI™ input 37 To view the HDMI™ device video: Select HDMI 1, HDMI 2, HDMI 3 or HDMI 4 video input source on the TV. (Press the INPUT button on the remote control. For more information, see "Selecting the video input to view" on page 71. To connect a DVI device, you will need: ❖❖ HDMI™ to DVI adapter cable For proper operation, the length of an HDMI™ to DVI adapter cable should not exceed 9.8 ft (3m). The recommended length is 6.6 ft (2m). ❖❖ 3.5mm Stereo to RCA Y-cable An HDMI™ to DVI adapter cable transfers video only. Separate analog audio cables are required (see illustration). NOTE To ensure that the HDMI™ or DVI device is reset properly: ❖❖ When turning on your electronic components, turn on the TV first, and then the HDMI™ or DVI device. ❖❖ When turning off your electronic components, turn off the HDMI™ or DVI device first, and then the TV. NOTE [1] EIA/CEA-861-D compliance covers the transmission of uncompressed digital video with high-bandwidth digital content protection, which is being standardized for reception of high definition video signals. Because this is an evolving technology, it is possible that some devices may not operate properly with the TV.
-
 1
1 -
2
-
3
-
4
-
5
-
6
-
7
-
8
-
9
-
10
-
11
-
12
-
13
-
14
-
15
-
16
-
17
-
18
-
19
-
20
-
21
-
22
-
23
-
24
-
25
-
26
-
27
-
28
-
29
-
30
-
31
-
 32
32 -
 33
33 -
 34
34 -
 35
35 -
 36
36 -
 37
37 -
 38
38 -
 39
39 -
 40
40 -
 41
41 -
 42
42 -
43
-
44
-
45
-
46
-
47
-
48
-
49
-
50
-
51
-
52
-
53
-
54
-
55
-
56
-
57
-
58
-
59
-
60
-
61
-
62
-
63
-
64
-
65
-
66
-
67
-
68
-
69
-
70
-
71
-
72
-
73
-
74
-
75
-
76
-
77
-
78
-
79
-
80
-
81
-
82
-
83
-
84
-
85
-
86
-
87
-
88
-
89
-
90
-
91
-
92
-
93
-
94
-
95
-
96
-
97
-
98
-
99
-
100
-
101
-
102
-
103
-
104
-
105
-
106
-
107
-
108
-
109
-
110
-
111
-
112
-
113
-
114
-
115
-
116
-
117
-
118
-
119
-
120
-
121
-
122
-
123
-
124
-
125
-
126
-
127
-
128
-
129
-
130
-
131
-
132
-
133
-
134
-
135
-
136
-
137
-
138
-
139
-
140
-
141
-
142
-
143
-
144
-
145
-
146
-
147
-
148
-
149
-
150
-
151
-
152
-
153
-
154
-
155
-
156
-
157
-
158
-
159
-
160
-
161
-
162
-
163
-
164
-
165
-
166
-
167
-
168
-
169
-
170
-
171
-
172
-
173
-
174
-
175
-
176
-
177
-
178
-
179
-
180
-
181
-
182
-
183
-
184
-
185
-
186
 |
 |