Toshiba 50L4300U User's Guide for Model Series L4300U and L7300U TV - Page 57
Sample Illustration Auto Tuning Results screen
 |
View all Toshiba 50L4300U manuals
Add to My Manuals
Save this manual to your list of manuals |
Page 57 highlights
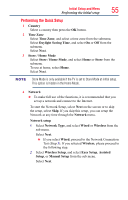
Initial Setup and Menu Performing the initial setup 57 2 Select Media Renderer, and select On or Off from the sub menu. When On is selected, the Media Renderer function can be used. 3 Select Next. 6 Channel Tuning Select Antenna or Cable, and select Start Scan. Auto Tuning will start. While scanning is in progress, the Auto Tuning Progress screen appears. NOTE If you do not want to scan channels, you do not need to make a selection for Channel Tuning. Select Skip to skip this step. NOTE If you want to stop scanning, pressing the EXIT button while scanning is in process. While scanning is in progress, the Auto Tuning Progress screen appears. After scanning is complete, the auto tuning results screen (such as the one below) will appear. Auto Tuning (Antenna) Ch. 101 - 201 201 101 - 201 201 101 - 201 201 101 - 201 201 Antenna Channels Found: 13 Type ATV DTV ATV DTV ATV DTV ATV RF Ch. 0 11 22 33 44 55 66 77 (Sample Illustration) Auto Tuning Results screen Press the OK button. NOTE The encrypted channels are not listed on the auto tuning result screen.
-
 1
1 -
2
-
3
-
4
-
5
-
6
-
7
-
8
-
9
-
10
-
11
-
12
-
13
-
14
-
15
-
16
-
17
-
18
-
19
-
20
-
21
-
22
-
23
-
24
-
25
-
26
-
27
-
28
-
29
-
30
-
31
-
32
-
33
-
34
-
35
-
36
-
37
-
38
-
39
-
40
-
41
-
42
-
43
-
44
-
45
-
46
-
47
-
48
-
49
-
50
-
51
-
 52
52 -
 53
53 -
 54
54 -
 55
55 -
 56
56 -
 57
57 -
 58
58 -
 59
59 -
 60
60 -
 61
61 -
 62
62 -
63
-
64
-
65
-
66
-
67
-
68
-
69
-
70
-
71
-
72
-
73
-
74
-
75
-
76
-
77
-
78
-
79
-
80
-
81
-
82
-
83
-
84
-
85
-
86
-
87
-
88
-
89
-
90
-
91
-
92
-
93
-
94
-
95
-
96
-
97
-
98
-
99
-
100
-
101
-
102
-
103
-
104
-
105
-
106
-
107
-
108
-
109
-
110
-
111
-
112
-
113
-
114
-
115
-
116
-
117
-
118
-
119
-
120
-
121
-
122
-
123
-
124
-
125
-
126
-
127
-
128
-
129
-
130
-
131
-
132
-
133
-
134
-
135
-
136
-
137
-
138
-
139
-
140
-
141
-
142
-
143
-
144
-
145
-
146
-
147
-
148
-
149
-
150
-
151
-
152
-
153
-
154
-
155
-
156
-
157
-
158
-
159
-
160
-
161
-
162
-
163
-
164
-
165
-
166
-
167
-
168
-
169
-
170
-
171
-
172
-
173
-
174
-
175
-
176
-
177
-
178
-
179
-
180
-
181
-
182
-
183
-
184
-
185
-
186
 |
 |