Toshiba D-R410 Owner's Manual - English - Page 11
Functional Overview - remote control
 |
UPC - 022265001356
View all Toshiba D-R410 manuals
Add to My Manuals
Save this manual to your list of manuals |
Page 11 highlights
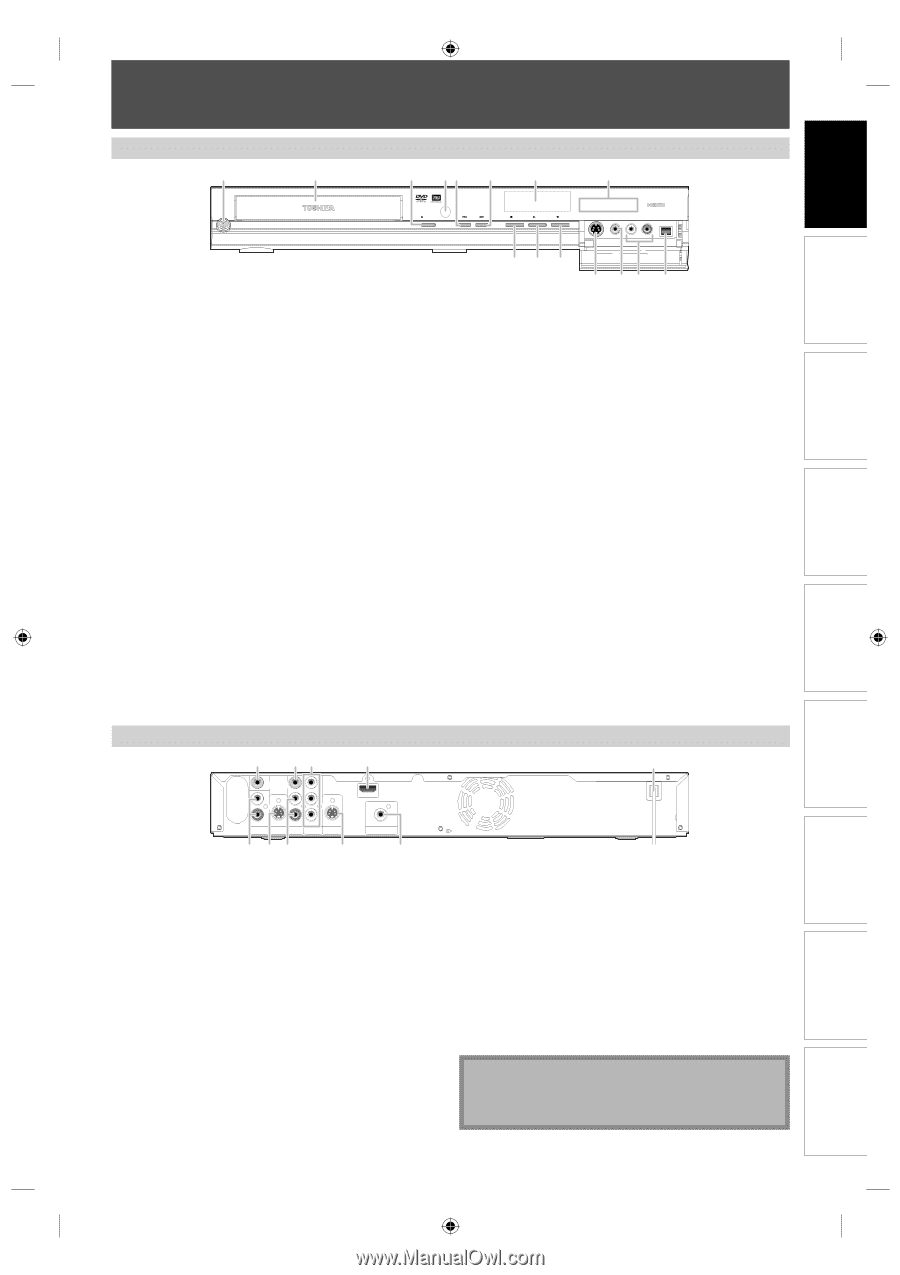
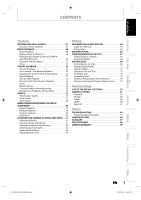
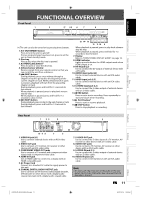
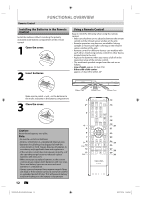
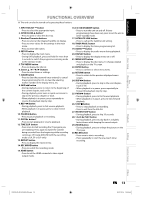
Introduction Connections Basic Setup Disc Management Recording FUNCTIONAL OVERVIEW Front Panel 1 2 3* 4 5 6 7 8 I/yON/STANDBY DVD -RW/R +RW/R RECORDING OPEN/CLOSE SKIP STOP PLAY REC 1080p 1080i 720p 480p (*) The unit can also be turned on by pressing these buttons. 1. I/y ON/STANDBY button Press to turn the unit on and off. If timer programmings have been set, press to set the unit in timer-standby mode. 2. Disc tray Place a disc when the disc tray is opened. 3. A OPEN/CLOSE button* Press to open or close the disc tray. 4. Infrared sensor window Receive signals from your remote control so that you can control the unit from a distance. 5. H (SKIP) button During playback, press once midway through a chapter or track to go back to the beginning of the current chapter or track. When pressed twice in quick succession, playback will start from the preceding chapter or track. During playback, press and hold for 1.5 seconds to fast reverse. When playback is paused, press to play back reverse step by step. When playback is paused, press and hold for 1.5 seconds to slow reverse. 6. G (SKIP) button During playback, press to skip to the next chapter or track. During playback, press and hold for 1.5 seconds to fast forward. 15 14* 13 L2 S-VIDEO VIDEO L R DV IN 12 11 10 9 When playback is paused, press to play back advance step by step. When playback is paused, press and hold for 1.5 seconds to slow forward. 7. Display Refer to "FRONT PANEL DISPLAY GUIDE" on page 16. 8. HDMI indicator Lights up and indicates the HDMI output mode when HDMI output is on. 9. DV IN jack (L3) Use to connect the DV output of external device with a DV cable. 10. AUDIO input jacks (L2) Use to connect external device with an RCA audio cable. 11. VIDEO input jack (L2) Use to connect external device with an RCA video cable. 12. S-VIDEO input jack (L2) Use to connect the S-video output of external device with an S-video cable. 13. I REC button Press once to start a recording. Press repeatedly to start one-touch timer recording. 14. B PLAY button* Press to start or resume playback. 15. C STOP button Press to stop playback or recording. Rear Panel 1 23 4 VIDEO VIDEO IN OUT L Y L PB/CB R AUDIO IN (L1) IN R PR/CR S-VIDEO AUDIO OUT COMPONENT VIDEO OUT OUT S-VIDEO HDMI OUT COAXIAL DIGITAL AUDIO OUTPUT PCM / BITSTREAM 10 9 8 7 6 1. VIDEO IN jack (L1) Use to connect external device with an RCA video cable. 2. VIDEO OUT jack Use to connect a TV monitor, AV receiver or other device with an RCA video cable. 3. COMPONENT VIDEO OUT jacks Use to connect a TV monitor with component video inputs with a component video cable. 4. HDMI OUT jack Use an HDMI cable to connect to a display with an HDMI compatible port. 5. AC Power Cord Connect to a standard AC outlet to supply power to this unit. 6. COAXIAL DIGITAL AUDIO OUTPUT jack Use to connect an AV receiver, Dolby Digital decoder, DTS decoder or other device with a digital audio coaxial input jack with a digital audio coaxial cable. 5 7. S-VIDEO OUT jack Use to connect the S-video input of a TV monitor, AV receiver or other device with an S-video cable. 8. AUDIO OUT jacks Use to connect a TV monitor, AV receiver or other device with an RCA audio cable. 9. S-VIDEO IN jack (L1) Use to connect the S-video output of external device with an S-video cable. 10. AUDIO IN jacks (L1) Use to connect external device with an RCA audio cable. Note • Do not touch the inner pins of the jacks on the rear panel. Electrostatic discharge may cause permanent damage to the unit. EN 11 Playback Editing Function Setup Others E7K7AUD_D-R410KU_EN.indd 11 2007/12/14 15:02:41
-
 1
1 -
2
-
3
-
4
-
5
-
 6
6 -
 7
7 -
 8
8 -
 9
9 -
 10
10 -
 11
11 -
 12
12 -
 13
13 -
 14
14 -
 15
15 -
 16
16 -
17
-
18
-
19
-
20
-
21
-
22
-
23
-
24
-
25
-
26
-
27
-
28
-
29
-
30
-
31
-
32
-
33
-
34
-
35
-
36
-
37
-
38
-
39
-
40
-
41
-
42
-
43
-
44
-
45
-
46
-
47
-
48
-
49
-
50
-
51
-
52
-
53
-
54
-
55
-
56
-
57
-
58
-
59
-
60
-
61
-
62
-
63
-
64
-
65
-
66
-
67
-
68
-
69
-
70
-
71
-
72
-
73
-
74
-
75
-
76
-
77
-
78
-
79
-
80
-
81
-
82
-
83
-
84
-
85
-
86
-
87
-
88
-
89
-
90
-
91
-
92
-
93
-
94
-
95
-
96
-
97
-
98
-
99
-
100
-
101
 |
 |