Toshiba D-R410 Owner's Manual - English - Page 80
Setup, Items highlight is the default, Contents
 |
UPC - 022265001356
View all Toshiba D-R410 manuals
Add to My Manuals
Save this manual to your list of manuals |
Page 80 highlights
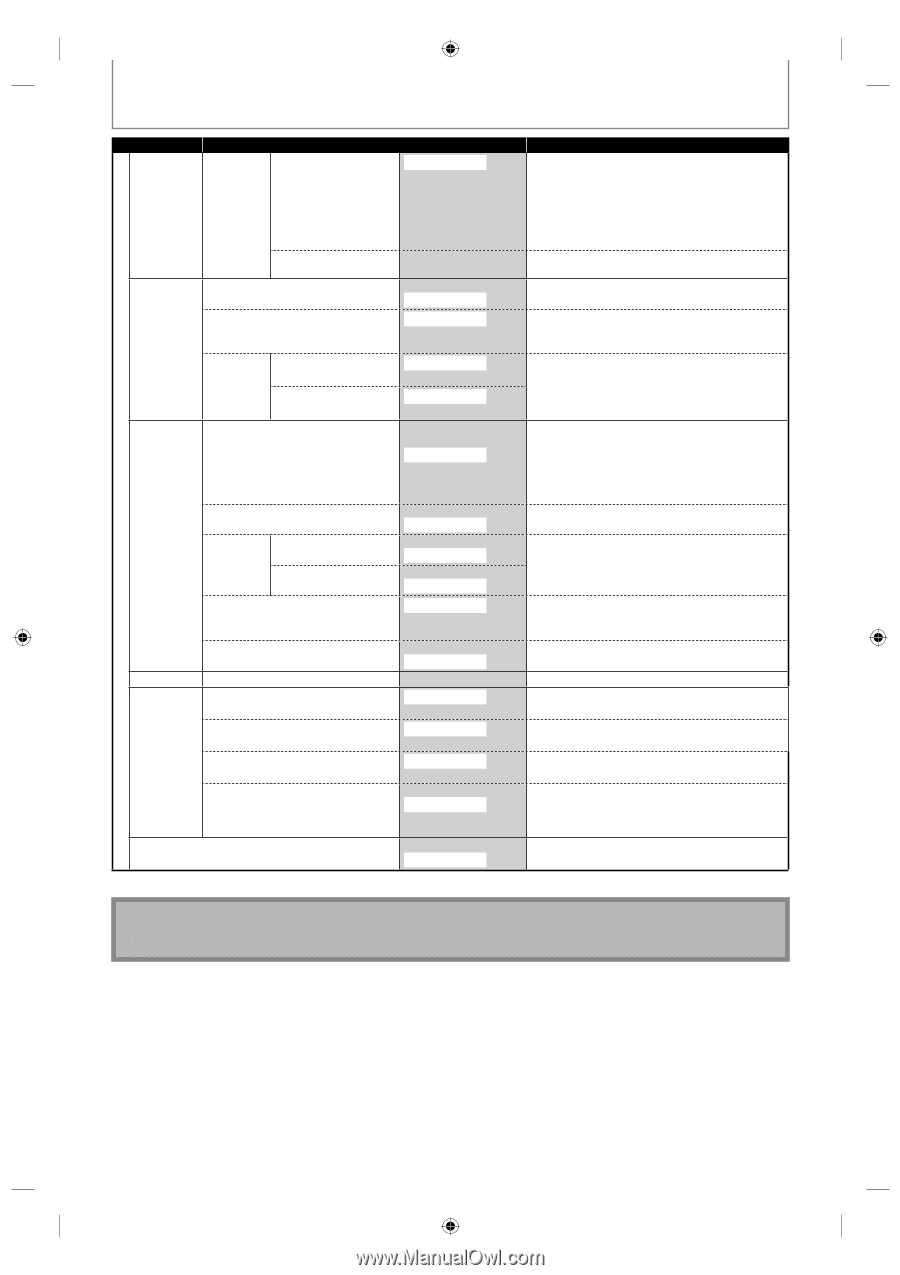
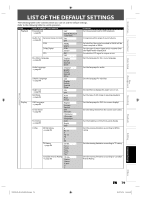
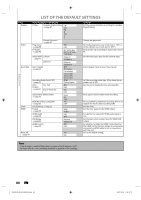
LIST OF THE DEFAULT SETTINGS General Setting Setup Display Video Recording Clock HDMI Items (highlight is the default) V-Chip Canadian English Rating 18+ → page 87 14+ PG G C8+ C E Change Password → page 87 Progressive ON → page 88 OFF TV Aspect → page 88 4:3 Letter Box 4:3 Pan & Scan 16:9 Wide Select Video L1(Rear) → page 31 Video In S-Video In L2(Front) Video In S-Video In Auto Chapter → page 32 OFF 5 minutes 10 minutes 15 minutes 30 minutes 60 minutes Recording Audio Select (XP) → page 33 PCM Dolby Digital Auto Disc Full ON Finalize OFF → page 27 End of Timer Rec ON OFF Aspect Ratio (Video mode) → page 33 Auto 4:3 16:9 Make Recording Compatible ON → page 32 OFF Clock Setting → page 23 Format → page 89 RGB YCbCr HDMI Audio ON → page 90 OFF RGB Range → page 90 Normal Enhanced HDMI Control ON → page 90 OFF Reset All Yes → page 91 No Contents Set the viewing limitation according to Canadian English Rating. Change the password. Set to the progressive scan mode (set to "ON") or to the interlace scan mode (set to "OFF"). Set a picture size according to aspect ratio of your TV. Set the video input type for the external input. Insert chapter marks at even time interval. Set the recording audio type. (Only when the rec mode is set to XP.) Set the unit to finalize the disc automatically. Set a aspect ratio for video mode recording. Set to prohibiting additional recording (OFF) or to replace the title list after recording (ON). Set the clock. Set the color space for the HDMI output. Set whether to output the HDMI audio signal or not. Set the black-white contrast level for HDMI RGB output. Set whether to utilize the HDMI Control function. The HDMI Control function allows all components connected via HDMI cable to act in conjunction with this unit. Set to the default setting. Note • Your change to each settings stays on even when the power is off. • An item which is not currently available is grayed in the settings. 80 EN E7K7AUD_D-R410KU_EN.indd 80 2007/12/18 12:51:57
-
 1
1 -
2
-
3
-
4
-
5
-
6
-
7
-
8
-
9
-
10
-
11
-
12
-
13
-
14
-
15
-
16
-
17
-
18
-
19
-
20
-
21
-
22
-
23
-
24
-
25
-
26
-
27
-
28
-
29
-
30
-
31
-
32
-
33
-
34
-
35
-
36
-
37
-
38
-
39
-
40
-
41
-
42
-
43
-
44
-
45
-
46
-
47
-
48
-
49
-
50
-
51
-
52
-
53
-
54
-
55
-
56
-
57
-
58
-
59
-
60
-
61
-
62
-
63
-
64
-
65
-
66
-
67
-
68
-
69
-
70
-
71
-
72
-
73
-
74
-
 75
75 -
 76
76 -
 77
77 -
 78
78 -
 79
79 -
 80
80 -
 81
81 -
 82
82 -
 83
83 -
 84
84 -
 85
85 -
86
-
87
-
88
-
89
-
90
-
91
-
92
-
93
-
94
-
95
-
96
-
97
-
98
-
99
-
100
-
101
 |
 |