Toshiba D-R4SU Owners Manual - Page 28
Initializing a DVD-RAM/RW disc Logical format
 |
View all Toshiba D-R4SU manuals
Add to My Manuals
Save this manual to your list of manuals |
Page 28 highlights
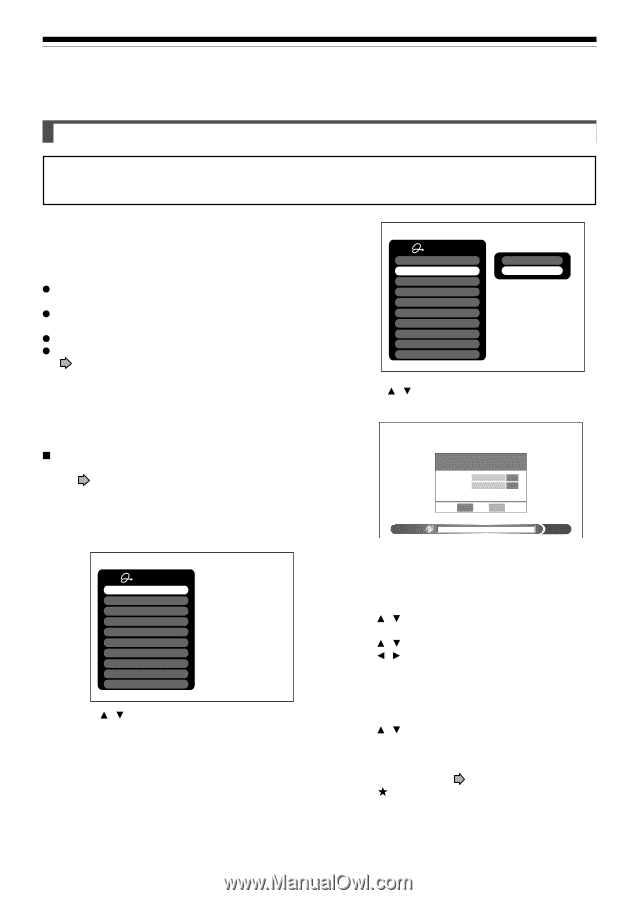
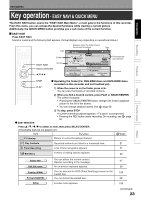
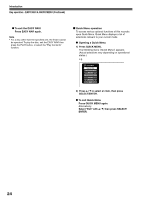
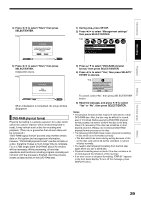
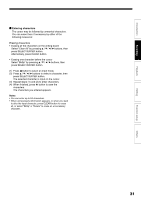
Recording Before recording (Continued) Initializing a DVD-RAM/RW disc (Logical format) Be sure to read this section prior to using a DVD-RAM/RW disc on this recorder for the first time. For DVD-R, initializing is not necessary. A disc should be initialized in the following cases: (The recorder may display a message to request you to do so.) e.g. When you use a DVD-RAM/RW disc on this recorder for the first time. If data fragments produced by repeated recording or erasing have accumulated. If a disc error has occurred. When you want to record on a DVD-RAM disc for PC. ( page 8) Initializing formats a disc logically and insures that it will perform to its full capability. However, this erases all data on the disc, so make sure that it does not matter if data on the disc is erased whenever you initialize a disc. How to initialize a disc To initialize a DVD-RAM disc, load it in the recorder. See page 20 for loading a disc. 1) During stop, press QUICK MENU. The following menu appears. (The actual contents depends on the operational status of the recorder.) e.g. Quick Menu Bit rate Disc management DVD compatible mode Aspect ratio(Video mode) DVD-Video:CHP create AV record quality SAP Time bar Remain Exit 2) Press / to select "Disc management," then press SELECT/ENTER. A sub menu appears on the right side. e.g. Quick Menu Bit rate Disc management DVD compatible mode Aspect ratio(Video mode) DVD-Video:CHP create AV record quality SAP Time bar Remain Exit Disc information DVD format 3) Press / to select "DVD format," then press SELECT/ENTER. e.g. DVD format Disc Number 0 0 1 - Edit Disc Name Edit Start Cancel Format 0% Numbering a disc The recorder automatically numbers discs when initializing. However, you can assign a desired number (using 3 digits) and designate sides A and B on a doublesided disc. (DVD-RW discs cannot be numbered.) (1) Press / buttons to select "Edit" of "Disc Number" then press SELECT/ENTER button. (2) Press / buttons to select a digit. (3) Press / buttons to shift. (4) Repeat steps (2) and (3). (5) Press SELECT/ENTER button. Naming a disc You can name a disc. (1) Press / buttons to select "Edit" of "Disc Name," then press SELECT/ENTER button. The character input window appears. (2) Enter a disc name following the procedure of "Entering characters" ( page 30). (3) Press button to eliminate the window. 28
-
 1
1 -
2
-
3
-
4
-
5
-
6
-
7
-
8
-
9
-
10
-
11
-
12
-
13
-
14
-
15
-
16
-
17
-
18
-
19
-
20
-
21
-
22
-
 23
23 -
 24
24 -
 25
25 -
 26
26 -
 27
27 -
 28
28 -
 29
29 -
 30
30 -
 31
31 -
 32
32 -
 33
33 -
34
-
35
-
36
-
37
-
38
-
39
-
40
-
41
-
42
-
43
-
44
-
45
-
46
-
47
-
48
-
49
-
50
-
51
-
52
-
53
-
54
-
55
-
56
-
57
-
58
-
59
-
60
-
61
-
62
-
63
-
64
-
65
-
66
-
67
-
68
-
69
-
70
-
71
-
72
-
73
-
74
-
75
-
76
-
77
-
78
-
79
-
80
-
81
-
82
-
83
-
84
-
85
-
86
-
87
-
88
-
89
-
90
-
91
-
92
-
93
-
94
-
95
-
96
-
97
-
98
-
99
-
100
-
101
-
102
-
103
-
104
-
105
-
106
-
107
-
108
-
109
-
110
-
111
-
112
-
113
-
114
-
115
-
116
-
117
-
118
-
119
-
120
-
121
-
122
-
123
-
124
-
125
-
126
-
127
-
128
-
129
-
130
-
131
 |
 |