Toshiba D-VR4XSU Owners Manual - Page 55
Timer recording
 |
View all Toshiba D-VR4XSU manuals
Add to My Manuals
Save this manual to your list of manuals |
Page 55 highlights
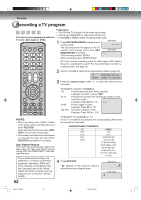
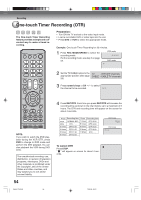
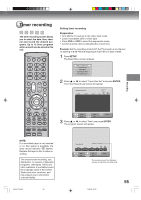
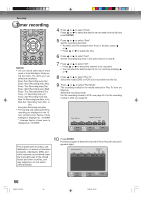
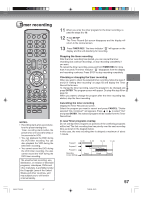
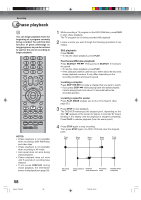
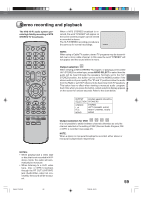
Timer recording The timer recording system allows you to select the date, time, channel and record the desired programs. Up to 12 timer programs within a month can be stored in this unit. Setting timer recording Preparation: • Turn ON the TV and set to the video input mode. • Load a recordable DVD or video tape. • Press DVD or VCR to select the appropriate mode. • Confirm that the clock is indicating the correct time. Example: Set the recording mode to LP; the TV program is on channel 12 starting at 8:00 PM and stopping at 9:30 PM on a date of 20th. 1 Press SETUP. The Easy Menu screen appears. External Audio Input Timer Rec Set Setup Menu Add Chapter Mark Set Index Picture 2 Press or to select "Timer Rec Set" and press ENTER. The Timer Record List screen will appear. Timer Record List Date Start End New Rec Rec CH TO Mode Recording CANCEL Select Delete ENTER SETUP Enter End RETURN Back 3 Press or to select "New" and press ENTER. The program screen will appear. NOTE: If a recordable tape is not inserted or no disc space is available, the timer record indicator " " flashes. Replace the tape or disc to allow recording. The unauthorized recording, use, distribution, or revision of television programs, videotapes, DVDs and other materials, is prohibited under the Copyright Laws of the United States and other countries, and may subject you to civil and/or criminal liability. 2H5-01 P53-59 55 Timer Rec Set Date 1/ 1 [Sat] Start 12:21 AM Remain = LP 4:14:51 End 1:21 AM Rec Rec CH TO Mode 2 DVD LP RETURN Select Back Set SETUP End ENTER Enter The remaining record time displayed changes to match the recording mode. 7/25/05, 23:21 55
-
 1
1 -
2
-
3
-
4
-
5
-
6
-
7
-
8
-
9
-
10
-
11
-
12
-
13
-
14
-
15
-
16
-
17
-
18
-
19
-
20
-
21
-
22
-
23
-
24
-
25
-
26
-
27
-
28
-
29
-
30
-
31
-
32
-
33
-
34
-
35
-
36
-
37
-
38
-
39
-
40
-
41
-
42
-
43
-
44
-
45
-
46
-
47
-
48
-
49
-
 50
50 -
 51
51 -
 52
52 -
 53
53 -
 54
54 -
 55
55 -
 56
56 -
 57
57 -
 58
58 -
 59
59 -
 60
60 -
61
-
62
-
63
-
64
-
65
-
66
-
67
-
68
-
69
-
70
-
71
-
72
-
73
-
74
-
75
-
76
-
77
-
78
-
79
-
80
-
81
-
82
-
83
-
84
-
85
-
86
-
87
-
88
-
89
-
90
-
91
-
92
 |
 |