Toshiba D-VR600 Owner's Manual - English - Page 51
One-touch Timer Recording OTR
 |
UPC - 022265000748
View all Toshiba D-VR600 manuals
Add to My Manuals
Save this manual to your list of manuals |
Page 51 highlights
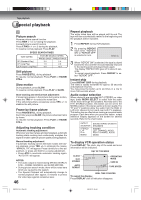
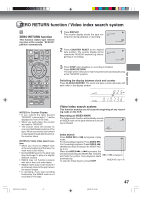
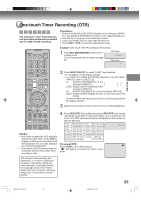
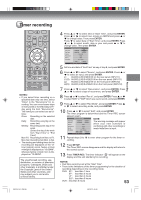
One-touch Timer Recording (OTR) The One-touch Timer Recording feature provides a simple and convenient way to make a timed recording. Preparation: • Connect the AUDIO (L/R)/VIDEO IN jacks on the rear panel (INPUT 1) to the AUDIO (L/R)/VIDEO OUT jacks of the Cable/Satellite box. • Turn ON the TV and set to the video input mode. • Load a recordable DVD or video tape into the unit. • Press DVD or VCR to select the appropriate mode. Example: One-touch Timer Recording for 30 minutes. 1 Press REC MODE/SPEED to select the recording mode. For the recording mode, see step 1 on page 50. VCR mode 00 : 00 : 00 SP DVD mode SP Recording 2 Press INPUT SELECT to select "LINE1" input position. "L1" will appear on the display window. • To record from AUDIO (L/R)/VIDEO IN jacks on the front panel (INPUT2), select "LINE2" (L2). L1: AUDIO (L/R)/VIDEO IN on the rear panel (INPUT1) L1(S): AUDIO (L/R)/S-VIDEO IN on the P rear panel (INPUT1) L2: AUDIO (L/R)/VIDEO IN on the front panel (INPUT2) L2(S): AUDIO (L/R)/S-VIDEO IN input on the front panel (INPUT2) Confirm whether the input source that you used is appeared on the display window. 3 Select the channel you wish to record on your cable/satellite box. NOTES: • If you wish to watch the DVD playback during the VCR OTR, press DVD to change to DVD mode and perform the DVD playback. You can also playback the VCR during DVD OTR. • You cannot set OTR that exceeds the remainder amount time of disc when recording in disc. 4 Press REC/OTR. Each additional press of REC/OTR will increase recording time as shown in the chart below, up to a maximum of 6 hours. The OTR and recording time will appear on the screen for about 4 seconds. Press Recording time Press Recording time once Normal REC 7 times OTR: 180 min. twice OTR: 30 min. 8 times OTR: 240 min. 3 times OTR: 60 min. 9 times OTR: 300 min. 4 times OTR: 90 min. 10 times OTR: 360 min. 5 times OTR: 120 min. 11 times OTR: Off 6 times OTR: 150 min. (Normal REC) OTR: 30 min. To cancel OTR Press STOP or turn off the power. " " will appear on screen for about 4 seconds. The unauthorized recording, use, distribution, or revision of television programs, videotapes, DVDs and other materials, is prohibited under the Copyright Laws of the United States and other countries, and may subject you to civil and/or criminal liability. 51 2K70101A_E P44-51 51 08`02`07, 20:45
-
 1
1 -
2
-
3
-
4
-
5
-
6
-
7
-
8
-
9
-
10
-
11
-
12
-
13
-
14
-
15
-
16
-
17
-
18
-
19
-
20
-
21
-
22
-
23
-
24
-
25
-
26
-
27
-
28
-
29
-
30
-
31
-
32
-
33
-
34
-
35
-
36
-
37
-
38
-
39
-
40
-
41
-
42
-
43
-
44
-
45
-
 46
46 -
 47
47 -
 48
48 -
 49
49 -
 50
50 -
 51
51 -
 52
52 -
 53
53 -
 54
54 -
 55
55 -
 56
56 -
57
-
58
-
59
-
60
-
61
-
62
-
63
-
64
-
65
-
66
-
67
-
68
-
69
-
70
-
71
-
72
-
73
-
74
-
75
-
76
-
77
-
78
-
79
-
80
 |
 |