Toshiba D-VR600 Owner's Manual - English - Page 69
Dubbing DV movie, Preparation
 |
UPC - 022265000748
View all Toshiba D-VR600 manuals
Add to My Manuals
Save this manual to your list of manuals |
Page 69 highlights
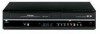
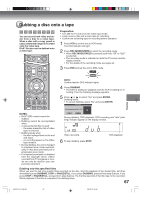
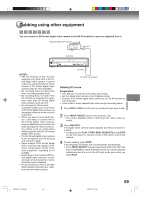
Dubbing using other equipment You can connect a DV format digital video camera to the DV IN terminal to record or playback from it. Playback Digital Video Camera To DV OUT DVD/VCR Dubbing NOTES: • The DV terminal of this recorder supports only input from a DV format digital video camera. It cannot output to a connected device. Some models of DV format digital video cameras may be not compatible. • DV recording does not start while timer recording standby mode. • DV recording does not work if the DV terminal is connected to equipment other than DV format digital video camera, such as a PC. • Do not keep the DV terminal connected unless you record from a DV format digital video camera, as it may give influence on the recorder if operated. • When you want to record both stereo 1 and stereo 2 sounds from a DV format digital video camera, make an additional connection to the audio input jacks on this recorder using cables such as audio/video cables supplied with the DV format digital video camera. • If a DV format digital video camera is not recognized, pull out the plug and connect it again. • Some models of DV format digital video cameras may support a different compression format. From such equipment, recording is not possible. • Depending on the models of DV format digital video cameras, recording may not work properly or some functions may be disabled. • On an input source from a DV tape which is partly recorded over, chapters may not made properly. To DV IN DV cable (not supplied) Dubbing DV movie Preparation: • Turn ON the TV and set to the video input mode. • Set the digital video camera to the Playback mode. • Connect a DV format digital video camera to the DV IN terminal on the front panel. • Load a disc or insert cassette tape with enough recording space. 1 Press DVD or VCR to set this unit to a mode that you want to dub. 2 Press INPUT SELECT and set the channel to DV. • You cannot playback DVD or VCR when DV input mode selected. 3 Press REC/OTR. The digital video camera starts playback and this unit starts recording. • You also can use PLAY, F.FWD, REW, PAUSE/STILL and STOP on the front panel or remote control of this unit to control DV camera. 4 To stop dubbing, press STOP. If the playback is finished, the recording stops automatically. • Press INPUT SELECT to select input mode other than "DV" and then press PLAY to check dubbed pictures. You cannot play the dubbed pictures this unit in the DV input mode even when you press PLAY. 2K70101A_E P64-69 69 08`02`07, 20:46 69
-
 1
1 -
2
-
3
-
4
-
5
-
6
-
7
-
8
-
9
-
10
-
11
-
12
-
13
-
14
-
15
-
16
-
17
-
18
-
19
-
20
-
21
-
22
-
23
-
24
-
25
-
26
-
27
-
28
-
29
-
30
-
31
-
32
-
33
-
34
-
35
-
36
-
37
-
38
-
39
-
40
-
41
-
42
-
43
-
44
-
45
-
46
-
47
-
48
-
49
-
50
-
51
-
52
-
53
-
54
-
55
-
56
-
57
-
58
-
59
-
60
-
61
-
62
-
63
-
 64
64 -
 65
65 -
 66
66 -
 67
67 -
 68
68 -
 69
69 -
 70
70 -
 71
71 -
 72
72 -
 73
73 -
 74
74 -
75
-
76
-
77
-
78
-
79
-
80
 |
 |