Toshiba DMF102XKU Owner's Manual - English - Page 24
Using the Media Frame, ENTER, THUMBNAIL, ROTATE, ZOOM IN, OPTION, Settings
 |
UPC - 022265003084
View all Toshiba DMF102XKU manuals
Add to My Manuals
Save this manual to your list of manuals |
Page 24 highlights
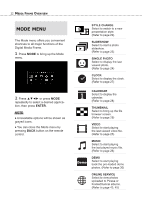
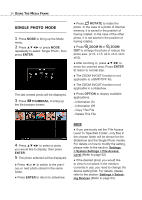
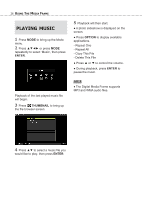
24 USING THE MEDIA FRAME SINGLE PHOTO MODE 1 Press MODE to bring up the Mode menu. 2 Press or press MODE repeatedly to select 'Single Photo', then press ENTER. The last viewed photo will be displayed. 3 Press THUMBNAIL to bring up the file browser screen. ● Press ROTATE to rotate the photo. In the case of a photo of internal memory, it is saved in the position of having rotated. In the case of the other photo, it is not saved in the position of having rotated. ● Press ZOOM IN or ZOOM OUT to enlarge the photo or reduce the photo size. (x1.0, x1.5, x2.0, x3.0, x4.0, x5.0). ● After zooming in, press to move the zoomed area. Press ENTER to return to normal size. ● The ZOOM IN/OUT function is not applicable to a BMP/TIFF file. ● The ZOOM IN/OUT function is not applicable in a slideshow. ● Press OPTION to display available applications. - Information On - Information Off - Copy This File - Delete This File 4 Press to select a photo you would like to display, then press ENTER. 5 The photo selected will be displayed. ● Press ◄ or ► to switch to the previous or next photo stored in the same folder. ● Press ENTER to return to slideshow. NOTE ♦ If you previously set the 'File Access Level' to 'Specified Folder', only files in the chosen folder will be shown for the Slideshow and the Single Photo modes. For details on how to modify the setting, please refer to the section: Settings > System Settings > File Access Level.(Refer to page 52) ♦ If the desired photo you would like to view is not saved in the medium currently in use, you need to change the device setting first. For details, please refer to the section: Settings > Selecting Devices.(Refer to page 53)
-
 1
1 -
2
-
3
-
4
-
5
-
6
-
7
-
8
-
9
-
10
-
11
-
12
-
13
-
14
-
15
-
16
-
17
-
18
-
 19
19 -
 20
20 -
 21
21 -
 22
22 -
 23
23 -
 24
24 -
 25
25 -
 26
26 -
 27
27 -
 28
28 -
 29
29 -
30
-
31
-
32
-
33
-
34
-
35
-
36
-
37
-
38
-
39
-
40
-
41
-
42
-
43
-
44
-
45
-
46
-
47
-
48
-
49
-
50
-
51
-
52
-
53
-
54
-
55
-
56
-
57
-
58
-
59
-
60
-
61
-
62
-
63
-
64
-
65
-
66
-
67
-
68
-
69
-
70
-
71
-
72
-
73
-
74
-
75
-
76
-
77
-
78
 |
 |