Toshiba DVR620 Owner's Manual - English - Page 100
Vcr Functions - instruction manual
 |
UPC - 022265002223
View all Toshiba DVR620 manuals
Add to My Manuals
Save this manual to your list of manuals |
Page 100 highlights
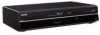
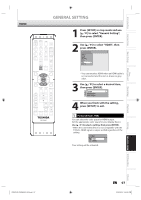
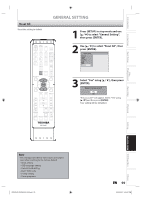
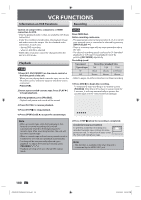
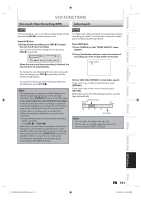
VCR FUNCTIONS Information on VCR Functions Recording Caution on using S-video, component, or HDMI connection for VCR: • Only the playback audio / video are available with these connections. • Under the conditions listed below, the playback image and audio cannot be output. Use the standard video connection, in such case; - during DVD recording. - when L3 (DV-IN) is selected. • HDMI video resolution cannot be changed when the unit is in VCR mode. Playback 1) Press [I/y ON/STANDBY] on the remote control or the front panel of the unit. When you are playing back a cassette tape, turn on the TV and be sure to select the input to which the unit is connected. Press [VCR]. 2) Insert a prerecorded cassette tape. Press [PLAY B] to begin playback. 3) During playback, press [PAUSE F]. Playback will pause and sound will be muted. Press [VCR] first. Before recording, make sure: • The appropriate external input position (L1/L2) to which your external tuner is connected is selected by pressing [INPUT SELECT ]. • There is a cassette tape with an erase-protection tab in the unit. • The desired recording speed is selected in SP (standard playback) or SLP (super long playback) mode by pressing [REC MODE] repeatedly. Recording speed: Tape speed Recording / playback time Type of tape T60 T120 T160 SP 1hour 2hours 2-2/3hours SLP 3hours 6hours 8hours • Refer to pages 39-42 for instructions on timer recording. 1) Press [REC I] to begin the recording. To temporarily stop recording or to resume it, press [PAUSE F]. After the unit has been in pause mode for 5 minutes, it will stop automatically to protect the cassette tape and the video head from damage. 4) Press [PLAY B] to resume playback. 5) Press [STOP C] to stop playback. 6) Press [OPEN/CLOSE A] to eject the cassette tape. Note • When a cassette tape ends during playback, fastforward or normal recording, the unit will automatically rewind to the beginning of the cassette tape. After rewinding finishes, the unit will eject the cassette tape. • When a cassette tape without erase-protection tab is inserted, the unit will start playback automatically. • Tracking will be automatically adjusted upon playback. To adjust the tracking manually, press [TRACKING / ]. • Playback will stop when you change the output mode. 2) Press [STOP C] when the recording is completed. Accidental erasure prevention To prevent accidental recording on a recorded cassette tape, remove its erase- protection tab. To record on it later, cover the hole with cellophane tape. erase-protection tab Note • This function is available only when the unit is connected by the VIDEO OUT jack. 100 EN E9PKAUD_DVR620KU_EN.indd 100 3/25/2009 3:49:09 PM
-
 1
1 -
2
-
3
-
4
-
5
-
6
-
7
-
8
-
9
-
10
-
11
-
12
-
13
-
14
-
15
-
16
-
17
-
18
-
19
-
20
-
21
-
22
-
23
-
24
-
25
-
26
-
27
-
28
-
29
-
30
-
31
-
32
-
33
-
34
-
35
-
36
-
37
-
38
-
39
-
40
-
41
-
42
-
43
-
44
-
45
-
46
-
47
-
48
-
49
-
50
-
51
-
52
-
53
-
54
-
55
-
56
-
57
-
58
-
59
-
60
-
61
-
62
-
63
-
64
-
65
-
66
-
67
-
68
-
69
-
70
-
71
-
72
-
73
-
74
-
75
-
76
-
77
-
78
-
79
-
80
-
81
-
82
-
83
-
84
-
85
-
86
-
87
-
88
-
89
-
90
-
91
-
92
-
93
-
94
-
 95
95 -
 96
96 -
 97
97 -
 98
98 -
 99
99 -
 100
100 -
 101
101 -
 102
102 -
 103
103 -
 104
104 -
 105
105 -
106
-
107
-
108
-
109
-
110
-
111
-
112
-
113
 |
 |