Toshiba DVR620 Owner's Manual - English - Page 51
Press [PLAY
 |
UPC - 022265002223
View all Toshiba DVR620 manuals
Add to My Manuals
Save this manual to your list of manuals |
Page 51 highlights
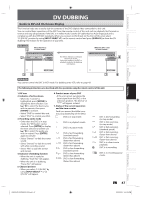
Introduction Connections Basic Setup DVD/VCR DUBBING VCR to DVD DVD to VCR 4 Use [K / L] to select "VCR then press [ENTER]. Dubbing Mode VCR DVD DVD VCR DVD", 4 Use [K / L] to select "DVD then press [ENTER]. Dubbing Mode VCR DVD DVD VCR VCR", 5 Press [SETUP] to exit. Press [VCR]. 5 Press [SETUP] to exit. Press [DVD]. 6 Press [PLAY B]. Then press [PAUSE F] at the point you wish to start recording. • Since it takes about a few seconds before the actual dubbing begins, please allow extra 5 seconds when selecting the starting point. 7 Press [DVD], then press [REC MODE] repeatedly to select the desired recording mode. 8 Press [DUBBING]. VCR to DVD duplication will start. 9 Press [STOP C] to stop the recording. Title list will automatically appear. • If you want to watch the duplicated material after the VCR to DVD duplication, press [TOP MENU] first then press [ENTER] twice. 6 Press [PLAY B]. Then press [PAUSE F] at the point you wish to start recording. 7 Press [VCR], then press [REC MODE] repeatedly to select the desired recording mode. 8 Press [DUBBING]. DVD to VCR duplication will start. 9 Press [STOP C] to stop the recording. Disc Management Recording Playback Editing Function Setup VCR Function Note • You cannot change the output mode during VCR to DVD or DVD to VCR duplication. • When "L3 (DV-IN)" is selected as input, dubbing cannot be performed. Dubbing can be performed with either L1 or L2 inputs. For CD to VCR duplication: • This function is available on Audio CD, not MP3, WMA, JPEG nor DivX® files. For DVD to VCR duplication: • The recording mode for VCR cannot be displayed at step 7 when using HDMI / Component / S-Video connection. To display the VCR recording mode on the screen, the unit must be connected by the VIDEO OUT jack and the TV's input select should be set to the appropriate external input channel. For VCR to DVD duplication: • After starting VCR to DVD duplication, the picture may be distorted because of the auto tracking function. This is not a malfunction. Be advised to playback the cassette tape until the picture is stabilized, then set the starting point where you wish to start recording, and start VCR to DVD duplication. • The playback sound mode is followed by the setting of VCR playback sound mode on page 102. Set the playback sound mode to which you wish to record to the DVD. • This unit will automatically stop the duplication if playback with no image is for more than 3 minutes during VCR to DVD duplication. • Dubbing indicator will appear on the front panel display during dubbing. EN 51 Others E9PKAUD_DVR620KU_EN.indd 51 3/25/2009 3:48:03 PM
-
 1
1 -
2
-
3
-
4
-
5
-
6
-
7
-
8
-
9
-
10
-
11
-
12
-
13
-
14
-
15
-
16
-
17
-
18
-
19
-
20
-
21
-
22
-
23
-
24
-
25
-
26
-
27
-
28
-
29
-
30
-
31
-
32
-
33
-
34
-
35
-
36
-
37
-
38
-
39
-
40
-
41
-
42
-
43
-
44
-
45
-
 46
46 -
 47
47 -
 48
48 -
 49
49 -
 50
50 -
 51
51 -
 52
52 -
 53
53 -
 54
54 -
 55
55 -
 56
56 -
57
-
58
-
59
-
60
-
61
-
62
-
63
-
64
-
65
-
66
-
67
-
68
-
69
-
70
-
71
-
72
-
73
-
74
-
75
-
76
-
77
-
78
-
79
-
80
-
81
-
82
-
83
-
84
-
85
-
86
-
87
-
88
-
89
-
90
-
91
-
92
-
93
-
94
-
95
-
96
-
97
-
98
-
99
-
100
-
101
-
102
-
103
-
104
-
105
-
106
-
107
-
108
-
109
-
110
-
111
-
112
-
113
 |
 |