Toshiba PSLV6U-00J001 User Manual - Page 84
Register, Management, Registration, Registration successful. Now we'll do the verification test.
 |
View all Toshiba PSLV6U-00J001 manuals
Add to My Manuals
Save this manual to your list of manuals |
Page 84 highlights
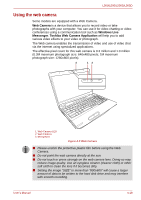
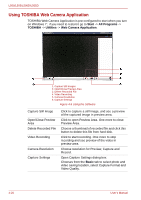
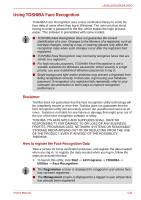
L500/L505/L500D/L505D 2. Click the Register button in the Management screen. The Registration screen is displayed. ■ If you wish to practice, click on the Next button in the Registration screen. ■ If you do not wish to practice, click on the Skip button in the Registration screen. 3. Click the Next button to start the guide. 4. First, take a picture while moving your neck slightly to the left and right. 5. Now take a picture while moving your neck down and up. Or click the Back button to practice the guide once more. 6. Click the Next button to start image-capturing process. Adjust the position of your face so that it fits within the face-shaped frame. 7. Once your face has been positioned properly, the recording will commence. Start moving your neck very slightly to the left and right, and then move your neck down and up. 8. Registration will end after you have repeatedly moved your neck left, right, down and up. When the register succeeds, below message will be displayed on the screen: "Registration successful. Now we'll do the verification test. Click the Next button." Click the Next button to perform the verification test. 9. Perform the verification test. Face the screen as you do when you register. ■ If verification fails, click the Back button and re-register. Please refer to step 8 from step 6. 10. If verification is successful, click the Next button and register an account. 11. Register the account. Fill in the account registration fields. Fill in the all fields. When you have finished it, click Next button. 12. The Management screen is displayed. The registered account name will be displayed. Clicking on it will cause the captured image of your face to be displayed on the left. 4-22 User's Manual
-
 1
1 -
2
-
3
-
4
-
5
-
6
-
7
-
8
-
9
-
10
-
11
-
12
-
13
-
14
-
15
-
16
-
17
-
18
-
19
-
20
-
21
-
22
-
23
-
24
-
25
-
26
-
27
-
28
-
29
-
30
-
31
-
32
-
33
-
34
-
35
-
36
-
37
-
38
-
39
-
40
-
41
-
42
-
43
-
44
-
45
-
46
-
47
-
48
-
49
-
50
-
51
-
52
-
53
-
54
-
55
-
56
-
57
-
58
-
59
-
60
-
61
-
62
-
63
-
64
-
65
-
66
-
67
-
68
-
69
-
70
-
71
-
72
-
73
-
74
-
75
-
76
-
77
-
78
-
 79
79 -
 80
80 -
 81
81 -
 82
82 -
 83
83 -
 84
84 -
 85
85 -
 86
86 -
 87
87 -
 88
88 -
 89
89 -
90
-
91
-
92
-
93
-
94
-
95
-
96
-
97
-
98
-
99
-
100
-
101
-
102
-
103
-
104
-
105
-
106
-
107
-
108
-
109
-
110
-
111
-
112
-
113
-
114
-
115
-
116
-
117
-
118
-
119
-
120
-
121
-
122
-
123
-
124
-
125
-
126
-
127
-
128
-
129
-
130
-
131
-
132
-
133
-
134
-
135
-
136
-
137
-
138
-
139
-
140
-
141
-
142
-
143
-
144
-
145
-
146
-
147
-
148
-
149
-
150
-
151
-
152
-
153
-
154
-
155
-
156
-
157
-
158
-
159
-
160
-
161
-
162
-
163
-
164
-
165
-
166
-
167
-
168
-
169
-
170
-
171
-
172
-
173
-
174
-
175
-
176
-
177
-
178
-
179
-
180
-
181
-
182
-
183
-
184
-
185
-
186
-
187
-
188
-
189
-
190
-
191
-
192
 |
 |