Toshiba Satellite A135-S4407 User Guide 3 - Page 156
Password Bank, User Settings-Opens the User Settings dialog containing
 |
View all Toshiba Satellite A135-S4407 manuals
Add to My Manuals
Save this manual to your list of manuals |
Page 156 highlights
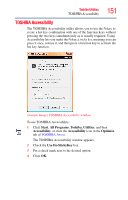
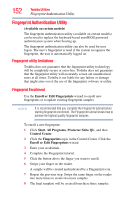
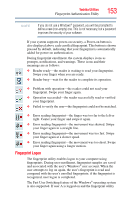
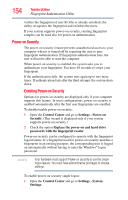
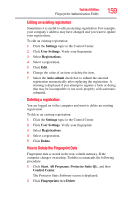
156 Toshiba Utilities Fingerprint Authentication Utility Settings ❖ System Settings-Opens the Settings dialog containing various options for setting up the product. Most of these settings can be modified only by administrators and affect all users. ❖ User Settings-Opens the User Settings dialog containing user-specific options for setting up the product. ❖ Power-on Security-The memory of the fingerprint device is limited (typical capacity is 21 fingerprints). You can decide which fingerprints are present in the device memory and can be used for verification on computer startup, or create new fingerprints to be used only for power-on authentication. ❖ Fingerprint Storage Inspector-Opens the Fingerprint Storage Inspector dialog where you can see the contents of your fingerprint storage. Help ❖ Introduction-Displays the Introduction dialog with basic information about product features. ❖ Tutorial-Runs the fingerprint tutorial which shows you how to enroll your fingerprints. This tutorial is highly recommended for first-time users of this technology. The quality of enrolled fingerprints is extremely important for your satisfaction with the product. ❖ Help icon-Displays this help. The help files in other languages (depending on your installation) are located in the mui subfolder of your installation folder. ❖ About icon-Displays version information. Password Bank The Password Bank stores registration and logon information for Web sites and dialogs, helping to automate the task of entering this information. You enter the required information only once, during Web page or dialog registration. When the window is displayed again, all the data is entered automatically when you scan your fingerprint on the reader. Registered Web pages can also be accessed directly from the Biomenu.
-
 1
1 -
2
-
3
-
4
-
5
-
6
-
7
-
8
-
9
-
10
-
11
-
12
-
13
-
14
-
15
-
16
-
17
-
18
-
19
-
20
-
21
-
22
-
23
-
24
-
25
-
26
-
27
-
28
-
29
-
30
-
31
-
32
-
33
-
34
-
35
-
36
-
37
-
38
-
39
-
40
-
41
-
42
-
43
-
44
-
45
-
46
-
47
-
48
-
49
-
50
-
51
-
52
-
53
-
54
-
55
-
56
-
57
-
58
-
59
-
60
-
61
-
62
-
63
-
64
-
65
-
66
-
67
-
68
-
69
-
70
-
71
-
72
-
73
-
74
-
75
-
76
-
77
-
78
-
79
-
80
-
81
-
82
-
83
-
84
-
85
-
86
-
87
-
88
-
89
-
90
-
91
-
92
-
93
-
94
-
95
-
96
-
97
-
98
-
99
-
100
-
101
-
102
-
103
-
104
-
105
-
106
-
107
-
108
-
109
-
110
-
111
-
112
-
113
-
114
-
115
-
116
-
117
-
118
-
119
-
120
-
121
-
122
-
123
-
124
-
125
-
126
-
127
-
128
-
129
-
130
-
131
-
132
-
133
-
134
-
135
-
136
-
137
-
138
-
139
-
140
-
141
-
142
-
143
-
144
-
145
-
146
-
147
-
148
-
149
-
150
-
 151
151 -
 152
152 -
 153
153 -
 154
154 -
 155
155 -
 156
156 -
 157
157 -
 158
158 -
 159
159 -
 160
160 -
 161
161 -
162
-
163
-
164
-
165
-
166
-
167
-
168
-
169
-
170
-
171
-
172
-
173
-
174
-
175
-
176
-
177
-
178
-
179
-
180
-
181
-
182
-
183
-
184
-
185
-
186
-
187
-
188
-
189
-
190
-
191
-
192
-
193
-
194
-
195
-
196
-
197
-
198
-
199
-
200
-
201
-
202
-
203
-
204
-
205
-
206
-
207
-
208
-
209
-
210
-
211
-
212
-
213
-
214
-
215
-
216
-
217
-
218
-
219
-
220
-
221
-
222
-
223
-
224
-
225
-
226
-
227
-
228
-
229
-
230
-
231
-
232
-
233
-
234
 |
 |