Toshiba Satellite A135-S4407 User Guide 3 - Page 192
Favorites bookmarks for Internet Explorer, Backup and Restore Center
 |
View all Toshiba Satellite A135-S4407 manuals
Add to My Manuals
Save this manual to your list of manuals |
Page 192 highlights
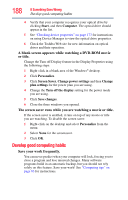
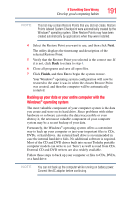
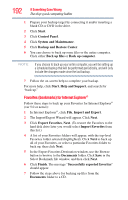
192 If Something Goes Wrong Develop good computing habits 1 Prepare your backup target by connecting it and/or inserting a blank CD or DVD in the drive. 2 Click Start. 3 Click Control Panel. 4 Click System and Maintenance. 5 Click Backup and Restore Center. 6 You can choose to back up some files or the entire computer. Click either Back up files or Back up computer. NOTE If you choose to back up your entire computer, you will be setting up a scheduled backup that will be performed periodically, and will only include the changes made since the last backup. 7 Follow the on-screen help to complete your backup. For more help, click Start, Help and Support, and search for "back up." Favorites (bookmarks) for Internet Explorer® Follow these steps to back up your Favorites for Internet Explorer® (ver 5.0 or newer): 1 In Internet Explorer®, click File, Import and Export. 2 The Import/Export Wizard will appear. Click Next. 3 Click Export Favorites, Next. (To restore the Favorites to the hard disk drive later you would select Import Favorites from this list.) 4 A list of your Favorites folders will appear, with the top-level Favorites folder selected (highlighted). Click Next to back up all of your Favorites, or select a particular Favorites folder to back up, then click Next. 5 In the Export Favorites Destination window, use the Browse button to browse to the Documents folder. Click Save in the Select Bookmark file window, and then click Next. 6 Click Finish. The message "Successfully exported favorites" should appear. 7 Follow the steps above for backing up files from the Documents folder to a CD.
-
 1
1 -
2
-
3
-
4
-
5
-
6
-
7
-
8
-
9
-
10
-
11
-
12
-
13
-
14
-
15
-
16
-
17
-
18
-
19
-
20
-
21
-
22
-
23
-
24
-
25
-
26
-
27
-
28
-
29
-
30
-
31
-
32
-
33
-
34
-
35
-
36
-
37
-
38
-
39
-
40
-
41
-
42
-
43
-
44
-
45
-
46
-
47
-
48
-
49
-
50
-
51
-
52
-
53
-
54
-
55
-
56
-
57
-
58
-
59
-
60
-
61
-
62
-
63
-
64
-
65
-
66
-
67
-
68
-
69
-
70
-
71
-
72
-
73
-
74
-
75
-
76
-
77
-
78
-
79
-
80
-
81
-
82
-
83
-
84
-
85
-
86
-
87
-
88
-
89
-
90
-
91
-
92
-
93
-
94
-
95
-
96
-
97
-
98
-
99
-
100
-
101
-
102
-
103
-
104
-
105
-
106
-
107
-
108
-
109
-
110
-
111
-
112
-
113
-
114
-
115
-
116
-
117
-
118
-
119
-
120
-
121
-
122
-
123
-
124
-
125
-
126
-
127
-
128
-
129
-
130
-
131
-
132
-
133
-
134
-
135
-
136
-
137
-
138
-
139
-
140
-
141
-
142
-
143
-
144
-
145
-
146
-
147
-
148
-
149
-
150
-
151
-
152
-
153
-
154
-
155
-
156
-
157
-
158
-
159
-
160
-
161
-
162
-
163
-
164
-
165
-
166
-
167
-
168
-
169
-
170
-
171
-
172
-
173
-
174
-
175
-
176
-
177
-
178
-
179
-
180
-
181
-
182
-
183
-
184
-
185
-
186
-
 187
187 -
 188
188 -
 189
189 -
 190
190 -
 191
191 -
 192
192 -
 193
193 -
 194
194 -
 195
195 -
 196
196 -
 197
197 -
198
-
199
-
200
-
201
-
202
-
203
-
204
-
205
-
206
-
207
-
208
-
209
-
210
-
211
-
212
-
213
-
214
-
215
-
216
-
217
-
218
-
219
-
220
-
221
-
222
-
223
-
224
-
225
-
226
-
227
-
228
-
229
-
230
-
231
-
232
-
233
-
234
 |
 |