Toshiba Satellite A135-S4407 User Guide 3 - Page 62
Sample Image Toshiba HDD Recovery Utility screen, Creating Recovery CDs/DVDs
 |
View all Toshiba Satellite A135-S4407 manuals
Add to My Manuals
Save this manual to your list of manuals |
Page 62 highlights
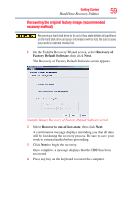
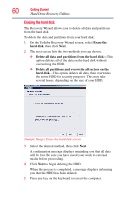
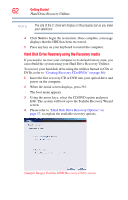
62 Getting Started Hard Drive Recovery Utilities NOTE The size of the C: drive will display on the progress bar as you make your selections. 4 Click Next to begin the restoration. Once complete, a message displays that the HDD has been recovered. 5 Press any key on your keyboard to restart the computer. Hard Disk Drive Recovery using the Recovery media If you need to recover your computer to its default factory state, you can rebuild the system using your Hard Drive Recovery Utilities. To recover your hard disk drive using the utilities burned to CDs or DVDs (refer to "Creating Recovery CDs/DVDs" on page 56): 1 Insert the first recovery CD or DVD into your optical drive and power on the computer. 2 When the initial screen displays, press F12. The boot menu appears. 3 Using the arrow keys, select the CD/DVD option and press Enter. The system will boot up to the Toshiba Recovery Wizard screen. 4 Please refer to "Hard Disk Drive Recovery Options" on page 57, to explain the available recovery options. (Sample Image) Toshiba HDD Recovery Utility screen
-
 1
1 -
2
-
3
-
4
-
5
-
6
-
7
-
8
-
9
-
10
-
11
-
12
-
13
-
14
-
15
-
16
-
17
-
18
-
19
-
20
-
21
-
22
-
23
-
24
-
25
-
26
-
27
-
28
-
29
-
30
-
31
-
32
-
33
-
34
-
35
-
36
-
37
-
38
-
39
-
40
-
41
-
42
-
43
-
44
-
45
-
46
-
47
-
48
-
49
-
50
-
51
-
52
-
53
-
54
-
55
-
56
-
 57
57 -
 58
58 -
 59
59 -
 60
60 -
 61
61 -
 62
62 -
 63
63 -
 64
64 -
 65
65 -
 66
66 -
 67
67 -
68
-
69
-
70
-
71
-
72
-
73
-
74
-
75
-
76
-
77
-
78
-
79
-
80
-
81
-
82
-
83
-
84
-
85
-
86
-
87
-
88
-
89
-
90
-
91
-
92
-
93
-
94
-
95
-
96
-
97
-
98
-
99
-
100
-
101
-
102
-
103
-
104
-
105
-
106
-
107
-
108
-
109
-
110
-
111
-
112
-
113
-
114
-
115
-
116
-
117
-
118
-
119
-
120
-
121
-
122
-
123
-
124
-
125
-
126
-
127
-
128
-
129
-
130
-
131
-
132
-
133
-
134
-
135
-
136
-
137
-
138
-
139
-
140
-
141
-
142
-
143
-
144
-
145
-
146
-
147
-
148
-
149
-
150
-
151
-
152
-
153
-
154
-
155
-
156
-
157
-
158
-
159
-
160
-
161
-
162
-
163
-
164
-
165
-
166
-
167
-
168
-
169
-
170
-
171
-
172
-
173
-
174
-
175
-
176
-
177
-
178
-
179
-
180
-
181
-
182
-
183
-
184
-
185
-
186
-
187
-
188
-
189
-
190
-
191
-
192
-
193
-
194
-
195
-
196
-
197
-
198
-
199
-
200
-
201
-
202
-
203
-
204
-
205
-
206
-
207
-
208
-
209
-
210
-
211
-
212
-
213
-
214
-
215
-
216
-
217
-
218
-
219
-
220
-
221
-
222
-
223
-
224
-
225
-
226
-
227
-
228
-
229
-
230
-
231
-
232
-
233
-
234
 |
 |