Toshiba Satellite A135-S4407 User Guide 3 - Page 67
Using external display devices, Connecting an external monitor or projector - video
 |
View all Toshiba Satellite A135-S4407 manuals
Add to My Manuals
Save this manual to your list of manuals |
Page 67 highlights
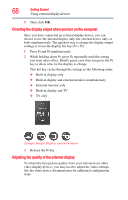
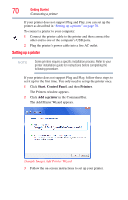
Getting Started Using external display devices 67 unassigned by default. In order to use one of these buttons, you must first configure that button so that it is associated with a function. To configure a virtual button: 1 Perform steps 1-5 in "Enabling Dual Mode" on page 66. 2 Select the virtual button you wish to configure. 3 Select the desired options, and then click OK. 4 Click OK. 5 Click OK to close the Mouse Properties window. Using external display devices Your computer comes with a built-in display panel, but you can also connect an external display device to an available video port, as follows: ❖ An external monitor or projector via the RGB (monitor) port ❖ A TV, VCR, or DVD recorder via the S-video (TV-out) port Before connecting an external monitor or video projector, configure your computer for the type of device you are connecting. To do this, refer to the documentation for your operating system and devices. NOTE Coaxial cable connection to this computer must only be used if the cable outer conductive shielding has been grounded by the cable installer at the building premises as close to the point of cable entrance, or attachment, as practicable and the connection complies with all local cable installation requirements that are applicable in your area. Connecting an external monitor or projector You can easily attach an external monitor or projector to your computer if you need a larger screen. To do this: 1 Connect the monitor's video cable to the RGB (monitor) port on the left side of the computer. 2 Connect the device's power cable to a live electrical outlet. 3 Turn on the external device. Your computer will automatically detect the external display device and activate a screen with display options. 4 Select the settings you desire and click Apply.
-
 1
1 -
2
-
3
-
4
-
5
-
6
-
7
-
8
-
9
-
10
-
11
-
12
-
13
-
14
-
15
-
16
-
17
-
18
-
19
-
20
-
21
-
22
-
23
-
24
-
25
-
26
-
27
-
28
-
29
-
30
-
31
-
32
-
33
-
34
-
35
-
36
-
37
-
38
-
39
-
40
-
41
-
42
-
43
-
44
-
45
-
46
-
47
-
48
-
49
-
50
-
51
-
52
-
53
-
54
-
55
-
56
-
57
-
58
-
59
-
60
-
61
-
 62
62 -
 63
63 -
 64
64 -
 65
65 -
 66
66 -
 67
67 -
 68
68 -
 69
69 -
 70
70 -
 71
71 -
 72
72 -
73
-
74
-
75
-
76
-
77
-
78
-
79
-
80
-
81
-
82
-
83
-
84
-
85
-
86
-
87
-
88
-
89
-
90
-
91
-
92
-
93
-
94
-
95
-
96
-
97
-
98
-
99
-
100
-
101
-
102
-
103
-
104
-
105
-
106
-
107
-
108
-
109
-
110
-
111
-
112
-
113
-
114
-
115
-
116
-
117
-
118
-
119
-
120
-
121
-
122
-
123
-
124
-
125
-
126
-
127
-
128
-
129
-
130
-
131
-
132
-
133
-
134
-
135
-
136
-
137
-
138
-
139
-
140
-
141
-
142
-
143
-
144
-
145
-
146
-
147
-
148
-
149
-
150
-
151
-
152
-
153
-
154
-
155
-
156
-
157
-
158
-
159
-
160
-
161
-
162
-
163
-
164
-
165
-
166
-
167
-
168
-
169
-
170
-
171
-
172
-
173
-
174
-
175
-
176
-
177
-
178
-
179
-
180
-
181
-
182
-
183
-
184
-
185
-
186
-
187
-
188
-
189
-
190
-
191
-
192
-
193
-
194
-
195
-
196
-
197
-
198
-
199
-
200
-
201
-
202
-
203
-
204
-
205
-
206
-
207
-
208
-
209
-
210
-
211
-
212
-
213
-
214
-
215
-
216
-
217
-
218
-
219
-
220
-
221
-
222
-
223
-
224
-
225
-
226
-
227
-
228
-
229
-
230
-
231
-
232
-
233
-
234
 |
 |