Toshiba Satellite C655-S5512 User Guide - Page 110
Printing your work, Using a file extension
 |
View all Toshiba Satellite C655-S5512 manuals
Add to My Manuals
Save this manual to your list of manuals |
Page 110 highlights
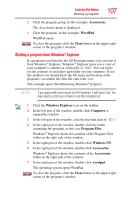
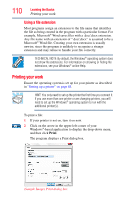
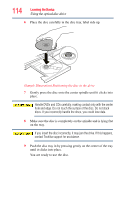
110 Learning the Basics Printing your work Using a file extension Most programs assign an extension to the file name that identifies the file as being created in the program with a particular format. For example, Microsoft® Word saves files with a .doc/.docx extension. Any file name with an extension of ".doc/.docx" is assumed to be a Microsoft® Word file. Creating your own extension is usually unwise, since the program is unlikely to recognize a strange extension and may refuse to handle your file correctly. TECHNICAL NOTE: By default, the Windows® operating system does not show file extensions. For information on showing or hiding file extensions, see your Windows® online Help. Printing your work Ensure the operating system is set up for your printer as described in "Setting up a printer" on page 88. HINT: You only need to set up the printer the first time you connect it. If you use more than one printer or are changing printers, you will need to set up the Windows® operating system to run with the additional printer(s). To print a file: 1 If your printer is not on, turn it on now. 2 Click on the arrow in the upper-left corner of your Windows®-based application to display the drop-down menu, and then click Print. The program displays a Print dialog box. (Sample Image) Print dialog box
-
 1
1 -
2
-
3
-
4
-
5
-
6
-
7
-
8
-
9
-
10
-
11
-
12
-
13
-
14
-
15
-
16
-
17
-
18
-
19
-
20
-
21
-
22
-
23
-
24
-
25
-
26
-
27
-
28
-
29
-
30
-
31
-
32
-
33
-
34
-
35
-
36
-
37
-
38
-
39
-
40
-
41
-
42
-
43
-
44
-
45
-
46
-
47
-
48
-
49
-
50
-
51
-
52
-
53
-
54
-
55
-
56
-
57
-
58
-
59
-
60
-
61
-
62
-
63
-
64
-
65
-
66
-
67
-
68
-
69
-
70
-
71
-
72
-
73
-
74
-
75
-
76
-
77
-
78
-
79
-
80
-
81
-
82
-
83
-
84
-
85
-
86
-
87
-
88
-
89
-
90
-
91
-
92
-
93
-
94
-
95
-
96
-
97
-
98
-
99
-
100
-
101
-
102
-
103
-
104
-
 105
105 -
 106
106 -
 107
107 -
 108
108 -
 109
109 -
 110
110 -
 111
111 -
 112
112 -
 113
113 -
 114
114 -
 115
115 -
116
-
117
-
118
-
119
-
120
-
121
-
122
-
123
-
124
-
125
-
126
-
127
-
128
-
129
-
130
-
131
-
132
-
133
-
134
-
135
-
136
-
137
-
138
-
139
-
140
-
141
-
142
-
143
-
144
-
145
-
146
-
147
-
148
-
149
-
150
-
151
-
152
-
153
-
154
-
155
-
156
-
157
-
158
-
159
-
160
-
161
-
162
-
163
-
164
-
165
-
166
-
167
-
168
-
169
-
170
-
171
-
172
-
173
-
174
-
175
-
176
-
177
-
178
-
179
-
180
-
181
-
182
-
183
-
184
-
185
-
186
-
187
-
188
-
189
-
190
-
191
-
192
-
193
-
194
-
195
-
196
-
197
-
198
-
199
-
200
-
201
-
202
-
203
-
204
-
205
-
206
-
207
-
208
-
209
-
210
-
211
-
212
-
213
-
214
-
215
-
216
-
217
-
218
-
219
-
220
-
221
-
222
-
223
-
224
 |
 |