Toshiba Satellite C855-S5214 User Guide - Page 51
If Start Windows, Help and Support.
 |
View all Toshiba Satellite C855-S5214 manuals
Add to My Manuals
Save this manual to your list of manuals |
Page 51 highlights
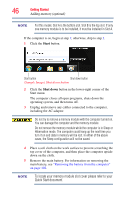
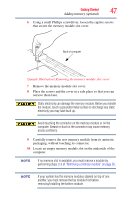
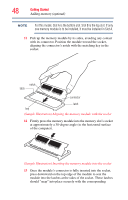
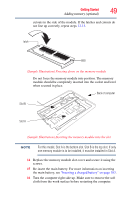
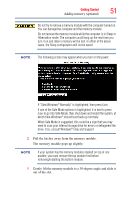
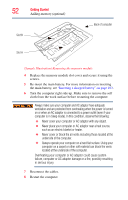
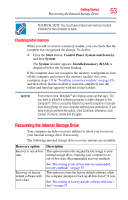
Getting Started 51 Adding memory (optional) Do not try to remove a memory module with the computer turned on. You can damage the computer and the memory module. Do not remove the memory module while the computer is in Sleep or Hibernation mode. The computer could hang up the next time you turn it on and data in memory will be lost. In either of the above cases, the Sleep configuration will not be saved. NOTE The following screen may appear when you turn on the power: If "Start Windows® Normally" is highlighted, then press Enter. If one of the Safe Mode options is highlighted, it is best to press Enter to go into Safe Mode, then shut down and restart the system, at which time Windows® should boot back up normally. When Safe Mode is suggested, this could be a sign that you may need to scan your internal storage drive for errors or defragment the drive. If so, consult Windows® Help and Support. 2 Pull the latches away from the memory module. The memory module pops up slightly. NOTE If your system has the memory modules stacked on top of one another, you must remove the top module first before removing/installing the bottom module. 3 Gently lift the memory module to a 30-degree angle and slide it out of the slot.
-
 1
1 -
2
-
3
-
4
-
5
-
6
-
7
-
8
-
9
-
10
-
11
-
12
-
13
-
14
-
15
-
16
-
17
-
18
-
19
-
20
-
21
-
22
-
23
-
24
-
25
-
26
-
27
-
28
-
29
-
30
-
31
-
32
-
33
-
34
-
35
-
36
-
37
-
38
-
39
-
40
-
41
-
42
-
43
-
44
-
45
-
 46
46 -
 47
47 -
 48
48 -
 49
49 -
 50
50 -
 51
51 -
 52
52 -
 53
53 -
 54
54 -
 55
55 -
 56
56 -
57
-
58
-
59
-
60
-
61
-
62
-
63
-
64
-
65
-
66
-
67
-
68
-
69
-
70
-
71
-
72
-
73
-
74
-
75
-
76
-
77
-
78
-
79
-
80
-
81
-
82
-
83
-
84
-
85
-
86
-
87
-
88
-
89
-
90
-
91
-
92
-
93
-
94
-
95
-
96
-
97
-
98
-
99
-
100
-
101
-
102
-
103
-
104
-
105
-
106
-
107
-
108
-
109
-
110
-
111
-
112
-
113
-
114
-
115
-
116
-
117
-
118
-
119
-
120
-
121
-
122
-
123
-
124
-
125
-
126
-
127
-
128
-
129
-
130
-
131
-
132
-
133
-
134
-
135
-
136
-
137
-
138
-
139
-
140
-
141
-
142
-
143
-
144
-
145
-
146
-
147
-
148
-
149
-
150
-
151
-
152
-
153
-
154
-
155
-
156
-
157
-
158
-
159
-
160
-
161
-
162
-
163
-
164
-
165
-
166
-
167
-
168
-
169
-
170
-
171
-
172
-
173
-
174
-
175
-
176
-
177
-
178
-
179
-
180
-
181
-
182
-
183
-
184
-
185
-
186
-
187
-
188
-
189
-
190
 |
 |
