Uniden BC898T English Owners Manual - Page 46
Type I ID's.
 |
UPC - 050633650370
View all Uniden BC898T manuals
Add to My Manuals
Save this manual to your list of manuals |
Page 46 highlights
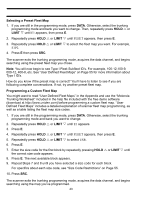
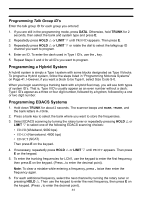
Selecting a Preset Fleet Map 1. If you are still in the programming mode, press DATA. Otherwise, select the trunking programming mode and bank you want to change. Then, repeatedly press HOLD U or LIMIT V until E1 appears, then press E. 2. Repeatedly press HOLD U or LIMIT V until FLEET appears, then press E. 3. Repeatedly press HOLD U or LIMIT V to select the fleet map you want. For example, E1P2. 4. Press E then press SRC. The scanner exits the trunking programming mode, acquires the data channel, and begins searching using the preset fleet map you chose. Note: You will now begin to see Type I Fleet-Subfleet ID's. For example, 100-12,100-9, 000-12, 400-8, etc. See "User Defined Fleet Maps" on Page 55 for more information about Type I ID's. How do you know if the preset map is correct? You'll have to listen to see if you are following complete conversations. If not, try another preset fleet map. Programming a Custom Fleet Map You might want to read "User Defined Fleet Maps" in the Appendix and use the "Motorola Trunking Worksheet" included in the help file included with the free demo software (download at http://www.uniden.com) before programming a custom fleet map. "User Defined Fleet Maps" includes a detailed explanation of scanner fleet map programming, as well as a table listing the fleet map size codes. 1. If you are still in the programming mode, press DATA. Otherwise, select the trunking programming mode and bank you want to change. 2. Repeatedly press HOLD U or LIMIT V until E1 appears. 3. Press E. 4. Repeatedly press HOLD U or LIMIT V until FLEET appears, then press E. 5. Repeatedly press HOLD U or LIMIT V to select USR. 6. Press E. 7. Enter the size code for the first block by repeatedly pressing HOLD U or LIMIT V until the correct size code appears. 8. Press E. The next available block appears. 9. Repeat Steps 7 and 8 until you have selected a size code for each block. For specifics about each size code, see "Size Code Restrictions" on Page 55. 10. Press SRC. The scanner exits the trunking programming mode, acquires the data channel, and begins searching using the map you've programmed. 43
-
 1
1 -
2
-
3
-
4
-
5
-
6
-
7
-
8
-
9
-
10
-
11
-
12
-
13
-
14
-
15
-
16
-
17
-
18
-
19
-
20
-
21
-
22
-
23
-
24
-
25
-
26
-
27
-
28
-
29
-
30
-
31
-
32
-
33
-
34
-
35
-
36
-
37
-
38
-
39
-
40
-
 41
41 -
 42
42 -
 43
43 -
 44
44 -
 45
45 -
 46
46 -
 47
47 -
 48
48 -
 49
49 -
 50
50 -
 51
51 -
52
-
53
-
54
-
55
-
56
-
57
-
58
-
59
-
60
-
61
-
62
-
63
-
64
 |
 |