Uniden G755 User Guide
Uniden G755 Manual
 |
View all Uniden G755 manuals
Add to My Manuals
Save this manual to your list of manuals |
Uniden G755 manual content summary:
- Uniden G755 | User Guide - Page 1
Video Surveillance System G455/G755 User's Guide 1 - Uniden G755 | User Guide - Page 2
. Our customer care specialists are available to serve you. Quickly find answers to your questions by: 1. Reading your owner's manual, included with this product. 2. Visiting our customer support website at www.uniden.com. 3. Calling our customer care specialists at 1-817-858-2900 or 1-800-658-8068. - Uniden G755 | User Guide - Page 3
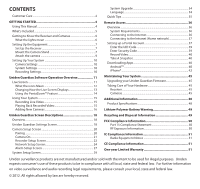
39 Enter Security Code 39 Record Video 40 Take A Snapshot 40 Downloading Apps 40 AndroidTM 40 iPhone®...42 Maintaining Your System 45 Upgrading your Uniden Guardian Firmware 45 Taking Care of Your Hardware 45 Receiver 45 Cameras 45 Additional Information 48 Product Specifications 48 - Uniden G755 | User Guide - Page 4
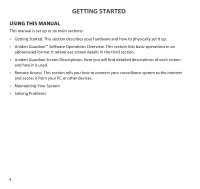
lists basic operations in an abbreviated format. It references screen details in the third section. •• Uniden Guardian Screen Descriptions. Here you will find detailed descriptions of each screen and how it is used. •• Remote Access. This section tells you how to connect your surveillance system to - Uniden G755 | User Guide - Page 5
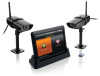
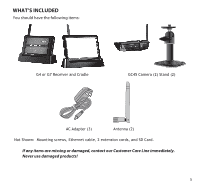
's Included You should have the following items: G4 or G7 Receiver and Cradle GC45 Camera (2) Stand (2) AC Adapter (3) Antenna (2) Not Shown: Mounting screws, Ethernet cable, 2 extension cords, and SD Card. If any items are missing or damaged, contact our Customer Care Line immediately. Never - Uniden G755 | User Guide - Page 6
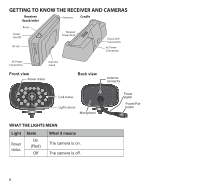
Getting to Know the Receiver and Cameras Receiver (back/side) Antenna Cradle Reset Power On/O SD slot Receiver Power Dock Data Cable Connection AC Power Connection AC Power Connection Pull-Out Stand Front view Power status Back view Antenna connector Link status Light sensor Microphone - Uniden G755 | User Guide - Page 7
indoor) power outlet. 3. Press and hold the Power button on the top of the receiver for 3 - 4 seconds to power it up. 4. The receiver displays the Uniden remains dark until the cameras are powered up. Mount the Camera Stand General Guidelines The Uniden Guardian GC45 cameras included with your - Uniden G755 | User Guide - Page 8
light from the infrared LED and might lower video quality. Periodically clean the lens glass with a soft cloth. Placement Considerations Consider the following when placing cameras: •• The clearest line-of-sight between the camera and monitor is best. -- Walls, especially brick and concrete, shorten - Uniden G755 | User Guide - Page 9
of an AC adapter to the camera's power pigtail and plug the other end into a 120 volt AC (standard indoor) power outlet. (If necessary, connect the extension cord to the camera's pigtail and connect the AC adapter to the extension cord.) Be sure the power plug and the connector are tightly twisted - Uniden G755 | User Guide - Page 10
Motion Detection ("Uniden Guardian Settings Screen" on page 18) •• Schedule Recordings ("Schedule Record" on page 23) System Settings •• Power Saving ("Power Saving" on page 29) •• Screen Auto Lock ("Screen Auto Lock" on page 30) •• Time ("Time" on page 31) •• Security code ("Security Code" on page - Uniden G755 | User Guide - Page 11
in Live screen mode. The operation of the G4 or G7 monitor is identical. The only difference between the two systems is the physical size of the monitor/receiver and how you extend the antenna. Live Screen SD card status Battery status Record status Camera number/ Signal strength Pop up menus - Uniden G755 | User Guide - Page 12
Uniden Guardian System Settings Access the Uniden Guardian Software Operation screens or view recorded events. SD Capacity Indicates memory capacity remaining. Battery Capacity Displays battery capacity. This graphic shows battery at nearly full. Camera Number Record Status Displays the camera - Uniden G755 | User Guide - Page 13
does Connects your system to the Internet. Motion System indicates motion detection recording in progress. Scheduled System indicates scheduled recording in progress. Pop up Menu Tab Opens and closes the pop up menu display. NO SD CARD INDICATOR Displays red when the SD card is not present - Uniden G755 | User Guide - Page 14
to return to Quad View. Using the PentaZoom™ Feature While in any camera's full screen view, selecting the + icon on the right side of the screen enables the PentaZoom feature. PentaZoom lets you select from 5 sections of the video image. Tap on a section and it will digitally zoom to full screen - Uniden G755 | User Guide - Page 15
Your System Recording Live Video 1. On the Live screen, tap for the camera to begin recording. 2. Tap it again to stop recording. You can record from all cameras at the same time. Playing Back Recorded Video From the pop-up menus, tap the following icons as they appear on the screens: The Record - Uniden G755 | User Guide - Page 16
for a 60 second countdown. 2. During the 60 second countdown, quickly press and release the Pairing button on that camera's power cord (see "Pairing" on page 20). 3. The system automatically adjusts the Camera On screen accordingly. 4. If you have any trouble, consult the the table on page 17. 16 - Uniden G755 | User Guide - Page 17
following table for camera pairing troubleshooting suggestions: If... Try... the camera's signal status icon shows no bars • making sure the camera is plugged in and the red LED is on. • making sure that the camera's antenna is attached and the receiver's antenna is extended. • making sure the - Uniden G755 | User Guide - Page 18
new cameras to the receiver. Makes the cameras visible to the monitor. Brightens or darkens the video of that camera. Records when something moves in front of the camera. Continues recording for 2 minutes. Motion detection is on by default. Set up a schedule for pre-determined recording times and - Uniden G755 | User Guide - Page 19
the system is idle for 2 minutes to conserve power. Locks the screen from further activity until the screen is unlocked. • Clock Alarm. Set an alarm. • Time Setting. Set the current time. • Timer. Time countdown. Formats/erases all the data on the SD card. Upgrades the receiver firmware. Changes - Uniden G755 | User Guide - Page 20
second countdown. 2. Press and release the Pairing button on that camera's power cord. The 60 second countdown will end when the pairing process is complete. 3. The system will automatically adjust the Camera On screen. Use this procedure to move a camera from one channel to a different channel. 20 - Uniden G755 | User Guide - Page 21
Tap the camera you want to turn on. 2. A check mark replaces the X under the camera. 3. To turn a camera off, tap the camera icon. An X replaces the checkmark and indicates the camera is turned off. Although the camera is turned off, it is still powered. The receiver will not receive video signals - Uniden G755 | User Guide - Page 22
as they appear on the screens: This screen should display: Tap the camera whose brightness level you want to change. The default brightness is 0, and the range is from -2 through 2. Recorder Setup Screen Use the Recorder Setup screen to select between Motion Detection and Schedule - Uniden G755 | User Guide - Page 23
default setting is to Low. The system records for 2 minutes when motion is detected. Schedule Record You can schedule up to 5 recording sessions. You are limited to the size of the SD card for how long a total recording time you have. These recording sessions must begin and end within a single - Uniden G755 | User Guide - Page 24
. 3. Tap CLEAR. The screen resets to the default values for that recording slot. Network Setup Screen The Network Setup screen allows you to select your internet connection type and security code. You can also display system default configuration. From the pop-up menu, tap the following icons This - Uniden G755 | User Guide - Page 25
an IP address to your Uniden Guardian system. Static IP is for those that have the ability to specify an IP address for the Uniden Guardian system. Security Code Set up your security code to limit who can have access to the system from a remote location. 1. Tap Security Code icon to display the - Uniden G755 | User Guide - Page 26
to the left of the space bar. Tap Return. The Security Code screen displays again. You must enter a security code to monitor your video from a PC or other device. 5. Tap OK on the system reboot prompt. The Network Setup screen displays. 6. Turn your Uniden Guardian monitor off then back on for the - Uniden G755 | User Guide - Page 27
specific to your monitor and is required (along with the security code) to gain remote access to your cameras over the internet. The information in the DHCP setting is assigned to your monitor from your home router. Alarm Setup Screen From the Alarm Setup screen, you can: •• Set the length of time - Uniden G755 | User Guide - Page 28
Period Screen This selection allows you to select the length of time the alarm will sound for the alarm clock. 1. Tap Period. The Change Siren Duration screen displays. 2. Tap the duration you want the siren to last (2, - Uniden G755 | User Guide - Page 29
the melody you tap and the receiver briefly plays a sample of the selected melody. 3. Tap the BACK arrow to return to the previous screen. System Setup Screen Power Saving When you turn on Power Saving mode, the monitor goes into sleep mode (LCD turns off) after it is idle for 2 minutes. Press the - Uniden G755 | User Guide - Page 30
Screen Auto Lock When you turn on Auto Lock mode, the monitor will automatically enter screen lock mode after it has been idle power button once to unlock the screen and return to normal touch screen operation. At any time from the Live screen, you can manually lock the system by tapping the power - Uniden G755 | User Guide - Page 31
the system time, and set a timer. From the pop-up menu, tap the The following screen displays: following icons as they appear on the screens: Clock Alarm This feature operates as an independent alarm clock. It does not affect the operation of live video or recording video. 1. Tap - Uniden G755 | User Guide - Page 32
PM to toggle between the two. 6. Tap SAVE when you are finished. Time Setting This screen contains fields to set the Month, Day, Year, Hour, Minute, and AM/PM. finished. It is important to set the correct time to ensure that the recorded video files and the scheduled record times are correct. 32 - Uniden G755 | User Guide - Page 33
that you format the card using these procedures. Formatting any SD card deletes all files on that card. From the pop-up menu, tap the following icons as they appear on the screens: The Format Storage screen displays: The Uniden Guardian System supports up to a 32 GB SD Card. 33 - Uniden G755 | User Guide - Page 34
upgrade the Uniden Guardian firmware, you will need to download the file from the Uniden Video portal site (www.unidenvideo.com) or from the Uniden website (www.uniden.com) to your computer. This file must then be transferred to the root directory of the SD card used in your Uniden Guardian system - Uniden G755 | User Guide - Page 35
not want to reset the language, tap CANCEL and return to the previous screen. Changing the language will reboot the system and ask you to recalibrate the touch screen. Follow the instructions on the screen. Quick Tips The Quick Tips screen provides more detail into 10 common areas. Tap on a subject - Uniden G755 | User Guide - Page 36
your router, port forwarding or a remote DDNS service. You must set up a free portal account to remotely view your system. Multiple users can access live video at the same time as long as they have the User ID (UID) code and security code. The number of remote viewers is determined by the amount of - Uniden G755 | User Guide - Page 37
will still be displayed on the monitor as well as on the smart phone. Setting up a Portal Account You need a Uniden portal account to gain remote access to your Uniden Guardian system live video. Be sure you have set up your security code. By default, the security code is 123456. We highly recommend - Uniden G755 | User Guide - Page 38
information on firmware updates and news. We recommend you check this box to receive updates. 9. Click in the check box (6) to receive information on special offers from Uniden. 10. Click Submit (7). The New Account Created screen displays. 11. Click Continue. The Video System Registration screen - Uniden G755 | User Guide - Page 39
Enter The Uid Code After selecting your Uniden Guardian system, you must enter the User ID (UID) code. This UID code can be found on the back of your handheld monitor behind the kickstand. It is the characters underneath the barcode. You also can find the UID code on the Network Information screen. - Uniden G755 | User Guide - Page 40
the location where you want to save them. Downloading Apps AndroidTM You can use a Google® AndroidTM smart phone or tablet with your Uniden Guardian System to remotely connect to and view live camera video. Follow these steps to download, add, and use the app. 1. From your AndroidTM smart phone or - Uniden G755 | User Guide - Page 41
code that you set on your Uniden Guardian monitor in the Security Code field. 7. Select Save. 8. Select the system you wish to view. View Video 1. Select a camera. 2. Tap Start to view video. 3. View video. 4. Tap Stop to stop the video. You can tap the video window while viewing to enlarge it - Uniden G755 | User Guide - Page 42
tablet. iPhone® In a similar fashion to the Android smart phone, you can use the Apple® iPhone® smart phone or iPad® tablet with your Uniden Guardian System to remotely connect to and view camera videos. Follow these steps to download the Uniden Guardian iPhone® App and set it up to work with your - Uniden G755 | User Guide - Page 43
system in the System Name field. 5. Enter the same UID code from your Uniden Guardian monitor in the Device UID field. 6. Enter the same security code that you set on your Uniden Guardian monitor in the Security Code field. 7. Tap Save. When you tap Save, the video streams automatically with Camera - Uniden G755 | User Guide - Page 44
You can tap to enlarge a video while viewing it and go to horizontal view. Select Snapshot to take a still camera picture of your video and store it on your iPhone® or iPad® You can select another camera to view from the menu. 44 - Uniden G755 | User Guide - Page 45
level. Compare it to your system firmware level. If you need to update your Uniden Guardian firmware, download the most current firmware version to your system's SD card and then upload that firmware to the receiver. 1. Eject the SD card from the receiver. 2. Insert the SD card into your PC. 3. Go - Uniden G755 | User Guide - Page 46
files play with a Quicktime® player. Download this free player from www.apple.com. • Video will play in players such as Windows Media® Player if an H.264 CODEC plug-in is installed. • Ensure that the system time is set to the current time. • Make sure that the SD card is inserted into the receiver - Uniden G755 | User Guide - Page 47
't pair with the receiver When I power up my receiver and cameras for the first time, they seem to be on but there is no picture on the screen I have my regular Live screen but there are no icons. Try.. • making sure the camera is plugged in and the red LED is on. • pressing and - Uniden G755 | User Guide - Page 48
Auto System Specifications Camera Receiver Weight 13 oz (370 g) G455: 7 oz (198 g) G755: 1lb 1 oz (468 g) Dimension 5.94 x 2.9 x 1.9" (151 5 x 3 x 0.9" (132 x 79 7.2 x 5 x 1.1" (184 x 128 x 74 x 49 mm) x 24 mm) x 28 mm) Operating temperature +14° F (-10° C) to 122° F (+50° C) Battery - Uniden G755 | User Guide - Page 49
System Specifications Camera Receiver Input voltage 100-240 V AC @ 60 or 50 Hz Operating voltage 5 V DC @ 1 Amp Power consumption H:55 V:44 Lithium-Polymer Battery Warning •• This equipment contains a rechargeable lithium-polymer battery. •• Do not charge the battery in temperatures below 32° - Uniden G755 | User Guide - Page 50
Uniden for recycling. FCC Compliance Information Part 15 Compliance Statement This device complies with Part 15 of the FCC Rules. Operation accordance with the instructions, may cause equipment off and on, the user is encouraged to try to /television technician for additional suggestions. CAUTION! - Uniden G755 | User Guide - Page 51
or parts or as part of any system not manufactured by Uniden, or (F) installed or programmed by anyone other than as detailed by the owner's manual for this product. STATEMENT OF REMEDY: In the event that the product does not conform to this warranty at any time while this warranty is in effect - Uniden G755 | User Guide - Page 52
freight prepaid, by traceable means, to warrantor at: Uniden America Service 4700 Amon Carter Blvd. Fort Worth, TX 76155 (800) 808-8058 during regular business hours (CST) (See www.uniden.com for current hours of operation.) © 2012 Uniden America Corporation All rights reserved Printed in China 52
-
 1
1 -
 2
2 -
 3
3 -
 4
4 -
 5
5 -
 6
6 -
 7
7 -
8
-
9
-
10
-
11
-
12
-
13
-
14
-
15
-
16
-
17
-
18
-
19
-
20
-
21
-
22
-
23
-
24
-
25
-
26
-
27
-
28
-
29
-
30
-
31
-
32
-
33
-
34
-
35
-
36
-
37
-
38
-
39
-
40
-
41
-
42
-
43
-
44
-
45
-
46
-
47
-
48
-
49
-
50
-
51
-
52
 |
 |
1
Video Surveillance System
G455/G755 User’s Guide