Uniden UDS655 English Owner's Manual
Uniden UDS655 Manual
 |
View all Uniden UDS655 manuals
Add to My Manuals
Save this manual to your list of manuals |
Uniden UDS655 manual content summary:
- Uniden UDS655 | English Owner's Manual - Page 1
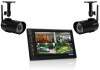
UDS655 Wireless Video Surveillance System - Uniden UDS655 | English Owner's Manual - Page 2
. Our customer care specialists are available to serve you. Quickly find answers to your questions by: 1. Reading your owner's manual, included with this product. 2. Visiting our customer support website at www.uniden.com. 3. Calling our customer care specialists at 1-817-858-2900 or 1-800-658-8068. - Uniden UDS655 | English Owner's Manual - Page 3
System Requirements 37 Install Uniden Remote Service Software 38 Setting up a Portal Account 41 Using Remote Access 44 Record Video Through the Portal 44 Take A Snapshot Through the Portal 45 Play Back Recorded Files on Your PC 45 View Live Video on TV 45 Using your UDS655 14 Downloading - Uniden UDS655 | English Owner's Manual - Page 4
tells you about the UDS655 special features, such as how to connect your surveillance system to the internet and access it from your PC or other wired/ wireless devices. •• Downloading and Using the Apps. Here you will find instructions for downloading the Uniden Gurardian app for Android based - Uniden UDS655 | English Owner's Manual - Page 5
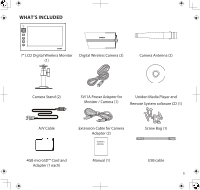
ZOOM ALARM 7" LCD Digital Wireless Monitor Digital Wireless Camera (2) (1) Camera Antenna (2) Camera Stand (2) 5V/1A Power Adaptor for Monitor / Camera (1) Uniden Media Player and Remote System software CD (1) A/V Cable Extension Cable for Camera Adaptor (2) OWNER'S MANUAL 4GB microSD™ Card - Uniden UDS655 | English Owner's Manual - Page 6
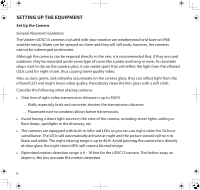
Setting Up the Equipment Set Up the Camera General Placement Guidelines The Uniden UDSC15 cameras included with your monitor are weatherproof and have an IP66 weather rating. Water can be sprayed on them and they will still work; however, the cameras cannot be submerged underwater. Although the - Uniden UDS655 | English Owner's Manual - Page 7
may record unnecessarily. You can mount the camera with the stand on the bottom (on camera, you might want to bring the monitor along; it's much easier to get the camera into the right position when you have the display handy. Mount the Camera camera, tug gently on the stand to make sure it is - Uniden UDS655 | English Owner's Manual - Page 8
camera as needed.Tighten it a few turns, then turn the camera to 2 Tighten the brace against the camera to secure it in place. face the direction you want. 3 2. Tighten the camera brace up against the camera to secure of the camera. 6. Connect one end of an AC adapter to the camera's power - Uniden UDS655 | English Owner's Manual - Page 9
needed. Pairing Accessory Cameras to The Monitor The two cameras that come with your UDS655 are paired to your monitor at the factory. If you add cameras, install them and then pair the camera to the monitor. 1. From the main menu, select Camera Setup and press M. Scroll to the camera number you - Uniden UDS655 | English Owner's Manual - Page 10
8 9 10 11 Your monitor operates in three modes: M, Playback, and Record. The monitor's keys may operate differently based on what mode it is in. Key M (MENU) Playback REC Mode Other 1 Link LED (Green) 2 Power/Charge LED (Red) 3 Channel Switch Cursor Left Change Camera (-) (CH-) 10 - Uniden UDS655 | English Owner's Manual - Page 11
Zoom 11 Alarm 12 Screen icons M (MENU) Cursor Down Cursor Up Cursor Right Playback REC Mode Skip Backward (◄◄) Skip Forward (►►) Change Camera + Select / Enter Esc/Exit/Back Pause/Play (►|| ) Esc/Exit/Back Previous File (|◄) Stop Full Stop () Next File (► |) Other Power Button Icon - Uniden UDS655 | English Owner's Manual - Page 12
Icon Meaning Display Modes Quad Display Scan Display Camera Displayed There are seven audio levels. Monitor Power Indicator YYYY-MM-DD AMhh:mm:ss X1 Date and Time In ZOOM mode - Zoom Level Indicator. X1 - Normal view. X2 - Second level of zoom in (X2 Zoom). 12 - Uniden UDS655 | English Owner's Manual - Page 13
Basic Operation Rules •• The Pairing LED on the camera will blink once to indicate pairing process has begun and then remain solid to indicate pairing success and data transmission is in progress. •• The UDS655 will return to QUAD mode from any screen after the monitor is idle for two minutes - Uniden UDS655 | English Owner's Manual - Page 14
turned on (Camera Setup), then the UDS655 records that camera in full screen (640 x 480). •• Press and hold power for 1 second to turn on the system. •• Press and hold power for 2 seconds to turn off the system. Using your UDS655 To... Change from quad view to single view (or back) Manually start - Uniden UDS655 | English Owner's Manual - Page 15
the memory card in the PC's memory slot or transfer the recorded files from the memory card to the computer. Uniden Media Player must be installed; it is included on the CD. To view on TV: Use the AV cable to connect the monitor to the TV (refer to page 37). See System Setup, page 29. Remove the - Uniden UDS655 | English Owner's Manual - Page 16
Main Menu Screen The UDS655 main menu lets you select from 8 screens to set your system preferences, from camera brightness to setting up and viewing recordings. This section describes the screens in detail. It provides a path to the screen being viewed and operation procedures - Uniden UDS655 | English Owner's Manual - Page 17
MASKING AREA RECORD TIME EVENT LIST EVENT LIST SYSTEM SETUP DATE AND TIME TV PUTPUT What it Does Pairs new cameras to the monitor. Brightens or darkens the video of that camera. Makes the cameras visible to the monitor. Sets up a schedule for pre-determined recording times and lengths. Records - Uniden UDS655 | English Owner's Manual - Page 18
the oldest files to be deleted when you want to record but the memory card is full. Camera Setup Screen From this selection on the main menu - This screen should display: The Setup Detail Options screen has three options: •• Pair a New Device •• Image Brightness •• Activate or Deactivate 18 - Uniden UDS655 | English Owner's Manual - Page 19
the factory to channels 1 and 2. You can add up to 2 more accessory cameras to your system; see our website at www.uniden.com for more information on how to buy accessory cameras for this system. When you add an accessory camera, you have to pair it to the monitor (that is, you have "introduce" the - Uniden UDS655 | English Owner's Manual - Page 20
repeat these steps. If Pairing fails again, move the camera and monitor closer together and repeat. Press Esc to back out and return to the main menu or press VOL+ or VOL- to select another camera to pair. Image Brightness 1. With the Setup Detail Options screen displayed for a camera, press CH+ to - Uniden UDS655 | English Owner's Manual - Page 21
CH+or CH- to activate or deactivate a camera/ Cameras not paired to the system cannot be activated. 3. Press M to accept the new setting and return to the Setup Detail Options screen. Select another camera if needed. Recorder Setup You can only record if the monitor is in LIVE view and an SD card - Uniden UDS655 | English Owner's Manual - Page 22
Detection Sensitivity •• Format Storage •• Setup Masking Area •• Motion Record Time Record Schedule Record Schedule lets you schedule recordings in 1 hour blocks. All active cameras will record; if you only want to record from specific cameras, turn off the other cameras. During LIVE view, audio is - Uniden UDS655 | English Owner's Manual - Page 23
screens. Combine recording modes 1. From the main menu, select Record Setup. The Record Schedule screen displays with the latest camera recording settings. 2. Press M to show the recording options, and then press CH+ and CH- to select MANUAL. A blue bar displays at the top of the first hour block - Uniden UDS655 | English Owner's Manual - Page 24
on, the live video vide will display an active blue box around the object that triggered the motion event. 1. From the Recorder Setup screen, press VOL + and VOL- to select Motion Detection Sensitivity; press M to enter. 2. Press CH+ and CH- to select the camera for - Uniden UDS655 | English Owner's Manual - Page 25
. 2. Press ESC to exit or M to initiate the memory card format process. 3. Format OK displays when complete. Press ESC to back out. Setup Masking Area You can mask off areas in the camera's view where movement in those areas could be normal, but also trigger recording (i. e., bushes and trees). 25 - Uniden UDS655 | English Owner's Manual - Page 26
Setup Masking Area; press M to enter. The Setup Masking Area screen displays: 2. Use CH+ and CH- to select a camera (1 - 4) for setting up the masking area. Press M to enter the camera screen. Mask other cameras as needed. Record Time Use Record Time to set a specific length of time for motion recording. - Uniden UDS655 | English Owner's Manual - Page 27
and VOL- to select Record Time; press M to select. The Setup Detail Options screen displays. 2. Use CH+ and CH- to select either of folders for find a specific recorded file for a specific date and hour on a particular day. This is the default screen when you access the main menu from any other - Uniden UDS655 | English Owner's Manual - Page 28
the recording. Date screen Recorded file details Camera recorded Recorded block screen Start / Stop Recording Time Record File Type - S: Schedule - M: Motion - C: Manual In this example, Camera 1 was in Schedule mode. 3. Press M to begin playback. • By default, video plays back in QUAD mode. The - Uniden UDS655 | English Owner's Manual - Page 29
CH- to select the channel for full screen playblack. A boxed number icon indicates which camera is in full screen playback mode. Delete Recorded Files You can the system is in playback mode. System Setup From this selection on the main menu - This screen should display: System setup has five - Uniden UDS655 | English Owner's Manual - Page 30
Press M to save the settings when you are finished. TV Output 1. From the System Setup screen, use VOL+ and VOL- to select TV OUTPUT; press M. The TV Output America. Power Saving Use this setting to determine how long your system will remain in an idle mode until it moves into power saving mode - Uniden UDS655 | English Owner's Manual - Page 31
to not have a bright LCD when sleeping. If Power Saving mode is on, motion detection events will turn the LCD screen back on. 1. From the System Setup screen, use VOL+ and VOL- to select Power Saving; press M. The Power Saving screen displays. 2. Use CH+ and CH- to choose between 5 min, or 10 - Uniden UDS655 | English Owner's Manual - Page 32
mode, from whatever camera is a previously viewed channel, or from a channel triggered by motion detection. Default The Default screen gives you the options of selecting a default language. Options are English, French (Français) or Spanish (Espanol). 1. From the System Setup screen, use VOL+ and - Uniden UDS655 | English Owner's Manual - Page 33
and back out. The DEFAULT screen will also alert you when it detects a new firmware upgrade on the SD card. Go to page 52 for details. Alarm Buzzer You can set the alarm buzzer to go off when a camera detects motion and begins recording. 1. From the main menu, use CH+, CH-, VOL+, and - Uniden UDS655 | English Owner's Manual - Page 34
into QUAD mode, then press ZOOM and into camera 1.) 3. Press CH+ and CH- to pan the camera from left to right and back or VOL+ and VOL- to tilt the camera up and down. 4. Press ESC to return to the the main menu. The system will exit Zoom mode after it is idle for - Uniden UDS655 | English Owner's Manual - Page 35
enter Scanning mode. 2. The screen scans between the cameras according to the scan time set up in the Multi Channels Idle Display screen (refer to page 31). If a recording session started during SCAN mode (Schedule or Motion recording), the system resumes display in quad mode. Memory Card OverWrite - Uniden UDS655 | English Owner's Manual - Page 36
again to toggle the overwrite setting between ON and OFF. Press M. The system overwrites the oldest files first. The system displays the following SD card detail information. • SD card available storage of micro SD cards to avoid operation errors. The UDS655 supports up to 32GB microSD cards. 36 - Uniden UDS655 | English Owner's Manual - Page 37
Remote System software CD in your kit provides the software you need to install. You will also need to set up a Uniden Portal account. Multiple user accounts on your PC can access live video on their accounts through the Portal account as long as they have the Device ID (DID) code and security code - Uniden UDS655 | English Owner's Manual - Page 38
® or •• AndroidTM smartphone or tablet Install Uniden Remote Service Software 1. Insert the UDS655 Remote Software CD in your PC's CD ROM. 2. Select Uniden Remote Service and double-click to install. 3. The Welcome window appears. Click Next to select an installation folder. 4. The default folder is - Uniden UDS655 | English Owner's Manual - Page 39
If the computer has more than one user account that needs to access the video feed, select Everyone; otherwise, select Just me. 5. The Confirm Installation screen displays. Click Next to begin installing the software. A progress bar displays. 39 - Uniden UDS655 | English Owner's Manual - Page 40
when the software is installed. Click Close to leave the Installation wizard. 7. Turn on the UDS655 monitor and connect it to the PC using the USB cable. 8. A New Hardware Found indicator appears on the lower right-hand side of the PC screen. 9. Click Start to activate OMGuard Remote Service. The - Uniden UDS655 | English Owner's Manual - Page 41
to 8 numeric digits. 11. Click Connect to Internet. Setting up a Portal Account Be sure you have the security code set up through Uniden Remote System software installation. This is required for remote access to your UDS655 system. 1. Go to http://www.unidenvideo.com. 2. Click Add New ACCOUNT. The - Uniden UDS655 | English Owner's Manual - Page 42
information on firmware updates and news. We recommend you check this box to receive updates. 9. Click in the check box (6) to receive information on special offers from Uniden. 10. Click Submit (7). The New Account Created screen displays. 11. Click Continue. The Video System Registration screen - Uniden UDS655 | English Owner's Manual - Page 43
account setup. Enter the security sode you created in Uniden Remote Service software installation (see page 41). 11. Click START. The security code you enter on the Uniden Video Portal and the apps must match the security code you entered during Uniden Remote Service software installation. Anytime - Uniden UDS655 | English Owner's Manual - Page 44
internet and that Uniden Remote Service software is installed. 2. Use the USB cable to connect the monitor and the PC. 3. Launch the Uniden Remote Service software. 4. Enter the security code. 5. Select Connect to Internet. Your system is now connected to the internet and your cameras' video can now - Uniden UDS655 | English Owner's Manual - Page 45
PC Software CD into your PC.. 2. Install Uniden Media Player onto your PC. It will post a shortcut icon to your desktop. 3. Remove SD card from the UDS655. Place it in the adapter and insert adapter into your PC. 4. Launch Uniden Media Player; click LOAD. 5. Navigate to the SD card on your system - Uniden UDS655 | English Owner's Manual - Page 46
2. Use the AV cable (provided) to connect the television to your monitor. 3. The monitor screen goes blank and video displays on your television. 46 - Uniden UDS655 | English Owner's Manual - Page 47
with your Uniden Guardian 2 System to remotely connect to and view live camera video. Follow these steps to download, add, and use the app. 1. From your AndroidTM smart phone or tablet device search the Android Market for Uniden Guardian 2. 2. Download the Uniden Guardian 2 app. This app has a black - Uniden UDS655 | English Owner's Manual - Page 48
the Security Code you entered in the Remote Access software. App Operation When you open the app on your Android phone, the image displayed on the main screen is the last camera image, captured automatically, from your previously established session. Tap to add an additional Guardian system. Tap - Uniden UDS655 | English Owner's Manual - Page 49
Launch the app; select Settings then ADD to add your system information to theapp. 4. Enter a name for your system in the System Name field. 5. Enter the same DID code from your Uniden Guardian monitor in the DID field. 6. Enter the same security code that you set on your Uniden Guardian monitor in - Uniden UDS655 | English Owner's Manual - Page 50
in the DID Code field. You will only have to enter the Security Code you entered in the Remote Access software. App Operation When you open the app on your iPhone or iPad, several icons display on the bottom task bar. Tap to add an additional Guardian system. Tap to enter System Setup page. Tap to - Uniden UDS655 | English Owner's Manual - Page 51
Snapshot icon. Tap to take a picture. Return icon. Tap to return to the Main screen. 51 - Uniden UDS655 | English Owner's Manual - Page 52
Your System Upgrading your Uniden UDS655 Firmware Check your system firmware version by selecting your language again on the DEFAULT screen. Both the cameras and monitor firmware display. Go to www.unidenvideo.com to check the current firmware level. Compare it to your system firmware level - Uniden UDS655 | English Owner's Manual - Page 53
or Deactivate screen on page 21). The camera's signal status icon shows one or two bars or the video quality is poor See General Placement Considerations on page 6 for tips on improving video quality. The camera won't pair with the monitor • Making sure the camera is plugged in and the red LED - Uniden UDS655 | English Owner's Manual - Page 54
no audio on my wireless device The app won't connect. I can't view video on the portal through my remote PC. Try.. If the Power Saving feature has been turned on, the monitor's LCD screen will power off. Tap the power button to turn the LCD back on. • Making sure the UDS655 is turned on. • Making - Uniden UDS655 | English Owner's Manual - Page 55
Specifications Maximum Channels Communication Range Monitor Resolution Camera Resolution Operating Temperature Operating voltage Current consumption Night Vision Dimension Camera Monitor return this product to Uniden for recycling. FCC Compliance for a Class B digital device, pursuant to Part - Uniden UDS655 | English Owner's Manual - Page 56
on, the user is encouraged to try to correct the interference by one or more of the following measures: ►► Reorient or relocate the receiving antenna. ►► Move the equipment away from the monitor. ►► Plug the equipment into an outlet on a circuit different from that to which the monitor is connected - Uniden UDS655 | English Owner's Manual - Page 57
by this warranty, (E) used in any conjunction with equipment or parts or as part of any system not manufactured by Uniden, or (F) installed or programmed by anyone other than as detailed by the owner's manual for this product. STATEMENT OF REMEDY: In the event that the product does not conform to - Uniden UDS655 | English Owner's Manual - Page 58
packaged with the Product. Include evidence of original purchase & a note describing the defect that has caused you to return it. The Product should be shipped freight prepaid, by traceable means, to warrantor at: Uniden America Service 4700 Amon Carter Blvd. Fort Worth, TX 76155 - Uniden UDS655 | English Owner's Manual - Page 59
59 - Uniden UDS655 | English Owner's Manual - Page 60
60
-
 1
1 -
 2
2 -
 3
3 -
 4
4 -
 5
5 -
 6
6 -
 7
7 -
8
-
9
-
10
-
11
-
12
-
13
-
14
-
15
-
16
-
17
-
18
-
19
-
20
-
21
-
22
-
23
-
24
-
25
-
26
-
27
-
28
-
29
-
30
-
31
-
32
-
33
-
34
-
35
-
36
-
37
-
38
-
39
-
40
-
41
-
42
-
43
-
44
-
45
-
46
-
47
-
48
-
49
-
50
-
51
-
52
-
53
-
54
-
55
-
56
-
57
-
58
-
59
-
60
 |
 |

UDS655
Wireless Video Surveillance System