ViewSonic PJ1165 User Guide
ViewSonic PJ1165 - XGA LCD Projector Manual
 |
UPC - 766907037616
View all ViewSonic PJ1165 manuals
Add to My Manuals
Save this manual to your list of manuals |
ViewSonic PJ1165 manual content summary:
- ViewSonic PJ1165 | User Guide - Page 1
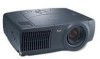
PJ1165 User Guide Guide de l'utilisateur Bedienungsanleitung Guía del usuario Guida dell'utente Användarhandbok Käyttöopas - ViewSonic PJ1165 | User Guide - Page 2
Menu 35 Network Setting Up 36 Lamp 37 Replacing The Lamp 38 Air Filter 39 Caring For The Air Filter 39 Other Care 40 Caring For The Inside Of The Projector .. 40 Caring For The Lens 40 Caring For The Cabinet And Remote Control 40 Troubleshooting 41 Related Messages 41 Regarding The - ViewSonic PJ1165 | User Guide - Page 3
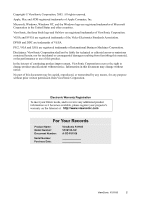
product information as it becomes available, please register your projector's warranty on the Internet at: http://www.viewsonic.com For Your Records Product Name: Model Number: Document Number: Serial Number: Purchase Date: ViewSonic PJ1165 VS10152-1W A-CD-PJ1165 ViewSonic PJ1165 2 - ViewSonic PJ1165 | User Guide - Page 4
Magnification Function Interesting parts of images can be magnified for closer viewing. • Keystone Distortion Correction Quick correction of distorted images electrically. Preparation Please see the "Contents Of Package" of the "User's Manual - Quick Guide". Your projector should come with the - ViewSonic PJ1165 | User Guide - Page 5
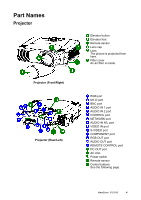
Part Names Projector Projector (Front/Right) Projector (Rear/Left) Elevator button Elevator foot Remote sensor Lens cap Lens The picture is projected from here. Filter cover An air filter is inside. RGB port M1-D port BNC port AUDIO IN 1 port AUDIO IN 2 port CONTROL port NETWORK port AUDIO IN R/L - ViewSonic PJ1165 | User Guide - Page 6
Control Panel on the Projector Remote Control STANDBY/ON button buttons S/T/W/X ( Keyboard Arrow keys ) Remote Control STANDBY/ON button and STANDBY/ON indicator TEMP indicator LAMP indicator VOLUME button INPUT dial SEARCH VOLUME button MUTE button ID CHANGE switch ViewSonic PJ1165 5 - ViewSonic PJ1165 | User Guide - Page 7
projector, while it is hot. • Install the projector in a suitable environment according to instructions of the "User's Manual - Safety Guide" and this manual. • The power outlet should be close to the projector Lens center Side View Screen Lens center Side View Screen Size Inches ViewSonic PJ1165 6 - ViewSonic PJ1165 | User Guide - Page 8
buttons. When you release the elevator buttons, the elevator feet will lock into position. 3 As necessary, you can also finely adjust the height of the projector by twisting the elevator feet by hand. Elevator feet Elevator buttons ViewSonic PJ1165 7 - ViewSonic PJ1165 | User Guide - Page 9
the RGB port (DDC 1/2B compatible). Plug-and-Play may no t work properly if any other type of connection is attempted. • Please use the standard drivers in your computer, as this projector is a Plug-and-Play monitor. ViewSonic PJ1165 8 - ViewSonic PJ1165 | User Guide - Page 10
Computer RGB out Audio out Projector RGB cable Stereo Mini cable RS-232C port RS-232C cable Network port CAT-5 cable If using a M1-D input DVI port USB port M1-D cable Audio out Stereo Mini cable If using a BNC input RGB out BNC cable Audio out Stereo Mini cable ViewSonic PJ1165 9 - ViewSonic PJ1165 | User Guide - Page 11
cable Audio out (R) Audio out (L) If using a component signal CR/PR out CB/PB out Y out Audio out (R) Audio out (L) If using a SCART RGB input Projector SCART RGB out SCART adapter ViewSonic PJ1165 10 - ViewSonic PJ1165 | User Guide - Page 12
of the three-pronged plug. • Make sure that you firmly connect the power cord to the projector and wall outlet. 1 Connect the connector of the power cord to the AC inlet of the projector. 2 Firmly plug the power cord's plug into the outlet. AC Inlet Connector Outlet Plug ViewSonic PJ1165 11 - ViewSonic PJ1165 | User Guide - Page 13
batteries. • Do not mix new battery with used one. • Replace the battery cover the battery cover in the batteries according to in the direction of the direction of the arrow. their plus minus terminals arrow and snap it back (as indicated in the into place. remote control). ViewSonic PJ1165 - ViewSonic PJ1165 | User Guide - Page 14
selected to the item "IR REMOTE ID" of the OPTION menu, the projector is controlled by a remote control irrespective of the position of the ID CHAGE switch. 2 Slide the knob of the switch into the position of the ID number of the projector you want to control. ID CHANGE switch ViewSonic PJ1165 13 - ViewSonic PJ1165 | User Guide - Page 15
illustrated on the right. memo The projector would be enumerated as a mouse and a keyboard of HID (Human Interface Device) class devices, after connecting cable. (Front) Mouse left button Mouse move pointer Keyboard Arrow keys Mouse right button Keyboard key (Rear) ViewSonic PJ1165 14 - ViewSonic PJ1165 | User Guide - Page 16
3 Press the STANDBY/ON button. The projector lamp will light up and the STANDBY/ON lamp cooling is complete. 3 Set the power switch to [O] (Off). The STANDBY/ON indicator will go off. 4 Attach the lens cap. STANDBY/ON button / indicator STANDBY/ON button Power switch (Off position) ViewSonic PJ1165 - ViewSonic PJ1165 | User Guide - Page 17
button of the remote control. Pressing the button toggles between the VIDEO ports as shown below Select the signal you wish to project. 2 Use the ZOOM buttons to adjust the screen size. 3 Use the FOCUS buttons to adjust the focus. SEARCH button ZOOM buttons FOCUS buttons ViewSonic PJ1165 16 - ViewSonic PJ1165 | User Guide - Page 18
selected to the item VIDEO of the INPUT menu. For a component video signal, the signal type is identified automatically independently of this function. AUTO button ViewSonic PJ1165 17 - ViewSonic PJ1165 | User Guide - Page 19
. memo Even if you don't do anything, the dialog will automatically disappear after a few seconds. Cursor buttons POSITION button RESET button Cursor buttons KEYSTONE button ViewSonic PJ1165 18 - ViewSonic PJ1165 | User Guide - Page 20
". 2 Press the BLANK button again to remove the BLANK screen, and return to the input signal screen. Cursor buttons VOLUME button MUTE button BLANK button ViewSonic PJ1165 19 - ViewSonic PJ1165 | User Guide - Page 21
to normal. memo The freezing feature will automatically finish if a remote control's button that changes some display state (ex. blanking the image might possibly remain as an afterimage. Do not leave the projector in FREEZE mode for too long. Using The Magnify Feature 1 Press ViewSonic PJ1165 20 - ViewSonic PJ1165 | User Guide - Page 22
the dialog and complete this operation. memo Even if you don't do anything, the dialog will automatically disappear after a few seconds. Cursor buttons VOLUME button ViewSonic PJ1165 21 - ViewSonic PJ1165 | User Guide - Page 23
Multifunctional Settings Using The Menu Functions This projector has the following menus: MAIN, PICTURE-1, PICTURE-2, INPUT, AUTO, SCREEN, OPTION and NETW ORK. Each of operation. memo Even if you don't do anything, the menu will automatically disappear after a few seconds. ViewSonic PJ1165 22 - ViewSonic PJ1165 | User Guide - Page 24
items shown in the table below can be performed. Perform each operation in accordance with the instructions in the table below. Item BRIGHT CONTRAST ASPECT WHISPER MIRROR LANGUAGE Description Adjust the brightness . Note that the items "WHISPER" and "LANGUAGE" are not reset. ViewSonic PJ1165 23 - ViewSonic PJ1165 | User Guide - Page 25
below can be performed. Perform each operation in accordance with the instruct ions in the table below. Item GAMMA COLOR BAL R COLOR R G B memo The R, G and B can be selected only when the USER is selected under the COLOR TEMP. GAMMA COLOR TEMP Adjust the gamma data using ViewSonic PJ1165 24 - ViewSonic PJ1165 | User Guide - Page 26
S/T buttons, and then press the X (or the ENTER) button to perform the function.: RESET This projector has 4 numbered memories for adjustment data. Performing the SAVE1, SAVE2, SAVE3 or SAVE4 puts the current GAMMA" of the CUSTOM menu under the item "GAMMA" are not reset. ViewSonic PJ1165 25 - ViewSonic PJ1165 | User Guide - Page 27
-2 menu, the items shown in the table below can be performed. Perform each operation in accordance with the instruct ions in the table below. memo This menu cannot be selected at a M1-D signal. Item V POSITION to the initial setting. Note that the item "H PHASE" is not reset. ViewSonic PJ1165 26 - ViewSonic PJ1165 | User Guide - Page 28
the items shown in the table below can be performed. Perform each operation in accordance with the instructions in the table below. Item COLOR SPACE COMPONENT VIDEO 3D-YCS VIDEO NR Description Select a color on the picture. (This table is continued to the following page.) ViewSonic PJ1165 27 - ViewSonic PJ1165 | User Guide - Page 29
to the section "Displaying the Child Window". Select a signal input port to display just when the projector is turned on, using the S/T buttons.: LAST INPUT M1-D RGB BNC COMPONENT SVIDEO VIDEO Selecting the the initial setting. Note that the item "INFORMATION" is not reset. ViewSonic PJ1165 28 - ViewSonic PJ1165 | User Guide - Page 30
in accordance with the instructions in the table below. is set to 1 to 99, the projector lamp will go off and the STANDBY/ON projector on without pressing the STANDBY/ON button. Please refer to the section "Turning Off The Power". (This table is continued to the following page.) ViewSonic PJ1165 - ViewSonic PJ1165 | User Guide - Page 31
-D ports, and pressing the VIDEO button selects the COMPONENT port. memo If no signal is found or the projector is unstable to find an input signal at any of its ports, it will return to the state it was returned to the initial setting. Note that the item "ADJUST" is not reset. ViewSonic PJ1165 30 - ViewSonic PJ1165 | User Guide - Page 32
the items shown in the table below can be performed. Perform each operation in accordance with the instructions in the table below. Item Description BLANK Select a type of the BLANK screen using the S/T but not the W button. (This table is continued to the following page.) ViewSonic PJ1165 31 - ViewSonic PJ1165 | User Guide - Page 33
the message of the right is displayed for a few seconds. If the picture registration failed, the message of the right is displayed for a few seconds. ViewSonic PJ1165 32 - ViewSonic PJ1165 | User Guide - Page 34
air filter after cleaning or replacement, to display the messages about the air filter. Incorrect performing causes incorrect operation of the messages. memo About caring for the air filter, please refer to the section "Air Filter". (This table is continued to the following page.) ViewSonic PJ1165 - ViewSonic PJ1165 | User Guide - Page 35
(or the ENTER) button calls the SERVICE menu. SERVICE Menu Select an item using the S/T though. Please use this function in using a projector at highlands etc. memo Note that the projector is noisier when the HIGH is selected. AUTO LAMP TIME" and "FILTER TI ME" are not reset. ViewSonic PJ1165 34 - ViewSonic PJ1165 | User Guide - Page 36
is set to the item "DHCP" of this NETWORK menu. The IP Address is identification number of the projector on the Network. 1. Set the IP Address using the S/T buttons. memo The same number as the IP The items of the NETWORK menu are collectively returned to the initial setting. ViewSonic PJ1165 35 - ViewSonic PJ1165 | User Guide - Page 37
it needs a Web Browser of Internet Explorer 4.0 or higher. Input the same IP address as set to the projector, to the Web Browser of the computer connected to LAN. ex. Case of IP Address = 192.168.1.11 Click "Return to top page". 6) Click "REBOOT" to complete this operation. ViewSonic PJ1165 36 - ViewSonic PJ1165 | User Guide - Page 38
to have the lamp replaced even if the bulb is not broken. • Do not use the projector with the lamp cover removed. At the lamp replacing, make sure that the screws are screwed in firmly. Loose screws could result in damage or injury. • Use only the lamp of the specified type PRJ-RLC-011. • If the - ViewSonic PJ1165 | User Guide - Page 39
message prompts you to replace the lamp, replace the lamp as soon as possible. 1 Turn off the projector, and unplug the power cord. Allow the lamp bulb to cool for at least 45 minutes. 2 Contact your dealer to prepare a new lamp. Tell the dealer your lamp type number. If the projector is mounted on - ViewSonic PJ1165 | User Guide - Page 40
in, then to replacing wait at least 45 minutes for the lamp to cool sufficiently. • Use only the air filter of the specified type. Please call ViewSonic Tech Support for P/N. • Do not use the projector with the air filter and filter cover removed. The use without the air filter could result in - ViewSonic PJ1165 | User Guide - Page 41
Remote Control 1 Turn off the projector, and unplug the power cord. 2 Wipe lightly with gauze or a soft cloth. memo If soiling is severe, dip soft cloth in water or a neutral cleaner dilute in water, and wipe lightly after wringing well. Then, wipe lightly with a soft, dry cloth. ViewSonic PJ1165 - ViewSonic PJ1165 | User Guide - Page 42
of the signal source. The horizontal or vertical wavelength of the inputted signal is outside of the response parameters of this unit. Please confirm the specs for this unit or the signal source specs. ViewSonic PJ1165 41 - ViewSonic PJ1165 | User Guide - Page 43
of the air passage aperture? • Is the air filter dirty? • Does the peripheral temperature exceed 35°C? If the same indication is displayed after the treatment, please change the lamp by referring to the section "Lamp". (This table is continued to the following page.) ViewSonic PJ1165 42 - ViewSonic PJ1165 | User Guide - Page 44
filter, or there is no air filter. Please immediately turn the power off, and clean or change the air filter by referring to the section "Air Filter". After cleaning or changing the air filter, please be sure to reset the filter time. After the treatment, resent the power to on. ViewSonic PJ1165 - ViewSonic PJ1165 | User Guide - Page 45
source does not correctly work. Correctly set up the signal source device by referring to the manual of the source device. The input changeover settings are mismatched. Select the input signal, and correct the settings. 16 (This table is continued to the following page.) ViewSonic PJ1165 44 - ViewSonic PJ1165 | User Guide - Page 46
the NOR MAL to the item WHISPER in the MAIN menu. 23 The lamp is approaching the end of its product lifetime. Replace the lamp. 35, 36 Pictures appear blurry. Either the focus and/or horizontal phase settings the INPUT dial and set it at a click point. 16 operation. ViewSonic PJ1165 45 - ViewSonic PJ1165 | User Guide - Page 47
Liquid crystal projector Panel size parts) • Please refer to the figure of the section "TECHNICAL" of the end of this manual. REMOTE CONTROL DC OUT Optional Parts Lamp Air filter Others PRJ-RLC-011 • Please call ViewSonic for the part number. • Please consult your dealer. ViewSonic PJ1165 - ViewSonic PJ1165 | User Guide - Page 48
Customer Support For technical support or product service, see the table below or contact your reseller. NOTE: You will need the product serial number. Country/Region Web site United States viewsonic.com/support Canada viewsonic.com/support United Kingdom viewsoniceurope.com Europe, Middle - ViewSonic PJ1165 | User Guide - Page 49
sole option repair or replace the product with a like product. Replacement product or parts may include remanufactured or refurbished parts or components. How long the warranty is effective: ViewSonic projectors are warranted for three (3) years for all parts excluding the lamp, three (3) years for - ViewSonic PJ1165 | User Guide - Page 50
IF THE CUT OFF PLUG IS INSERTED INTO AN APPROPRIATE SOCKET. If a new plug is to be fitted, please observe the wiring code as shown below. electric shock. Use the following guidelines if it is necessary to replace the original cord set, or if the cord set is not enclosed ViewSonic PJ1165 49 - ViewSonic PJ1165 | User Guide - Page 51
a Class B digital device, pursuant to part 15 of the FCC Rules. These limits and used in accordance with the instructions, may cause harmful interference to radio User Information for all Countries NOTICE: Use the cables which are included with the projector or specified. ViewSonic PJ1165 50 - ViewSonic PJ1165 | User Guide - Page 52
ViewSonic® Corporation
-
 1
1 -
 2
2 -
 3
3 -
 4
4 -
 5
5 -
 6
6 -
 7
7 -
8
-
9
-
10
-
11
-
12
-
13
-
14
-
15
-
16
-
17
-
18
-
19
-
20
-
21
-
22
-
23
-
24
-
25
-
26
-
27
-
28
-
29
-
30
-
31
-
32
-
33
-
34
-
35
-
36
-
37
-
38
-
39
-
40
-
41
-
42
-
43
-
44
-
45
-
46
-
47
-
48
-
49
-
50
-
51
-
52
 |
 |

User Guide
Guide de l’utilisateur
Bedienungsanleitung
Guía del usuario
Guida dell'utente
Användarhandbok
Käyttöopas
PJ1165