ViewSonic VB-STND-008 User Guide English
ViewSonic VB-STND-008 Manual
 |
View all ViewSonic VB-STND-008 manuals
Add to My Manuals
Save this manual to your list of manuals |
ViewSonic VB-STND-008 manual content summary:
- ViewSonic VB-STND-008 | User Guide English - Page 1
Warranty information contained in this User Guide will describe your limited coverage from ViewSonic® Corporation, which is also found on our web site at http://www.viewsonic.com in English, or in specific languages using the Regional selection box of our website. Model No. VS18670 P/N: VB-STND-008 - ViewSonic VB-STND-008 | User Guide English - Page 2
exceeding the world's expectations for technological evolution, innovation, and simplicity. At ViewSonic®, we believe that our products have the potential to make a positive impact in the world, and we are confident that the ViewSonic® product you have chosen will serve you well. Once again, thank - ViewSonic VB-STND-008 | User Guide English - Page 3
device. • Keep this user guide in a safe place for later reference. • Read all warnings and follow all instructions. • To prevent damage, disassembly is not covered by warranty. • This product is special use with ViewSonic® commercial Touch Display only, Use with other model is capable of resulting - ViewSonic VB-STND-008 | User Guide English - Page 4
Controlling the Lift 22 Using the Trolley Cart Control Panel or Control Pad 22 Using the Application on the IFP 23 Appendix 25 Specifications...25 Troubleshooting...26 4 - ViewSonic VB-STND-008 | User Guide English - Page 5
Regulatory and Service Information 27 Compliance Information 27 FCC Compliance Statement 27 Industry Canada Statement 27 CE Hazardous Substances 29 Product Disposal at End of Product Life 29 Copyright Information 30 Customer Service 31 Limited Warranty 32 Mexico Limited Warranty 35 - ViewSonic VB-STND-008 | User Guide English - Page 6
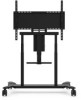
Introduction Package Contents Letter Item A B C D E F G H I J Quantity 2 6 4 4 4 4 Description Bolts Nuts Bolts Bolts Bolts Bolts Note M6 x 14mm M8 M5 x 25mm M6 x 25mm M8 x 25mm M4 x 8mm 1 Hex Tool 4mm 1 Wrench 4 Caster Covers Left Covers x2 Right Covers x2 2 Attachable Cord - ViewSonic VB-STND-008 | User Guide English - Page 7
Letter M Item Quantity Description 2 (one per side) Trolley Bases Note N 2 Mounting Brackets O 1 Power Extension Cord P 1 Power Cord Q 1 Keyboard Tray NOTE: The power cord included in your package may vary depending on your country. Please contact your local reseller for more - ViewSonic VB-STND-008 | User Guide English - Page 8
Product Overview Front and Side View I/O Ports and Controls 1 2 4 5 3 Label 1 2 3 4 5 Port USB A1 Lift Up/Down, Tilt Up/Down Buttons RJ452 AC Out AC In Description USB A Port Adjust Lift Height RJ45 Port Power Output Socket Power Input Socket 1 Only use the USB-A port to connect with an IFP. - ViewSonic VB-STND-008 | User Guide English - Page 9
Control Pad Lift Up Tilt Up Lift Down Tilt Down 9 - ViewSonic VB-STND-008 | User Guide English - Page 10
Initial Setup Assembling the Product Step 1 - Connect the Trolley Body and Base 1. Prepare the following items: Trolley Body Trolley Base 2. Align the three holes on the Trolley Base (M) to the bolts underneath the Trolley Body. Using the Wrench (H), secure the Trolley Base to the Trolley Body - ViewSonic VB-STND-008 | User Guide English - Page 11
3. Ensure all Nuts are tightened properly on the assembled Trolley Cart. Trolley Cart 11 - ViewSonic VB-STND-008 | User Guide English - Page 12
Brackets (N) to the IFP. Depending on the size of the IFP, use either M5 (C), M6 (D), or M8 (E) bolts. Refer to the IFP user guide to find the right bolt size. // NOTE: The VB-STND-008 does not include an IFP. Step 3 - Attach the Keyboard Tray Attach the Keyboard Tray (Q) to the middle support. 12 - ViewSonic VB-STND-008 | User Guide English - Page 13
Step 4 - Secure the IFP to the Trolley Cart 1. Lift the IFP up and hook the Mounting Brackets onto the Trolley Cart. NOTE: It is recommended to perform this step with two or more people to avoid personal injury and/or damage to the IFP and Trolley Cart. 2. Secure the Mounting Brackets to the Trolley - ViewSonic VB-STND-008 | User Guide English - Page 14
Step 5 - Removing the Protective Cover and Installing a Chrome Box 1. Unscrew the M4 x 8mm bolts (F) and remove the Protective Cover from the Trolley Cart. Attach the Chrome Box onto the Trolley Cart. NOTE: The VB-STND-008 does not include a Chrome Box. Protective Cover 14 - ViewSonic VB-STND-008 | User Guide English - Page 15
2. Reattach the Protective Cover onto the Trolley Cart with the M4 x 8mm bolts, covering the Chrome Box. 3. Ensure all parts are accurately and securely held together, as shown in the diagrams below. 15 - ViewSonic VB-STND-008 | User Guide English - Page 16
Step 6 - Move and Park the Trolley Cart After moving the Trolley Cart to desired location, push down on the wheel brakes to lock the Trolley Cart in place. 16 - ViewSonic VB-STND-008 | User Guide English - Page 17
Step 7 - Install the Caster Covers Install the Caster Covers (I) to further secure the Trolley Cart in place NOTE: It is recommended to install the Caster Covers to avoid personal injury and/or damage to the IFP and Trolley Cart 1. Ensure the wheels are aligned with the Trolley Cart. 2. Slide the - ViewSonic VB-STND-008 | User Guide English - Page 18
Storing the Caster Covers The Caster Covers are magnetic. Refer to the diagram below for the position of the magnet. When moving the Trolley Cart, attach the Caster Covers to the left and right supports. 18 - ViewSonic VB-STND-008 | User Guide English - Page 19
Making Connections Connecting to Power 1. Connect the power cord to the Trolley Cart. 2. Plug the power cord plug into a power outlet. 1 2 3. Use the cord clamp to secure the cord in place. 19 - ViewSonic VB-STND-008 | User Guide English - Page 20
Connecting to the Control Pad Connect the Control Pad to the Trolley Cart via the RJ45 Port. NOTE: The Control Pad has a magnet on the back. The Control Pad can be attached to any metal surface on the Trolley Cart. Make sure the attached area does not obstruct the Lift functions. 20 - ViewSonic VB-STND-008 | User Guide English - Page 21
Connecting to the IFP 1. Connect the IFP to the AC power output of the Trolley Cart. 2. Connect the USB Type A cord to both the IFP and the Trolley Cart. 1 6 7 SPDIF 8 RS232 LAN 9 10 1 2 2 2 3 HDMI OUT USB USB USB HDMI IN 1 HDMI IN 2 HDMI IN 3 TOUCH USB HDMI IN TOUCH OUT USB - ViewSonic VB-STND-008 | User Guide English - Page 22
on the IFP. Using the Trolley Cart Control Panel or Control Pad 1. 2. Name Lift Up Icon Description Press and hold to raise the VB-STND-008. Lift Down Press and hold to lower the VB-STND-008. Tilt Up Press and hold to tilt the VB-STND-008 backwards. Tilt Down Press and hold to tilt the - ViewSonic VB-STND-008 | User Guide English - Page 23
Using the Application on the IFP 1. Select the More Options Icon (...) from the side tool bar. 2. Select Trolley Cart Control. 23 - ViewSonic VB-STND-008 | User Guide English - Page 24
Trolley Cart accordingly. Name Lift Up Icon Description Press and hold to raise the VB-STND-008. Lift Down Press and hold to lower the VB-STND-008. Tilt Down Press and hold to tilt the VB-STND-008 forwards. Tilt Up Preset Position 1 Preset Position 2 Preset Position 3 Stop Press and hold - ViewSonic VB-STND-008 | User Guide English - Page 25
Appendix Specifications Item Specifications Swivel 360° by 4" silent wheel Height Adjust Range Wall Mount Pattern 560 mm (22.05 in) 800 x 600 mm max. Material Aluminum Alloy, Plastic, Steel Wall Mount Loading Keyboard Tray Loading 75 kg max. (165 lbs max.) 10 kg max. (22 lbs max.) Input - ViewSonic VB-STND-008 | User Guide English - Page 26
Troubleshooting This section describes some common problems that you may experience when using the Trolley Cart. Problem or Issue No power Lift is not moving Possible Solutions • Plug another electrical device into the power outlet to verify that the outlet is supplying - ViewSonic VB-STND-008 | User Guide English - Page 27
Regulatory and Service Information Compliance Information This section addresses all connected requirements radiate radio frequency energy, and if not installed and used in accordance with the instructions, may cause harmful interference to radio communications. However, there is no guarantee that - ViewSonic VB-STND-008 | User Guide English - Page 28
a glass or ceramic other than dielectric ceramic in capacitors, e.g. piezoelectronic devices, or in a glass or ceramic matrix compound. • Lead in dielectric ceramic in capacitors for a rated voltage of 125V AC or 250V DC or higher. 28 - ViewSonic VB-STND-008 | User Guide English - Page 29
0.1 weight % and 0.01 weight % for cadmium, except for the exemptions set in Schedule 2 of the Rule. Product Disposal at End of Product Life ViewSonic® respects the environment and is committed to working and living green. Thank you for being part of Smarter, Greener Computing. Please visit the - ViewSonic VB-STND-008 | User Guide English - Page 30
or use of this product. In the interest of continuing product improvement, ViewSonic® Corporation reserves the right to change product specifications without notice. Information in means, for any purpose without prior written permission from ViewSonic® Corporation. VB-STND-008_UG_ENG_1b_20231012 30 - ViewSonic VB-STND-008 | User Guide English - Page 31
Customer Service For technical support or product service, see the table below or contact your reseller. NOTE: You will need the product's serial number. Country/ Region Website Country/ Region Website Asia Pacific & Africa Australia www.viewsonic.com/au/ Bangladesh www.viewsonic.com/bd/ - ViewSonic VB-STND-008 | User Guide English - Page 32
, fire, water, lightning, or other acts of nature, unauthorized product modification, or failure to follow instructions supplied with the product. ͫ Repair or attempted repair by anyone not authorized by ViewSonic®. ͫ Damage to or loss of any programs, data, or removable storage media. ͫ Normal wear - ViewSonic VB-STND-008 | User Guide English - Page 33
in the product User Guide. • Removal, installation, and set-up service charges, including wall-mounting of the product. How to get service: • For information about receiving service under warranty, contact ViewSonic® Customer Support (Please refer to the "Customer Service" page). You will need - ViewSonic VB-STND-008 | User Guide English - Page 34
Canada: For warranty information and service on ViewSonic® products sold outside of the U.S.A. and Canada, contact ViewSonic® or your local ViewSonic® dealer. The warranty period : http://www.viewsonic.com/eu/ under "Support/Warranty Information". Display Warranty Term Template In UG VSC_TEMP_2007 34 - ViewSonic VB-STND-008 | User Guide English - Page 35
components & accessories. How long the warranty is effective: ViewSonic® LCD displays are warranted for between 1 and 3 years product modification, unauthorized attempted repair, or failure to follow instructions supplied with the product. ͫ Causes external to the product set-up service charges. 35 - ViewSonic VB-STND-008 | User Guide English - Page 36
service: For information about receiving service under warranty, contact ViewSonic® Customer Support (Please refer to the attached "Customer Service problem, and (e) the serial number of the product. • Take or ship the product, in the original container packaging, to an authorized ViewSonic® service - ViewSonic VB-STND-008 | User Guide English - Page 37
Colo Centro 39300 Acapulco, Guerrero Tel: 744-48-32627 Monterrey: Global Product Services Mar Caribe # 1987, Esquina con Golfo Pérsico Fracc. Bernardo Reyes, 20 de Noviembr Tijuana, Mexico FOR USA SUPPORT: ViewSonic® Corporation 381 Brea Canyon Road, Walnut, CA. 91789 USA Tel: 800-688-6688 E-Mail - ViewSonic VB-STND-008 | User Guide English - Page 38
-
 1
1 -
 2
2 -
 3
3 -
 4
4 -
 5
5 -
 6
6 -
 7
7 -
8
-
9
-
10
-
11
-
12
-
13
-
14
-
15
-
16
-
17
-
18
-
19
-
20
-
21
-
22
-
23
-
24
-
25
-
26
-
27
-
28
-
29
-
30
-
31
-
32
-
33
-
34
-
35
-
36
-
37
-
38
 |
 |

VB-STND-008
User Guide
Model No. VS18670
P/N: VB-STND-008
IMPORTANT: Please read this User Guide to obtain important information on installing and using your product in
a safe manner, as well as registering your product for future service. Warranty information contained in this User
Guide will describe your limited coverage from ViewSonic
®
Corporation, which is also found on our web site at
http://www.viewsonic.com in English, or in specific languages using the Regional selection box of our website.