ViewSonic VP191B User Guide
ViewSonic VP191B - 19" LCD Monitor Manual
 |
UPC - 766907789621
View all ViewSonic VP191B manuals
Add to My Manuals
Save this manual to your list of manuals |
ViewSonic VP191B manual content summary:
- ViewSonic VP191B | User Guide - Page 1
ViewSonic® VP191b/VP191s LCD Display - User Guide - Guide de l'utilisateur - Bedienungsanleitung - Guía del usuario - Guida dell'utente - Guia do usuário - Användarhandbok - Käyttöopas - Podręcznik użytkownika - Használati útmutató - Py Uživatelská píruka - ViewSonic VP191B | User Guide - Page 2
of Wall Mount (Optional 7 Using the LCD Display Setting the Timing Mode 8 OSD and Power Lock Settings 8 Adjusting the Screen Image 9 Main Menu Controls 10 Other Information Specifications 15 Troubleshooting 16 Customer Support 17 Cleaning the LCD Display 18 Limited Warranty 19 ViewSonic - ViewSonic VP191B | User Guide - Page 3
and used in accordance with the instructions, may cause harmful interference to which can be determined by turning the equipment off and on, the user is encouraged to try to assure continued FCC compliance, the user must use grounded power supply cord and the cables which ViewSonic VP191b/VP191s 1 - ViewSonic VP191B | User Guide - Page 4
instructions. Servicing is required when the unit has been damaged in any way, such as power-supply cord or plug is damaged, liquid has been spilled or objects have fallen into the unit, the unit has been exposed to rain or moisture, does not operate normally, or has been dropped. ViewSonic VP191b - ViewSonic VP191B | User Guide - Page 5
Inc. Microsoft, Windows, Windows NT, and the Windows logo are registered trademarks of Microsoft Corporation in the United States and other countries. ViewSonic, the three birds logo, OnView, ViewMatch, and ViewMeter are registered trademarks of ViewSonic Corporation. VESA is a registered trademark - ViewSonic VP191B | User Guide - Page 6
), and Windows XP. Package Contents Your LCD display package includes: • LCD display • Power cord • Video cables (VGA and DVI) • ViewSonic Wizard CD-ROM • Perfect PortraitTM software CD-ROM (VP191b/VP191s) NOTE: The CD jacket contains the Quick Start Guide, and the CD includes the User Guide PDF - ViewSonic VP191B | User Guide - Page 7
Follow the on-screen instructions. 5. Windows users: Set the timing mode (resolution and refresh rate) Example: 1280 x 1024 @ 60 Hz. For instructions on changing the resolution and refresh rate, see the graphic card's user guide. Installation is complete. Enjoy your new ViewSonic, LCD display. To be - ViewSonic VP191B | User Guide - Page 8
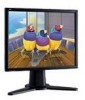
the LCD display clockwise 90 degrees as shown above. To Raise and Lower the display You can easily raise and lower the display panel (the head) manually. As you face the front of the display, take hold of each side of the head and pull up or down. The panel should move easily. ViewSonic VP191b - ViewSonic VP191B | User Guide - Page 9
left. Notice the four screws. 4. Remove the four screws from the back plate. 5. Attach the mounting bracket from the VESA compatible wall mounting kit (100 mm x 100 mm distance). 6. Attach the LCD display to the wall, following the instructions in the wall-mounting kit. ViewSonic VP191b/VP191s 7 - ViewSonic VP191B | User Guide - Page 10
picture quality set your LCD display timing mode to: VESA 1280 x 1024 @ 60Hz. To set the Timing Mode: 1. Set the resolution: Right-click on the Windows desktop > Properties > Settings > set the resolution. 2. Set the refresh rate: See your graphic card's user guide for instructions. WARNING: Do not - ViewSonic VP191B | User Guide - Page 11
"Main Menu Controls" on page 11. Main Menu with OnView controls Front Control Panel shown below in detail Displays the Main Menu or exits the control screen and to toggle analog and digital connection. Power light Green = ON Orange = Power Saving Standby Power On/Off ViewSonic VP191b/VP191s 9 - ViewSonic VP191B | User Guide - Page 12
computer's graphic card so that it outputs a video signal 1280 x 1024 @ 60Hz to the LCD display. (Look for instructions on "changing the refresh rate" in your graphic card's user guide.) • If necessary, make small adjustments using H. POSITION and V. POSITION until the screen image is completely - ViewSonic VP191B | User Guide - Page 13
image. Input Select toggles between inputs if you have more than one computer connected to the VP191b/VP191s. Color Adjust provides several color adjustment modes: preset color temperatures and RGB which allows red to the screen image for warmer white and richer red. ViewSonic VP191b/VP191s 11 - ViewSonic VP191B | User Guide - Page 14
, and the ViewSonic website URL. See your graphic cards user guide for instructions on changing the resolution and refresh rate (vertical frequency). NOTE: VESA 1280 x 1024 @ 60Hz (recommended) means that the resolution is 1280 x 1024 and the refresh rate is 60 Hertz. Manual Image Adjust Sub-menu - ViewSonic VP191B | User Guide - Page 15
of the screen image. Setup menu displays the menu shown below: Language allows you to choose the language used in the menus and control screens. Resolution Notice allows you to enable or disable this notice. ViewSonic VP191b/VP191s 13 - ViewSonic VP191B | User Guide - Page 16
is first turned on. The user will need to control all the port settings manually under this condition. Inputs can be switched quickly by pressing the "Up" arrow button on the front panel controls. a factory Preset Timing Mode listed in the Specifications of this manual. ViewSonic VP191b/VP191s 14 - ViewSonic VP191B | User Guide - Page 17
-interlaced Power Macintosh up to 1280 x 1024 Resolution Recommended and supported 1280 refresh rates; doing so may result in permanent damage to the LCD display. 1 Macintosh computers older than G3 require a ViewSonic® Macintosh adapter. To order an adapter, contact ViewSonic. ViewSonic VP191b - ViewSonic VP191B | User Guide - Page 18
Troubleshooting No power • Make sure power button (or switch) is ON. • Make sure A/C power cord is securely connected to the LCD display. • Plug another electrical device (like a radio) into the power outlet to verify that the outlet is supplying proper voltage. Power is ON but no screen image • - ViewSonic VP191B | User Guide - Page 19
4018 F=+ 65 273 1566 [email protected] South Africa and other countries www.viewsonic.com T=+886 (2) 2246 3456 F=+886 (2) 8242 3668 [email protected] Hong Kong www.hk.viewsonic.com T=+886 (2) 2246 3456 F=+886 (2) 8242 3668 [email protected] ViewSonic VP191b/VP191s 17 - ViewSonic VP191B | User Guide - Page 20
• MAKE SURE THE LCD DISPLAY IS TURNED OFF. • NEVER SPRAY LCD display screen or case. Some chemical cleaners have been reported to damage the screen and/or case of the LCD display. • ViewSonic will not be liable for damage resulting from use of any ammonia or alcoholbased cleaners. ViewSonic VP191b - ViewSonic VP191B | User Guide - Page 21
above limitations and exclusions may not apply to you. Sales outside the U.S.A. and Canada: For warranty information and service on ViewSonic products sold outside of the U.S.A. and Canada, contact ViewSonic or your local ViewSonic dealer. ViewSonic LCD Warranty (V3.0) ViewSonic VP191b/VP191s 19 - ViewSonic VP191B | User Guide - Page 22
-
 1
1 -
 2
2 -
 3
3 -
 4
4 -
 5
5 -
 6
6 -
 7
7 -
8
-
9
-
10
-
11
-
12
-
13
-
14
-
15
-
16
-
17
-
18
-
19
-
20
-
21
-
22
 |
 |

ViewSonic
®
- User Guide
- Guide de l'utilisateur
- Bedienungsanleitung
- Guía del usuario
- Guida dell'utente
- Guia do usuário
- Användarhandbok
- Käyttöopas
- Podr
ę
cznik u
ż
ytkownika
- Használati útmutató
- Py
ководство
польэователя
- Uživatelská píruka
-
ユーザーズガイ ド
-
使用手冊
-
使用手冊
-
사용자 안내서
-
VP191b/VP191s
LCD Display