Viking BVGRC8486GWSS Countertop Rear Trim - Installation Instructions
Viking BVGRC8486GWSS Manual
 |
View all Viking BVGRC8486GWSS manuals
Add to My Manuals
Save this manual to your list of manuals |
Viking BVGRC8486GWSS manual content summary:
- Viking BVGRC8486GWSS | Countertop Rear Trim - Installation Instructions - Page 1
Viking Installation Guide Viking Range Corporation 111 Front Street Greenwood, Mississippi 38930 USA (662) 455-1200 For product information call 1-888-VIKING1 (845-4641) or visit the Viking Web site at vikingrange.com F1448K EN Range/Rangetop Rear Trim Accessories & Range Curb Base Fronts (020211) - Viking BVGRC8486GWSS | Countertop Rear Trim - Installation Instructions - Page 2
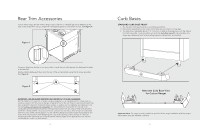
Rear Trim Accessories All rear trim devices are installed in the same basic way. ATTACHING REAR TRIM (Illustration I) Grasp the trim on each end and carefully place in the channels (B) located at each rear corner of the product. Align the screw holes (A) at each end of the trim device with the - Viking BVGRC8486GWSS | Countertop Rear Trim - Installation Instructions - Page 3
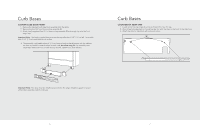
; remove, tighten bolts, and reattach. A Alternate Curb Base View for Custom Ranges Important Note: The range must be installed as specified in the range installation guide for proper airflow when using the standard curb base. 5 - Viking BVGRC8486GWSS | Countertop Rear Trim - Installation Instructions - Page 4
front to back setting; remove, tighten bolts, and reattach. B C Important Note: The range must be installed as specified in the range installation guide for proper airflow when using the custom curb base. Curb Bases COUNTERTOP REAR TRIM 1. Locate screw hole openings (A) on back of island trim near
-
 1
1 -
 2
2 -
 3
3 -
 4
4
 |
 |

Viking Range Corporation
111 Front Street
Greenwood, Mississippi 38930 USA
(662) 455-1200
For product information
call 1-888-VIKING1 (845-4641)
or visit the Viking Web site at
vikingrange.com
F1448K EN
(020211)
Viking Installation Guide
Range/Rangetop Rear Trim Accessories
& Range Curb Base Fronts