Viking DGVU2004BSS Installation Instructions
Viking DGVU2004BSS Manual
 |
View all Viking DGVU2004BSS manuals
Add to My Manuals
Save this manual to your list of manuals |
Viking DGVU2004BSS manual content summary:
- Viking DGVU2004BSS | Installation Instructions - Page 1
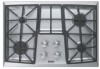
Viking Installation Guide ® Viking Range Corporation 111 Front Street Greenwood, Mississippi 38930 USA (662) 455-1200 For product information, call 1-888-VIKING1 (845-4641) or visit the Viking Web site at vikingrange.com F20680B EN 09VK3130 ed.11-10 (020111) Designer DGVU Built-In Gas Cooktops - Viking DGVU2004BSS | Installation Instructions - Page 2
of the cooktop in the gas stream for safety and ease of service. In Massachusetts: This appliance must be installed by a licensed plumber or gas-fitter. A "T" handle manual gas valve must be installed in the gas supply line to the appliance. • Installers should leave these instructions with the - Viking DGVU2004BSS | Installation Instructions - Page 3
not be used for space heating. This information is based on safety considerations. 4 IMPORTANT- Please Read and Follow WARNING ELECTRICAL GROUNDING INSTRUCTIONS The cooktop must be electrically grounded in accordance with local codes or, in the absence of codes, with the ANSI/NFPA No. 70-latest - Viking DGVU2004BSS | Installation Instructions - Page 4
71.4 cm) 2-13/16" (7.1 cm) 7-3/16" (18.4 cm) Power cord Regulator 18-1/4" (47.0 cm) 2" (5.1 cm) 10-3/16" (27.1 cm) 6 2" (5.1 cm) Dimensions 36" Gas Cooktop 36-3/4" (93.3 cm) 21" (53.4 cm) 4" (10.2 cm) Wiring diagram and rating plate location 34-1/8" (86.6 cm) 2-13/16" (7.1 cm) 7-3/16" (18 - Viking DGVU2004BSS | Installation Instructions - Page 5
Specifications Designer Gas Cooktops Description Overall width Overall height from bottom to top of grate DGVU200 30-3/4" (78.1 cm) 4" (10.2 cm) DGVU260 36-3/4" (93.3 cm) Overall depth from rear Cutout width Cutout height Cutout depth Gas requirements Electrical requirements Maximum amp usage - Viking DGVU2004BSS | Installation Instructions - Page 6
.7 cm) side clearance must be 18" (45.7 cm) above the 36" (91.4 cm) high countertop. • Wall cabinet above the cooktop must be a minimum of 30" (76.2 cm) above the cooking surface for the hood. Refer to the rangehood installation instructions for additional information. Woor oSdte/eCloOmvpeorlsaitye (( - Viking DGVU2004BSS | Installation Instructions - Page 7
the open top burners will have to be lit manually with a match. Gas Connection • Thread the appliances 36" (3-foot) long flexible gas connector. • Installer-supplied intake pipes should be checked visually for any foreign matter before installing in a service line. CAUTION Before placing the cooktop - Viking DGVU2004BSS | Installation Instructions - Page 8
instructions could result in serious injury or property damage. WARNING Electrical power and gas must be turned off prior to conversion. To convert from both natural to LP/Propane and LP/Propane to natural a conversion kit is supplied. Initial Ignition of Burners • All cooktops small, review each - Viking DGVU2004BSS | Installation Instructions - Page 9
• In case of failure, shut the gas OFF using the installer supplied manual shut-off valve. Site Preparation Note: It is recommended that a thorough site materials and literature package from the cooktop before beginning installation. Remove Installation Instructions from literature pack and read them - Viking DGVU2004BSS | Installation Instructions - Page 10
Conversion 1 WARNING LP conversion should only be performed by a qualified service technician Remove aluminum gas spreaders. 2 2 2 2 2 1 2 Install and tighten injectors. Replace aluminum flame spreaders. 18 LP Pressure Regulator Conversion 1 2 Disconnect electrical power and shut off - Viking DGVU2004BSS | Installation Instructions - Page 11
Natural Gas Conversion 1 WARNING Natural conversion should only be performed by a qualified service technician. Remove aluminum gas spreaders. 2 2 2 2 2 1 Remove injectors using a 9/32" nut driver. 4 1 1 1 1 3 95 160 180 139 139 95 160 180 160 Reference chart to determine which - Viking DGVU2004BSS | Installation Instructions - Page 12
Gas & Electrical Connection Bracket Installation 1 1 Note: Refer to "Electrical & Gas Requirements" section for proper installation information. Countertop Cooktop Final Installation 1 2 1 1 2 1 1 Bracket Place brackets in the slots and lower until the bracket catches. Use the bolt to - Viking DGVU2004BSS | Installation Instructions - Page 13
water and with a liquid cleanser designed for this material if build-up cooktop. Record the following information indicated below. You will need it if service is ever required. Model number Serial number Date of purchase Date installed Dealer's name Address These installation instructions - Viking DGVU2004BSS | Installation Instructions - Page 14
Notes 26 Notes 27
-
 1
1 -
 2
2 -
 3
3 -
 4
4 -
 5
5 -
 6
6 -
 7
7 -
8
-
9
-
10
-
11
-
12
-
13
-
14
 |
 |

Viking Installation Guide
Designer DGVU Built-In Gas Cooktops
Viking Range Corporation
111 Front Street
Greenwood, Mississippi 38930 USA
(662) 455-1200
For product information,
call 1-888-VIKING1 (845-4641)
or visit the Viking Web site at
vikingrange.com
F20680B EN
(020111)
®
09VK3130 ed.11-10