Viking RDDFF236SS Installation Instructions - Page 2

IMPORTANT, Table of Contents - dimensions

Page 2 highlights

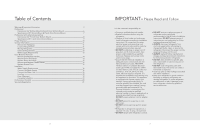
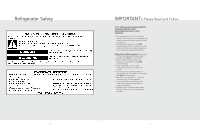
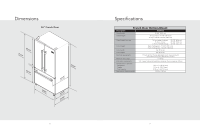
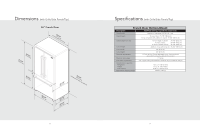
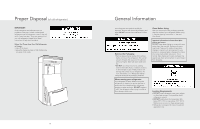
Table of Contents Warnings & Important Information 3 Professional Dimensions (36" Bottom-Mount & French Door Bottom-Mount 6 Specifications (36" Bottom-Mount & French Door Bottom-Mount 7 Professional with grille/side panels/top Dimensions (36" French Door Bottom-Mount 8 Specifications (36" French Door Bottom-Mount 9 Proper Disposal 10 General Information 11 Remove the Packaging 11 Location Requirements 11 Moving Refrigerator 12 Electrical Requirements 12 Water Supply Requirements 13 Door & Drawer Removal Remove and Replace Handles 14 Remove Doors and Hinge 14 Replace Doors and Hinge 15 Remove and Replace Freezer Drawer 15 Replace Drawer Front 15 Installation Water Supply Requirements 16 Connect the Water Supply 16 Connect the Water Line 16 Leveling 18 Door Alignment 19 Complete Installation 19 Performance Checklist 20 Service & Registration 21 2 IMPORTANT- Please Read and Follow It is the customer's responsibility to: • Contact a qualified electrical installer. • Read all instructions before using the refrigerator. • Observe all local codes and ordinances. Install refrigerator according to installation instructions. All connections for water, electrical power and grounding must comply with local codes and be made by licensed personnel when required. • DO NOT modify plug on power cord. If plug does not fit electrical outlet, have proper outlet installed by a qualified technician. Replace worn power cords and/or loose plugs. • Assure that the electrical installation is adequate and in conformance with the National Electrical Code, ANSI/NFPA 70-latest edition or Canadian Electrical Code C22.1-1998 and C22.2 No. 0-M91 (or latest edition), and all local codes and ordinances. (115 volt, 60-Hz, 15 amp, fused, electrical supply is required. It is required that a separate circuit serving only this appliance be provided. This appliance is equipped with a power supply cord having a 3-prong grounding plug. To minimize possible shock hazard, the cord must be plugged into a mating 3-prong, grounding type wall receptacle. If a 2-prong receptacle is encountered, the customer must contact a qualified electrical installer to have it replaced with a properly grounded 3-prong receptacle. DO NOT use an extension cord or adapter plug. • DO NOT ground to a gas line or coldwater pipe. • DO NOT remove warning tag from power cord. • Refrigerator is designed to operate on a separate 115 volt, 15 amp., 60 cycle line. • DO NOT tamper with refrigerator controls. • DO NOT service or replace any part of refrigerator unless specifically recommended in Use & Care or Installation Instructions. DO NOT attempt service if instructions are not understood or if they are beyond personal skill level. • ALWAYS disconnect refrigerator from electrical supply before attempting to change light bulbs, clean, or service the refrigerator. Disconnect the power cord by grasping the plug, not the cord. • ALWAYS read and follow manufacturer's storage and ideal environment instructions for items being stored in refrigerator. • DO NOT allow children to operate, play with, crawl inside or stand on any part of the refrigerator. • DO NOT clean refrigerator parts with flammable fluids. The fumes can create a fire hazard or explosion. • Clean up spills or water leakage associated with water installation. • Keep your refrigerator in good condition. Bumping or dropping refrigerator can damage refrigerator or cause refrigerator to malfunction or leak. If damage occurs, have refrigerator checked by qualified service technician. 3

  • 1
  • 2
  • 3
  • 4
  • 5
  • 6
  • 7
  • 8
  • 9
  • 10
  • 11
  • 12

IMPORTANT
It is the customer’s responsibility to:
• Contact a qualified electrical installer.
• Read all instructions before using the
refrigerator.
• Observe all local codes and ordinances.
Install refrigerator according to installation
instructions. All connections for water,
electrical power and grounding must
comply with local codes and be made by
licensed personnel when required.
DO NOT
modify plug on power cord. If
plug does not fit electrical outlet, have
proper outlet installed by a qualified
technician. Replace worn power cords
and/or loose plugs.
• Assure that the electrical installation is
adequate and in conformance with the
National Electrical Code, ANSI/NFPA
70-latest edition or Canadian Electrical
Code C22.1-1998 and C22.2 No. 0-M91
(or latest edition), and all local codes and
ordinances. (115 volt, 60-Hz, 15 amp,
fused, electrical supply is required. It is
required that a separate circuit serving only
this appliance be provided. This appliance
is equipped with a power supply cord
having a 3-prong grounding plug. To
minimize possible shock hazard, the cord
must be plugged into a mating 3-prong,
grounding type wall receptacle. If a
2-prong receptacle is encountered, the
customer must contact a qualified
electrical installer to have it replaced with a
properly grounded 3-prong receptacle.
DO NOT
use an extension cord or adapter
plug.
DO NOT
ground to a gas line or cold-
water pipe.
DO NOT
remove warning tag from power
cord.
• Refrigerator is designed to operate on a
separate 115 volt, 15 amp., 60 cycle line.
DO NOT
tamper with refrigerator controls.
DO NOT
service or replace any part of
refrigerator unless specifically
recommended in Use & Care or Installation
Instructions.
DO NOT
attempt service if
instructions are not understood or if they
are beyond personal skill level.
ALWAYS
disconnect refrigerator from
electrical supply before attempting to
change light bulbs, clean, or service the
refrigerator. Disconnect the power cord by
grasping the plug, not the cord.
ALWAYS
read and follow manufacturer’s
storage and ideal environment instructions
for items being stored in refrigerator.
DO NOT
allow children to operate, play
with, crawl inside or stand on any part of
the refrigerator.
DO NOT
clean refrigerator parts with
flammable fluids. The fumes can create a
fire hazard or explosion.
• Clean up spills or water leakage associated
with water installation.
• Keep your refrigerator in good condition.
Bumping or dropping refrigerator can
damage refrigerator or cause refrigerator
to malfunction or leak. If damage occurs,
have refrigerator checked by qualified
service technician.
3
Please Read and Follow
Table of Contents
Warnings & Important Information ____________________________________________________________3
Professional
Dimensions (36” Bottom-Mount & French Door Bottom-Mount) __________________________6
Specifications (36” Bottom-Mount & French Door Bottom-Mount) ________________________7
Professional with grille/side panels/top
Dimensions (36” French Door Bottom-Mount) ____________________________________________8
Specifications (36” French Door Bottom-Mount) __________________________________________9
Proper Disposal _____________________________________________________________________________10
General Information _________________________________________________________________________11
Remove the Packaging __________________________________________________________________11
Location Requirements __________________________________________________________________11
Moving Refrigerator _____________________________________________________________________12
Electrical Requirements _________________________________________________________________12
Water Supply Requirements _____________________________________________________________13
Door & Drawer Removal
Remove and Replace Handles ___________________________________________________________14
Remove Doors and Hinge _______________________________________________________________14
Replace Doors and Hinge _______________________________________________________________15
Remove and Replace Freezer Drawer____________________________________________________15
Replace Drawer Front ___________________________________________________________________15
Installation
Water Supply Requirements _____________________________________________________________16
Connect the Water Supply ______________________________________________________________16
Connect the Water Line _________________________________________________________________16
Leveling ________________________________________________________________________________18
Door Alignment _________________________________________________________________________19
Complete Installation ___________________________________________________________________19
Performance Checklist ______________________________________________________________________20
Service & Registration _______________________________________________________________________21
2