Viking RVMHC330 Installation Instructions
Viking RVMHC330 Manual
 |
View all Viking RVMHC330 manuals
Add to My Manuals
Save this manual to your list of manuals |
Viking RVMHC330 manual content summary:
- Viking RVMHC330 | Installation Instructions - Page 1
Installation Guide Convection Microwave Hood - Viking RVMHC330 | Installation Instructions - Page 2
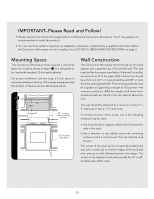
installed. See ELECTRICAL GROUNDING INSTRUCTIONS on page 2. Mounting For proper installation and servicing, a 2-inch space is necessary between the top of the range backguard and the bottom plaster/lath. The mounting surfaces must be capable of supporting a weight of 110 pounds-the oven and contents- - Viking RVMHC330 | Installation Instructions - Page 3
install an outlet near the appliance. The Power Supply Cord directly above the Convection Microwave Hood mounting location as shown in figure 2. Note: • If you have any questions about the grounding or electrical instructions, consult a qualified electrician or serviceperson. • Neither Viking Range - Viking RVMHC330 | Installation Instructions - Page 4
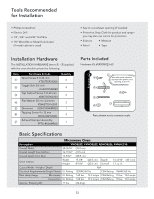
opening (if needed) • Protective Drop Cloth for product and range you may also use carton for protection • Scissors • Measure common scale. Basic Specifications Microwave Oven Description VMOR205, CVMOR205, RDMOR206, RVMHC330 Overall Width 29-15/16" (76.0 cm) Overall Height from - Viking RVMHC330 | Installation Instructions - Page 5
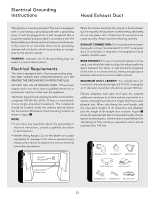
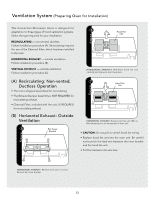
Ventilation System (Preparing Oven for Installation) figure figure figure figure figure This Convection Microwave Hood is designed for adaptation to three types of hood ventilation systems. Select the type required for your installation. Recirculating - non-vented, ductless. Follow installation - Viking RVMHC330 | Installation Instructions - Page 6
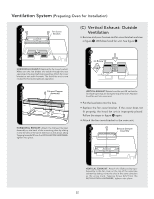
HORIZONTAL EXHAUST: Attach the Exhaust Damper Assembly to the back of the mounting plate by sliding it into the slits in the same direction as the arrow. Using Tapping Screw 4x12 from the INSTALLATION HARDWARE, tighten into place. figure figure figure (A) Rotate 90˚ VERTICAL EXHAUST: Rotate hood - Viking RVMHC330 | Installation Instructions - Page 7
into A, B, C and D where appropriate (these correspond to holes of the Wall Template) and put the Toggle Nuts onto the Toggle Bolts. • Refer to instructions in Wall Te(mA)plate. Space more than wall thickness MOUNTING PLATE: Align the Mounting Plate carefully and hold in position while tightening - Viking RVMHC330 | Installation Instructions - Page 8
into two pieces (A) and (B). ffiigguurree figure (B) MOUNTING OVEN TO THE WALL: Place the oven and the carton portions together on the top of the range. Slide carton toward backguard until it stops. Align the lower back edge of the oven with the mounting plate. Thread the power supply cord through - Viking RVMHC330 | Installation Instructions - Page 9
for Installation • Make sure the unit has been installed according to all of the Installation Instructions and the Wall and Top Cabinet Templates. • Plug in the power cord. • Keep the Operation Manual. Viking Range, LLC 111 Front Street Greenwood, Mississippi 38930 USA (662) 455-1200 For product - Viking RVMHC330 | Installation Instructions - Page 10
Guide d'installation Micro-ondes à hotte et á convection F - Viking RVMHC330 | Installation Instructions - Page 11
un électricien qualifié avant que la Micro-ondes á Hotte et á Convection soit installée. Voir les INSTRUCTIONS AU SOL ÉLECTRIQUES page F2. L'espace de support Cette Micro-ondes á Hotte et á Convection exige un espace de support sur un mur comme représenté sur le schéma 1. Elle est conçue pour être - Viking RVMHC330 | Installation Instructions - Page 12
coffret directement au-dessus de l'endroit de support de micro-ondes á hotte et á convection comme montré en le schéma 2. REMARQUE : • Si vous avez n'importe quelles questions au sujet de fondre ou des instructions électriques, consultez un électricien ou un serviceperson qualifié. • Ni Viking Range - Viking RVMHC330 | Installation Instructions - Page 13
.Couper à la longeur voulue. Pièces montrées pas à la balance commune. schéma Fiche Technique Micro-ondes Description VMOR205, CVMOR205, RDMOR206, RVMHC330 Dimensions extérieures: Largeur 76,0 cm (29-15/16 po) Dimensions extérieures: Hauteur 41,5 cm (16-11/32 po) Dimensions extérieures - Viking RVMHC330 | Installation Instructions - Page 14
Coude de 10 (10 pi.) Chapeau toit (24 pi.) Système de ventilation (préparant le Coude 25˚ (25 pi.) Coude 45˚ (5 pi.) Chapeau mur (40 pi.) four pour l'installation) schéma schéma Cette Micro-ondes á Hotte et á Convection est conçue schéma pour l'adaptation à trois types de systèmes de - Viking RVMHC330 | Installation Instructions - Page 15
d'Échappement schéma schémaschéma schéma Échappement Horizontal : Attachez l'Assemblée d'amortisseur d'échappement au dos du plat de support en le glissant dans les fentes dans la même direction que la flèche. Voir le schéma 9. L'utilisation de la vis de tapement 4 x 12 du MATÉRIEL d'INSTALLATION - Viking RVMHC330 | Installation Instructions - Page 16
éma schéma schéma CE FOUR NE PEUT PAS ÊTRE CORRECTEMENT INSTALLÉ SANS SE RAPPORTER AUX INSTRUCTIONS DE SUPPORT TROUVÉES SUR DES CALIBRES DE CABINET DE MUR ET DE DESSUS. Plat de support • Séparez 4 boulons à bascule, emballés dans le MATÉRIEL d'INSTALLATION, des écrous à bascule. Toggle Bolt Écrou - Viking RVMHC330 | Installation Instructions - Page 17
mur : En utilisant la ligne de découpage autour du carton, de la coupe dans deux morceaux de (A) et (B). sscchhéémmaa schéma (B) Four de support au mur : Placez le four et les parties de carton ensemble sur le dessus de la gamme. Voir le schéma ). Glissez le carton vers - Viking RVMHC330 | Installation Instructions - Page 18
contrôle pour l'installation • S'assurent l'unité a été installée selon tous les instructions d'installation et calibres de Cabinet de mur et de dessus. • Branchez le cordon de secteur. • Maintenez l'opération manuelle. Viking Range, LLC 111 Front Street Greenwood, Mississippi 38930 USA (662) 455 - Viking RVMHC330 | Installation Instructions - Page 19
Instrucciones de Instalación Campana del Microondas por Convección S - Viking RVMHC330 | Installation Instructions - Page 20
Instrucciones de Instalación Importante-Por favor lea y siga! • Lea detenidamente las instrucciones antes de instalar la campana del microondas por convección. Se recomiendan que la instalación de este producto sea realizada entre dos personas. • Si se requiere un tomacorriente eléctrico nuevo, su - Viking RVMHC330 | Installation Instructions - Page 21
pregunta sobre las instrucciones eléctricas o de conexión a tierra, consulte a un electricista calificado o al encargado de brindar el servicio. • Ni Viking Range, LLC ni el distribuidor pueden aceptar ninguna responsabilidad por los daños al horno o las lesiones personales causadas por no seguir - Viking RVMHC330 | Installation Instructions - Page 22
ón. Corte para ajustar. Las partes mostradas no reflejan su tamaño real. figura Especificaciones Básicas Horno Microondas Descripción VMOR205, CVMOR205, RDMOR206, RVMHC330 Ancho total 29-15/16" (76.0 cm) Altura total desde la parte inferior 16-11/32" (41.5 cm) Profundidad total desde - Viking RVMHC330 | Installation Instructions - Page 23
Codo Ancho de 10 pulgadas (10 pies.) Tapa de Techo (24 pies.) Sistema de Ventilación (Preparación del Ho9r0n˚ Coodopa4r5a˚ Cosdou(5Ipniess.) (25 pies.) taTlaapacdieóPanre)d (40 pies.) figura figura figura figura figura Esta Campana del microondas por convección está diseñada para adaptarse - Viking RVMHC330 | Installation Instructions - Page 24
figu figura figura figura figura 90˚ Codo 45˚ Codo (5 pies.) (10 pies.) Adaptador (5 pies.) Sistema de Ventilación Codo Ancho de 10 pulgadas (10 pies.) Tapa de Techo (24 pies.) (Pre paración del Horno para su Instalación) figura 90˚ Codo (25 pies.) 45˚ Codo (5 pies.) Tapa de Pared ( - Viking RVMHC330 | Installation Instructions - Page 25
figura figura figura figura Instalación del Horno figura figura figura ESTE HORNO NO PUEDE INSTALARSE APROPIADAMENTE SI NO SE CONSULTAN LAS INSTRUCCIONES DE MONTAJE QUE SE ENCUENTRAN EN LAS PLANTILLAS DE PARED Y DEL GABINETE SUPERIOR. Placa de Montaje • Separe 4 pernos acodados de la TORNILLER - Viking RVMHC330 | Installation Instructions - Page 26
Instalación del Horno (A) (A) figura fifigguurraa figurfiagura fifigguurraa figura figura (B) (B) (B) MONTAJE DEL HORNO A LA PARED: Utilizando la línea de corte alrededor de la caja de cartón, corte en dos piezas (A) y (B). ffiigguurraa figura (B) MONTAJE DEL HORNO A LA PARED: Coloque el - Viking RVMHC330 | Installation Instructions - Page 27
con todas las instrucciones de instalación y las plantillas de pared y gabinete superior. • Enchufe el cable de alimentación. • Guarde el Manual de Operación. Viking Range, LLC 111 Front Street Greenwood, Mississippi 38930 EE.UU (662) 455-1200 Para mayor información sobre productos, llame al 1-888 - Viking RVMHC330 | Installation Instructions - Page 28
Viking Range, LLC 111 Front Street Greenwood, Mississippi 38930 USA (662) 455-1200 For product information, call 1-888-845-4641 TINSLB033MRR0
-
 1
1 -
 2
2 -
 3
3 -
 4
4 -
 5
5 -
 6
6 -
 7
7 -
8
-
9
-
10
-
11
-
12
-
13
-
14
-
15
-
16
-
17
-
18
-
19
-
20
-
21
-
22
-
23
-
24
-
25
-
26
-
27
-
28
 |
 |

Installation Guide
Convection Microwave Hood