Viking VBUI Installation Instructions
Viking VBUI Manual
 |
View all Viking VBUI manuals
Add to My Manuals
Save this manual to your list of manuals |
Viking VBUI manual content summary:
- Viking VBUI | Installation Instructions - Page 1
Install / Use & Care MANUAL FR-D'installation/d'utilisation et d'entretien ES-De instalación/operación y mantenimiento 5 SERIES Professional Undercounter Refrigerator / Beverage Center Réfrigérateur de comptoir / Stockage de boissons Professionnel Refrigerador - Viking VBUI | Installation Instructions - Page 2
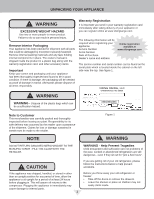
Service Information 16 Troubleshooting 17 Warranty 18 Important Safety Instructions Warnings and safety instructions appearing in this guide / product damage. NOTE NOTE-Important information to help assure a problem free installation and operation. ! WARNING State of California Proposition 65 - Viking VBUI | Installation Instructions - Page 3
in place. The owners manual is shipped inside the your appliance. Service Number Serial Number Tragedies Child entrapment and suffocation are not problems of the past. Junked or abandoned rid of your old refrigerator, please follow the instructions below to help prevent accidents. Before you throw - Viking VBUI | Installation Instructions - Page 4
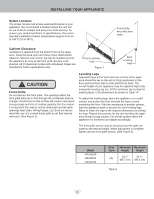
INSTALLING YOUR APPLIANCE Select Location The proper location will ensure peak performance of your appliance. We recommend a location where the unit will be out of direct sunlight and away from heat sources. To ensure your product performs to specifications, the recommended installation location - Viking VBUI | Installation Instructions - Page 5
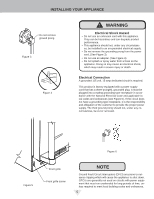
INSTALLING YOUR APPLIANCE Do not remove ground prong Figure 3 Figure 4 ! WARNING Electrical Shock Hazard • Do not use an extension cord with this appliance. They can be hazardous and can degrade product performance. • This appliance should not, under any circumstances, be installed to an un- - Viking VBUI | Installation Instructions - Page 6
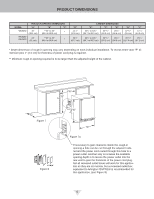
PRODUCT DIMENSIONS MODEL VBUI5150 VRUI5240 VBUI5240 ROUGH-IN OPENING DIMENSIONS "A" "B" "C" 15" (38.1 cm) **34" to 35" (86.4 to 88.9 cm) * 24" (61 cm) **34" to 35" (86.4 to 88.9 cm) * "D" 14 7⁄8" (37.8 cm) 237⁄8" (60.7 cm) CABINET DIMENSIONS "E" "F" "G" 333⁄4" to 343⁄4" 2323⁄32" - Viking VBUI | Installation Instructions - Page 7
PRODUCT DIMENSIONS PRODUCT DATA MODEL ELECTRICAL REQUIREMENTS # PRODUCT WEIGHT VBUI5150 115V/60HZ/15A 105 lbs (47.6 kg) VRUI5240 VBUI5240 115V/60Hz/15A 140 lbs (63.6 kg) "H" # A grounded 15 amp dedicated circuit is required. Follow all local building codes when installing electrical and - Viking VBUI | Installation Instructions - Page 8
on continuously. Press and hold the "Lock" keypad until the display goes past "Loc" and reads "nSL". To enable the sleep mode, repeat the instruction, again going past "Loc" until the display reads "SLP". On initial power up, the control display will indicate a "Power Failure" alarm. This is - Viking VBUI | Installation Instructions - Page 9
the Alarm indicator are active. To un-lock the control panel, repeat this instruction until the display reads "nLc", then immediately release your finger from the the unit and surrounding floor. 9 Action to Take Call service to have the temperature sensor replaced and remove all perishable goods from - Viking VBUI | Installation Instructions - Page 10
of high usage or introduction of warm contents to the storage compartment. If the temperature alarm continues to occur, your unit may require service. Power Failure ALARM RESET NOTE The audible alarm can be muted, for each occurrence, by pressing the lock keypad. • Power failure - If power - Viking VBUI | Installation Instructions - Page 11
request, then will display "VAC" continuously until Vacation mode is exited. A power outage will not exit Vacation mode, exiting can only be accomplished manually. To exit Vacation mode and return to normal operation, press and hold the "On/Off" keypad until the control displays the temperature. 11 - Viking VBUI | Installation Instructions - Page 12
SHELVING CONFIGURATIONS Loading Tips and Suggestions Your appliance is equipped with a cantilever shelf system which provides maximum adjust ability and customizing of the shelving arrangements listed below. Figure 13 Figure 11 VBUI5150 Beverage Center: 15" (38.1 cm) Wide Models: Shown with a - Viking VBUI | Installation Instructions - Page 13
SHELVING CONFIGURATIONS Figure 14 Frame and flat glass shelf with trim Wine shelf underneath glass Figure 15 Wine cutout and flat glass shelf with vibration dampening mat, the glass can be removed for wine storage. Figure 16 5 bottle rollout display rack with vibration dampening mat 13 - Viking VBUI | Installation Instructions - Page 14
front upward and lift out. (See Figure 17b). To install a shelf insert the shelf in the appliance and insert the top hooks into the shelf support slots and drop the shelf down so the hooks drop over the bottom of the slots. Rear tang (hook) on shelf Figure 17a Tall bottle - Viking VBUI | Installation Instructions - Page 15
replacement All models use an LED to illuminate the interior of the appliance. This component is very reliable, but should it fail, contact a qualified service technician for replacement of the LED. 15 - Viking VBUI | Installation Instructions - Page 16
the problem that you are having. If you are unable to obtain the name of an authorized service agency, or if you continue to have service problems, contact Viking Range, LLC at (888) 845-4641 or write to: VIKING RANGE, LLC PREFERRED SERVICE - Viking VBUI | Installation Instructions - Page 17
If the appliance appears to be malfunctioning, read through this manual first. If the problem persists, check the troubleshooting guide below. Locate the problem in the guide and refer to the cause and its remedy before calling for service. The problem may be something very simple that can be solved - Viking VBUI | Installation Instructions - Page 18
the United States, Canada, Mexico and the Caribbean (excluding Cuba, Dominican Republic, and Haiti). Products must be purchased in the country where service is requested. If the product or one of its component parts contains a defect or malfunction during the full warranty period after a reasonable - Viking VBUI | Installation Instructions - Page 19
19 - Viking VBUI | Installation Instructions - Page 20
Viking Range, LLC 111 Front Street Greenwood, Mississippi 38930 USA (662) 455-1200 For product information, call 1-888-(845-4641) or visit our web site at vikingrange.com 058185-000B EN (030118) - Viking VBUI | Installation Instructions - Page 21
Install / Use & Care MANUAL FR-D'installation/d'utilisation et d'entretien ES-De instalación/operación y mantenimiento 5 SERIES Professional Undercounter Refrigerator / Beverage Center Réfrigérateur de comptoir/ Stockage de boissons Professionnel Refrigerador - Viking VBUI | Installation Instructions - Page 22
12 Entretien et nettoyage 15 Conseils pour l'économie d'énergie 15 Obtention de service 16 Dépannage 17 Garantie 18 Importantes instructions de sécurité Les avertissements et les instructions de sécurité qui apparaissent dans ce guide n'ont pas la prétention de couvrir toutes les conditions et - Viking VBUI | Installation Instructions - Page 23
cessaires au moment de l'enregistrement de votre appareil : Numéro de service Numéro de série Date d'achat Nom et adresse du revendeur débarrasser de votre vieil appareil de refroidissement, veuillez suivre ces instructions pour aider à éviter des accidents possibles. Avant de jeter votre - Viking VBUI | Installation Instructions - Page 24
INSTALLATION DE VOTRE APPAREIL Choix de l'emplacement Un bon emplacement assurera une performance de pointe pour votre appareil. Nous recommandons un endroit où l'appareil ne sera pas exposé directement au rayonnement solaire et restera écarté de sources de chauffage. Pour assurer que les - Viking VBUI | Installation Instructions - Page 25
pourrait causer une commotion électrique, entraînant potentiellement des blessures graves voire mortelles. Raccordement électrique Un circuit secteur dédié en 115 V supportant 15 A est nécessaire. Ce produit est équipé en usine d'un cordon secteur comportant une fiche avec terre à trois broches. Il - Viking VBUI | Installation Instructions - Page 26
DIMENSIONS DU PRODUIT DIMENSIONS D'OUVERTURE BRUTE MODÈLE «A» «B» «C» VBUI5150 15 po (61 cm) **34 po à 35 po (86.4 à 88.9 cm) * VRUI5240 24 po VBUI5240 (61 cm) **34 po à 35 po (87 à 89,5 cm) * «D» 147⁄8 po (37.8 cm) 237⁄8 po (60.7 cm) DIMENSIONS D'ARMOIRE «E» «F» «G» 333⁄4 po à 343 - Viking VBUI | Installation Instructions - Page 27
lb (47.6 kg) "H" VRUI5240 VBUI5240 115V/60Hz/15A 140 lb (63.6 kg) # Un circuit secteur dédié avec liaison de terre supportant 15 A est nécessaire. Appliquez toutes les normes de construction locales à "J" l'installation de l'électricité et de l'appareil. "G" "D" "F" "E" 31⁄2 po (8.9 cm - Viking VBUI | Installation Instructions - Page 28
UTILISATION DE VOTRE COMMANDE ÉLECTRONIQUE Diminution Augmentation de Marche/ de température Arrêt température Zone d'affichage Allumage d'éclairage (porte en verre seulement) Verrouillage des touches Indicateur de statut du système Figure 10 Commandes électroniques Power Failure ALARM - Viking VBUI | Installation Instructions - Page 29
verrouillage illuminée), il faut déverrouiller la commande avant qu'on puisse utiliser la touche pour restaurer une alerte. Voir page 9 (Verrouillage des commandes) pour les instructions de déverrouillage de la commande. Codes d'erreur des capteurs de température 9-FR - Viking VBUI | Installation Instructions - Page 30
de givre. Il peut s'ensuivre un dégât des eaux au niveau de l'appareil et du plancher alentour. Action à prendre Demandez une intervention de service pour remplacer ce capteur de température. Enlevez tous les articles périssables du compartiment pour empêcher de gâtant. Débranchez immédiatement le - Viking VBUI | Installation Instructions - Page 31
si des produits chauds sont chargés dans le compartiment de conservation. Si l'alerte de température continue à se produire, votre appareil peut exiger le service. Mode de vacances : Ce mode de fonctionnement peut être utilisé pour économiser de l'énergie durant les périodes où elle est la plus co - Viking VBUI | Installation Instructions - Page 32
CONFIGURATIONS DE ÉTAGÈRES Conseils et suggestions pour le chargement Votre réfrigérateur est équipé d'un système de étagères en porteà-faux qui procure une capacité maximale d'ajustement et une personnalisation des arrangements comme c'est montré plus loin. Figure 11 VUBI5150 Stockage de boissons - Viking VBUI | Installation Instructions - Page 33
CONFIGURATIONS DE ÉTAGÈRES Figure 14 Étagère, encadrement et verre Étagère à vin à dessous en verre Figure 15 Découpe de vin et plat tablette de verre avec tapis d'amortissement des vibrations, le verre peut être enlevé pour le stockage du vin. Figure 16 étagère-présentoir pour 5 bouteilles avec - Viking VBUI | Installation Instructions - Page 34
ère des deux mains et faites pivoter son avant vers le haut, puis soulevez-la et dégagez-la des et enlevez-la des échelles de support. Figure 17b ! ATTENTION N'essayez jamais de bouger une étagère chargée, évacuez tout ce qu'elle porte avant de la déplacer. Utilisez vos deux mains - Viking VBUI | Installation Instructions - Page 35
éclairer l'intérieur de l'appareil. Ce type de composant est très fiable, mais en cas de panne contactez un technicien de service qualifié pour le remplacement de l'éclairage à DEL. Les suggestions suivantes vont minimiser le coût de fonctionnement de votre appareil de refroidissement. 1. N'installez - Viking VBUI | Installation Instructions - Page 36
persistent, contactez Viking Range, LLC au (888) 845-4641 ou écrivez à : VIKING RANGE, LLC PREFERRED SERVICE 111 Front Street Greenwood, Mississippi 38930 USA Le numéro de série et le numéro de modèle la protection dans le cadre de la garantie. Conservez ce guide à titre de référence future. 16-FR - Viking VBUI | Installation Instructions - Page 37
, commencez par bien relire son manuel. Si le problème persiste, consultez le guide de dépannage qui suit. Identifiez le problème dans ce guide et consultez les colonnes de causes et de remèdes avant d'appeler pour du service. Le problème peut être quelque chose de très simple qui peut - Viking VBUI | Installation Instructions - Page 38
GARANTIE DE PRODUIT À USAGE DOMESTIQUE GARANTIE RÉFRIGÉRATEUR DE COMPTOIR/ STOCKAGE DE BOISSONS GARANTIE COMPLÈTE DE DEUX ANS Réfrigérateur de comptoir/ Stockage de boissons et toutes leurs pièces composantes, à l'exception de ce qui est détaillé ci-dessous *†, sont garantis contre tout défaut de - Viking VBUI | Installation Instructions - Page 39
19-FR - Viking VBUI | Installation Instructions - Page 40
Viking Range, LLC 111 Front Street Greenwood, Mississippi 38930 USA (662) 455-1200 Pour tout renseignement concernant les produits, appelez le 1-888-(845-4641) ou consultez le site web à l'adresse vikingrange.com 058185-000B FR (030118) - Viking VBUI | Installation Instructions - Page 41
Install / Use & Care MANUAL FR-D'installation/d'utilisation et d'entretien ES-De instalación/operación y mantenimiento 5 SERIES Professional Undercounter Refrigerator / Beverage Center Réfrigérateur de comptoir / Stockage de boissons Professionnel Refrigerador - Viking VBUI | Installation Instructions - Page 42
ÍNDICE Índice: Información de seguridad 2 Desembalaje de su artefacto 3 Registro de garantía 3 Instalación de su artefacto 4 Espacios libres alrededor del gabinete 4 Nivelación del artefacto 4 Conexión eléctrica 5 Dimensiones del producto 6 Uso de su control electrónico 8 Puesta en - Viking VBUI | Installation Instructions - Page 43
dañarse por el movimiento sujetas firmemente. Retire los materiales de empaque internos y -si las hubiera- las cintas que sujetan los componentes. El manual del usuario se envía dentro del producto en una bolsa de plástico junto con la tarjeta de registro de garantía y otros accesorios. Importante - Viking VBUI | Installation Instructions - Page 44
INSTALACIÓN DE SU ARTEFACTO Selección de la ubicación La ubicación adecuada asegurará el desempeño óptimo de su artefacto. Recomendamos una ubicación en la que la unidad esté a cubierto de la luz solar directa y lejos de fuentes de calor. Para asegurar que su producto funcione de acuerdo con las - Viking VBUI | Installation Instructions - Page 45
INSTALACIÓN DE SU ARTEFACTO No quite la clavija de puesta a tierra del cordón de alimentación eléctrica. Figura 3 ! ADVERTENCIA Peligro de choque eléctrico • No utilice cordones de extensión con este artefacto. Pueden ser peligrosos, y pueden degradar el funcionamiento del producto. • Este - Viking VBUI | Installation Instructions - Page 46
DIMENSIONES DEL PRODUCTO MODELO DIMENSIONES DE LA ABERTURA DE INSTALACIÓN pulgadas (cm) "A" "B" "C" VBUI5150 15" (38.1 cm) **34" to 35" (86.4 to 88.9 cm) * VRUI5240 VBUI5240 24" (61 cm) **34" to 35" (86.4 to 88.9 cm) * DIMENSIONES DEL GABINETE pulgadas (cm) "D" "E" "F" "G" "H" 14 - Viking VBUI | Installation Instructions - Page 47
DIMENSIONES DEL PRODUCTO MODELO VBUI5150 VRUI5240 VBUI5240 DATOS DEL PRODUCTO REQUISITOS ELÉCTRICOS # PESO DEL PRODUCTO 115V/60HZ/15A 105 lbs (47.6 kg) 115V/60Hz/15A 140 lbs (63.6 kg) # Se necesita un circuito dedicado de 15 amperes con conexión a tierra. Cumpla con todos los códigos de edi - Viking VBUI | Installation Instructions - Page 48
USO DE SU CONTROL ELECTRÓNICO Tecla Tecla para Tecla para bajar "Encendido / subir la la temperatura Apagado" temperatura Figura 10 Control electrónico para una sola zona Pantalla Tecla "Luces" (solo puerta de Tecla vidrio) "Bloqueo" Indicadores de estado del sistema Power Failure ALARM RESET - Viking VBUI | Installation Instructions - Page 49
USO DE SU CONTROL ELECTRÓNICO Ajuste de la temperatura: Para establecer o ver el valor de consigna de la temperatura (con el control fuera del modo de espera), pulse la tecla "-" o "+". La pantalla mostrará "SET" y el valor de consigna de la temperatura parpadeando. Para ajustar la temperatura más - Viking VBUI | Installation Instructions - Page 50
USO DE SU CONTROL ELECTRÓNICO Códigos de error del sensor de temperatura Los sensores de temperatura son monitoreados continuamente. Cualquier condición de CIRCUITO ABIERTO o EN CORTOCIRCUITO iniciará un CÓDIGO DE ERROR según se enumera a continuación: Sensor Códigos de error del sensor de - Viking VBUI | Installation Instructions - Page 51
USO DE SU CONTROL ELECTRÓNICO NOTA La alarma de temperatura puede ocurrir como resultado de un uso intensivo o la introducción de los contenidos calientes en el compartimiento de almacenamiento. Si la alarma de temperatura persiste, su unidad puede requerir servicio. NOTA La alarma audible se - Viking VBUI | Installation Instructions - Page 52
CONFIGURACIONES DE ESTANTES Consejos y sugerencias para cargar el refrigerador Su artefacto está equipado con un sistema de estantes en voladizo que ofrece muchas posibilidades de ajuste y se adapta a distintas disposiciones de estantes, enumeradas a continuación. Figura 11 VBUI5150 Centro de - Viking VBUI | Installation Instructions - Page 53
CONFIGURACIONES DE ESTANTES Figura 14 Estante con marco y vidrio plano. Vidrio con estante para vinos por debajo. Figura 15 Découpe de vin et plateau de verre plat avec tapis d'amortissement des vibrations, le verre peuvent être enlevés pour le stockage du vin. Figure 16 Gaveta exhibidora deslizante - Viking VBUI | Installation Instructions - Page 54
CONFIGURACIONES DE ESTANTES ! PRECAUCION Antes de cargar el estante en voladizo presiónelo hacia abajo para verificar que está bien asegurado en los soportes. Gancho de un estante instalado Ranura de soporte del estante Para agregar o desmontar un estante, proceda como se indica a continuación - Viking VBUI | Installation Instructions - Page 55
CUIDADOS Y LIMPIEZA - CONSEJOS PARA AHORRAR ENERGÍA Rejilla frontal Verifique que nada obstruye el flujo de aire requerido en las aberturas delanteras del gabinete. Cepille o limpie con una aspiradora las pelusas y suciedad acumuladas en las aberturas de la rejilla al menos una o dos veces al año ( - Viking VBUI | Installation Instructions - Page 56
Range, LLC llamando al teléfono (888) 845-4641, o escriba a: VIKING RANGE, LLC PREFERRED SERVICE 111 Front Street Greenwood, Mississippi 38930 USA. El número de serie y de modelo de su horno perder la cobertura de la garantía. Guarde este manual ya que puede necesitar consultarlo en el futuro. 16-ES - Viking VBUI | Installation Instructions - Page 57
LOCALIZACIÓN DE FALLAS Antes de llamar al servicio técnico siga estos consejos Si el artefacto parece estar funcionando mal, lea primero este manual. Si el problema persiste, vea la guía de localización de fallas incluida a continuación. Antes de llamar al servicio técnico, localice el problema en - Viking VBUI | Installation Instructions - Page 58
GARANTÍA DE PRODUCTOS ELECTRODOMÉSTICOS GARANTÍA REFRIGERADOR BAJO MOSTRADOR / CENTRO DE BEBIDAS GARANTÍA TOTAL DE DOS AÑOS Se garantiza que los todos los Refrigerador bajo mostrador / Centro de bebidas y todas sus piezas, excepto según se detalla a continuación*†, están libres de defectos en los - Viking VBUI | Installation Instructions - Page 59
19-ES - Viking VBUI | Installation Instructions - Page 60
Viking Range, LLC 111 Front Street Greenwood, Mississippi 38930 USA. (662) 455-1200 Para obtener información del producto, llame al teléfono 1-888-(845-4641) o visite el sitio web en vikingrange.com. 058185-000B SP (030118)
-
 1
1 -
 2
2 -
 3
3 -
 4
4 -
 5
5 -
 6
6 -
 7
7 -
8
-
9
-
10
-
11
-
12
-
13
-
14
-
15
-
16
-
17
-
18
-
19
-
20
-
21
-
22
-
23
-
24
-
25
-
26
-
27
-
28
-
29
-
30
-
31
-
32
-
33
-
34
-
35
-
36
-
37
-
38
-
39
-
40
-
41
-
42
-
43
-
44
-
45
-
46
-
47
-
48
-
49
-
50
-
51
-
52
-
53
-
54
-
55
-
56
-
57
-
58
-
59
-
60
 |
 |

Install / Use & Care
MANUAL
5 SERIES
Professional Undercounter Refrigerator / Beverage Center
Réfrigérateur de comptoir / Stockage de boissons Professionnel
Refrigerador bajo mostrador / Centro de bebidas Profesional
VRUI5240
VBUI5150
VBUI5240
FR-D’installation/d’utilisation et d’entretien
ES-De instalación/operación y mantenimiento