Viking VGIC5304BSS Installation Instructions
Viking VGIC5304BSS Manual
 |
View all Viking VGIC5304BSS manuals
Add to My Manuals
Save this manual to your list of manuals |
Viking VGIC5304BSS manual content summary:
- Viking VGIC5304BSS | Installation Instructions - Page 1
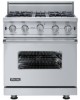
Viking Installation Guide ® Viking Range Corporation 111 Front Street Greenwood, Mississippi 38930 USA (662) 455-1200 For product information, call 1-888-VIKING1 (845-4641) or visit the Viking Web site at vikingrange.com F20706 EN (020210) Professional Freestanding Gas Open Burner Ranges - Viking VGIC5304BSS | Installation Instructions - Page 2
22 Performance Checklist 22 Service & Registration 23 2 IMPORTANT-Read and Follow! • Before beginning, please read these instructions completely and carefully. • DO NOT remove permanently affixed labels, warnings, or plates from product. This may void the warranty. • All local and national - Viking VGIC5304BSS | Installation Instructions - Page 3
Viking Range Corporation will NOT warranty any problems gas supplier from a neighbor's phone. -Follow the gas supplier's instructions. -If you cannot reach your gas supplier, call the fire department. • Installation and service must be performed by a qualified installer, service agency, or the gas - Viking VGIC5304BSS | Installation Instructions - Page 4
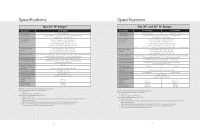
-.17/c8m") ((22673905--..6977//cc88mm"")) 1" (2.5 cm) ((99413..0153c-ct7m7mo/"))8mm"ainx.. Note: Unit shown with standard island trim. 6 Dimensions Gas 24", 30" and 36" W. Ranges 8-1/8" (20.6 cm) 28-1/16" (71.2 cm) 26-7/16" (67.2 cm) 1-5/8" (4.1 cm) 1" (2.5 cm) 35-7/8" (91.1 cm) min. to 37" (94 - Viking VGIC5304BSS | Installation Instructions - Page 5
(1.3 cm) ID gas service line Gas Manifold Pressure Natural " [91.4 cm] and below) • Sides - 0" • Top grate support - 36" (91.4 cm) Above cooking surface (above 36" [91.4 trim and combustible rear wall 8 Specifications Gas 30" and 36" W. Ranges Description 30" W. Models 36" W. Models Overall - Viking VGIC5304BSS | Installation Instructions - Page 6
of a standard hood should be 30" (76.2 cm) min. to 36" (91.4 cm) max. above the countertop. This would typically result in the bottom of the hood being 66" (167.6 cm) to 72" (182.9 cm) above the floor. Refer to the range hood installation instructions for additional information. These dimensions - Viking VGIC5304BSS | Installation Instructions - Page 7
to LP gas. The range is designed specifically for natural gas or liquid propane (LP) gas. Before beginning installation verify that the model is compatible with the intended gas supply. Manual shut-off valve: This installer-supplied valve must be installed in the gas service line before the - Viking VGIC5304BSS | Installation Instructions - Page 8
fan, contact a Viking Authorized Service Center before continuing bracket supplied with the range. This is the anti-tip Installation" section. Some stainless steel parts may have a plastic protective wrap , a qualified licensed plumber, or certified gas installer. Door Removal 1 2 Open door - Viking VGIC5304BSS | Installation Instructions - Page 9
rather than tilting. Raise unit about a foot. Unscrew temporary legs from couplings. 4 Screw legs into couplings on all four corners. Lower range gently to keep any undue strain from legs and internal mounting hardware. 16 Leveling/Adjustments/Alignment 1 2 Measure the four corners in cutout - Viking VGIC5304BSS | Installation Instructions - Page 10
22-1/4" (56.5 cm) from where the right side of range (facing range) is to be located. 18 Mark and drill holes where bracket Gas & Electric DANGER GAS LEAK HAZARD To avoid risk of personal injury or death; leak testing of the appliance must be conducted according to the manufacturer's instructions - Viking VGIC5304BSS | Installation Instructions - Page 11
Final Installation 1 2 Slide range into place. Be sure anti-tip bracket slides into the anti-tip opening. 3 Burner caps and burner bowls are packed in styrofoam top pack with the grates. Place burner bowl in grate support and burner cap on top of burner. Place burner grate over burner cap and on - Viking VGIC5304BSS | Installation Instructions - Page 12
convection fan on. h Check convection fan function-convection fan comes on when switch is turned on. 22 Service & Registration Only authorized replacement parts may be used in performing service on the appliance. All servicing should be referred to a qualified technician. Contact Viking Range
-
 1
1 -
 2
2 -
 3
3 -
 4
4 -
 5
5 -
 6
6 -
 7
7 -
8
-
9
-
10
-
11
-
12
 |
 |

Viking Range Corporation
111 Front Street
Greenwood, Mississippi 38930 USA
(662) 455-1200
For product information,
call 1-888-VIKING1 (845-4641)
or visit the Viking Web site at
vikingrange.com
F20706 EN
(020210)
®
Viking Installation Guide
Professional Freestanding Gas
Open Burner Ranges