Viking VMOD241 Installation Instructions
Viking VMOD241 Manual
 |
View all Viking VMOD241 manuals
Add to My Manuals
Save this manual to your list of manuals |
Viking VMOD241 manual content summary:
- Viking VMOD241 | Installation Instructions - Page 1
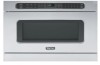
Viking Installation Guide Guide d'installation Viking / Guía de instalación Viking Setup/ Help Control Lock On/Off Sensor Popcorn Sensor Reheat Sensor Cook Keep Warm Defrost Reheat OPEN CLOSE Start Add-A-Minute Stop/ Clear 1 2 3 4 5 Power Level 6 7 8 9 0 Timer/ Clock VMOD241SS - Viking VMOD241 | Installation Instructions - Page 2
- Viking VMOD241 | Installation Instructions - Page 3
Viking Installation Guide Setup/ Help Control Lock On/Off Sensor Popcorn Sensor Reheat Sensor Cook Keep Warm Defrost Reheat OPEN CLOSE Start Add-A-Minute Stop/ Clear 1 2 3 4 5 Power Level 6 7 8 9 0 Timer/ Clock VMOD241SS Setup/ Help Control Lock On/O Sensor Popcorn Sensor - Viking VMOD241 | Installation Instructions - Page 4
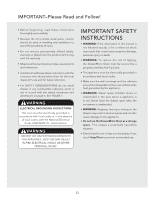
SHOCK OR OTHER PERSONAL INJURY. IMPORTANT SAFETY INSTRUCTIONS • WARNING: If the information in this manual is not followed exactly, a fire or where a appliance is in use. Never leave the drawer open when the microwave is unattended. • WARNING: Stepping, leaning or sitting on the drawer may result - Viking VMOD241 | Installation Instructions - Page 5
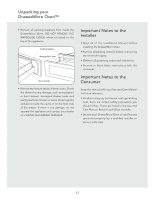
VIKING AUTHORIZED SERVICER. Important Notes to the Installer • Read all of the Installation Manual before installing the DrawerMicro Oven. • Remove all packing material before connecting the electrical supply. • Observe all governing codes and ordinances. • Be sure to leave these instructions with - Viking VMOD241 | Installation Instructions - Page 6
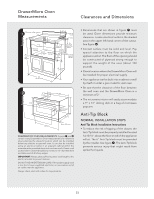
of the opening should be constructed of plywood strong enough to support the weight of the oven (about 100 pounds). • microwave interior will easily accommodate a 9" x 13" oblong dish or a bag of microwave popcorn. Anti-Tip Block NORMAL INSTALLATION STEPS Anti-Tip Block Installation Instructions - Viking VMOD241 | Installation Instructions - Page 7
grounding or electrical instructions, consult a qualified electrician or service person. PARTS SUPPLIED B 4 Screws DRAWER INSTALLATION: Place the DrawerMicro Oven adjacent to the wall or cabinet opening. Plug the power supply cord into the electrical outlet Carefully guide - Viking VMOD241 | Installation Instructions - Page 8
and Care Manual for cleaning instructions. Model and Serial Number Location The name plate includes model number and serial number. Open the Microwave Drawer fully. The label is slightly beyond the back wall of the microwave cavity facing up from the flat surface. Before You Call for Service Read - Viking VMOD241 | Installation Instructions - Page 9
Guide d'installation Viking Setup/ Help Control Lock On/Off Sensor Popcorn Sensor Reheat Sensor Cook Keep Warm Defrost Reheat OPEN CLOSE Start Add-A-Minute Stop/ Clear 1 2 3 4 5 Power Level 6 7 8 9 0 Timer/ Clock VMOD241SS Setup/ Help Control Lock On/O Sensor Popcorn Sensor - Viking VMOD241 | Installation Instructions - Page 10
. IL POURRAIT EN RÉSULTER UN INCENDIE, UN CHOC ÉLECTRIQUE OU AUTRE BLESSURE INSTRUCTIONS DE SÛRETÉ IMPORTANTES • ADVERTISSEMENT : Si l'on ne suit pas de pr muraux et les placards autour du Four DrawerMicro sont faits pour supporter la chaleur produite par le électroménager. • ADVERTISSEMENT : - Viking VMOD241 | Installation Instructions - Page 11
DU GUIDE D'ONDES, qui se trouve sur le dessus du Four DrawerMicro. Surface d'étanchéité Couvercle du guide d'ondes contactez votre revendeur ou votre AGENT DE SERVICE AGRÉÉ VIKING. Remarques Importantes pour L'installateur • Assurez-vous de laisser ces instructions avec le consommateur. Remarques - Viking VMOD241 | Installation Instructions - Page 12
du bloc antibasculement Prévoir ouverture de 14 po Plancher doit pouvoir supporter 100lbs 19 po jusqu'à la surface du sol Prévoir chevauchement de pour micro-ondes. Bloc Anti-Basculement ÉTAPES D'INSTALLATION HABITUELLES Instructions pour l'installation du bloc antibasculement • Pour réduire le - Viking VMOD241 | Installation Instructions - Page 13
Installation du Tiroir 5 po (127 mm) schéma • Si jamais l'on choisit de changer l'emplacement du Four DrawerMicro, il faut changer l'emplacement du / réinstaller le bloc antibasculement en même temps. En fixant le bloc antibasculement au mur, assurez-vous que les vis pénètrent complètement dans - Viking VMOD241 | Installation Instructions - Page 14
mise à la terre mise à la terre Consultez le manuel d'utilisateur pour des instructions sur le nettoyage. Emplacement des Numéros de Modèle et de Série d'utilisateur pour trouver le numéro de service sans frais et les coordonnées pertinentes de Viking. Veuillez nous téléphoner ou nous écrire - Viking VMOD241 | Installation Instructions - Page 15
5 Power Level 6 7 8 9 0 Timer/ Clock VMOD241SS Setup/ Help Control Lock On/O Sensor Popcorn Sensor Reheat Keep Warm Defrost Sensor Cook Reheat OPEN CLOSE Start Add-A-Minute Stop/ Clear 1 2 3 4 5 Power Level 6 7 8 9 0 Timer/ Clock DMOD241SS Horno DrawerMicro™ 111 Front - Viking VMOD241 | Installation Instructions - Page 16
, CHOQUE ELÉCTRICO U OTRAS LESIONES PERSONALES. INSTRUCCIONES DE SEGURIDAD IMPORTANTES • ADVERTENCIA: Si no se cumple con la información contenida en este manual con exactitud, es posible que ocurra un incendio o descarga eléctrica que podría causar daño a la propiedad, lesiones personales o la - Viking VMOD241 | Installation Instructions - Page 17
ún daño, no opere el electrodoméstico y comuníquese con su distribuidor o PERSONAL DE SERVICIO AUTORIZADO DE VIKING. Notas Importantes Para el Instalador • Lea por completo el Manual de instalación antes de instalar el Horno DrawerMicro. • Retire todos los materiales de embalaje antes de conectar - Viking VMOD241 | Installation Instructions - Page 18
Medidas del Horno DrawerMicro Espacios Libres y Dimensiones figura 1 Ubicación del tomacorriente 5" Altura del mostrador 36" Abertura de 4" 22 ¹⁄₈" Deje un traslapo de ¾" Profundidad de 23 ½"min. Deje un traslapo de ¾" (6") Bloque antivolcaduras 3 ¹⁄₂" Deje un traslapo de Abertura de 14 - Viking VMOD241 | Installation Instructions - Page 19
Instalación de la Gaveta • Si el Horno DrawerMicro es traslado alguna vez a otra ubicación, el bloque antivolcaduras también deber ser trasladado e instalado. Al instalarla en la pared, asegúrese de que los tornillos penetren por completo en el drywall y se aseguren en madera o metal de modo que el - Viking VMOD241 | Installation Instructions - Page 20
Manual de uso y cuidado para ver las instrucciones de limpieza. Ubicación del modelo y número de serie La placa incluye el número de modelo y número de serie la garantía en su Manual de uso y cuidado para obtener el número de teléfono gratuito y dirección de servicio de Viking. Por favor llámenos
-
 1
1 -
 2
2 -
 3
3 -
 4
4 -
 5
5 -
 6
6 -
 7
7 -
8
-
9
-
10
-
11
-
12
-
13
-
14
-
15
-
16
-
17
-
18
-
19
-
20
 |
 |

Viking Installation Guide
111 Front Street
Greenwood, Mississippi 38930 USA
DrawerMicro™ Oven
Guide d’installation Viking / Guía de instalación Viking
Four DrawerMicro™ / Horno DrawerMicro™
Control
Lock
Control
Lock
Start
Add-A-Minute
Sensor
Cook
Sensor
Cook
Reheat
Reheat
OPEN
CLOSE
Power
Level
Timer/
Clock
Stop/
Clear
3
4
5
6
7
8
9
0
Sensor
Reheat
Sensor
Reheat
Defrost
Defrost
Sensor
Popcorn
Sensor
Popcorn
Setup/
Help
Setup/
Help
Keep Warm
Keep Warm
1
2
On/Off
On/Off
Control
Lock
Start
Add-A-Minute
Start
Add-A-Minute
Sensor
Cook
Sensor
Cook
Reheat
Reheat
OPEN
OPEN
CLOSE
CLOSE
Power
Level
Power
Level
Timer/
Clock
Timer/
Clock
Stop/
Clear
Stop/
Clear
3
4
5
6
7
8
9
0
Sensor
Reheat
Defrost
Sensor
Popcorn
Setup/
Help
Keep Warm
1
2
On/Off
VMOD241SS
DMOD241SS