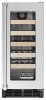
Viking VWCI5150GRSS Installation Instructions
Viking VWCI5150GRSS Manual
 |
View all Viking VWCI5150GRSS manuals
Add to My Manuals
Save this manual to your list of manuals |
Viking VWCI5150GRSS manual content summary:
- Viking VWCI5150GRSS | Installation Instructions - Page 1
Installation Guide 15"W./24"W. Undercounter Refrigeration - Viking VWCI5150GRSS | Installation Instructions - Page 2
"W. Professional 5 Dimensions (24"W. Professional 6 Dimensions (24"W. Professional 7 Specifications 8 Cutout Dimensions 9 General Information 10 Anti-Tip Brackets 12 Installation 13 Kickplate Installation 15 Installation Checklist 16 Service Information 17 2 - Viking VWCI5150GRSS | Installation Instructions - Page 3
• Viking Range, LLC will NOT warranty any problems resulting from GFI outlets which are not installed properly , follow these basic precautions: • Read all instructions before using the unit. • Never allow children attempting to change light bulbs, clean, or service the unit. FOR YOUR SAFETY DO NOT - Viking VWCI5150GRSS | Installation Instructions - Page 4
. IMPORTANT: Child entrapment and suffocation are not problems of the past. Junked or abandoned refrigeration units your old refrigeration unit, please follow these instructions to help prevent accidents. IMPORTANT: Now as steps or to support more than they were designed to support. CAUTION • Do not - Viking VWCI5150GRSS | Installation Instructions - Page 5
Dimensions (15"W. Professional) 3(706-.51/c8m") 1(347-.87/c8m") 222((66(46257-1-69-.1.51.1/0//c1c1c1m6mm66)")")" 3((88479m3m-..t0015aoinx/"cc..4mm")) 50" (127.0 cm) area in which electrical outlet must be located 5-1/16" (12.9 cm) Power cord 6-5/8" (16.8 cm) off floor.* Door Swing 15-25/32" - Viking VWCI5150GRSS | Installation Instructions - Page 6
Dimensions (24"W. Professional) 3(706-.51/c8m") 2(630-.67/c8m") 222((66(46257-1-69-.1.51.1/0//c1c1c1m6mm66)")")" 3((88479m3m-..t0015aoinx/"cc..4mm")) 50" (127.0 cm) area in which electrical outlet must be located 7-9/16" (12.9 cm) Power cord 6-7/16" (16.8 cm) off floor.* Door Swing 24-25/32" - Viking VWCI5150GRSS | Installation Instructions - Page 7
Dimensions (24"W. Professional) (3706-.51/c8m") (2630-.67/c8m") ((388479mm3-..t0015aoinx/"cc.4.mm")) 22(((2566462617---19...0151///11ccc6mmm66"""))) 40" (102.0 cm) Door Swing 22-1/16" (56.0 cm) 24-1/16" (61.1 cm) 26-9/16" (67.5 cm) 7 - Viking VWCI5150GRSS | Installation Instructions - Page 8
Specifications 15"/24"W. Undercounter/Freestanding Refrigeration Description Overall width Overall height Overall depth from rear cabinet (with door panel) (with door handle) Cutout width Cutout height Cutout depth Electrical requirements Maximum amp usage Approximate shipping weight 15" 24" 14 - Viking VWCI5150GRSS | Installation Instructions - Page 9
Cutout Dimensions (61.0 c2m4)" A 34-1/2" (87.6 cm) min. to 35-1/2" (90.2 cm) max. 4" (10.2 cm) min. to 10" (25.4 cm) max. A 15"W. Models - 15" (38.1 cm) 24"W. Models - 24" (61.0 cm) 9 - Viking VWCI5150GRSS | Installation Instructions - Page 10
prepared. Ensure the space dimensions and electrical service are correct for the models to be it is recommended that the countertop be supported by structure other than the refrigerated cabinet inch. Preparing Electrical Connections All electrical instructions assume that outlet is located 4 to - Viking VWCI5150GRSS | Installation Instructions - Page 11
General Information Unpacking and Moving Unit CAUTION Do not cut cardboard sleeve covering the unit. Cutting may result in damage to the exterior of the cabinet. 1. Uncrate the unit outside on a flat level surface. Remove the cardboard sleeve by removing the banding holding the sleeve to the - Viking VWCI5150GRSS | Installation Instructions - Page 12
Anti-Tip Brackets WARNING Unit may tip forward if loaded racks/shelves are all pulled out at the same time. To prevent tipping and provide a stable installation, the unit must be secured in place with the anti-tip brackets provided with the unit. A set of metal anti-tip brackets are supplied with - Viking VWCI5150GRSS | Installation Instructions - Page 13
under the anti-tip brackets. 5. Shim the front of the unit so the front face is flush with surrounding cabinetry. Adjust the front legs to support the countertop at the shimmed height. Using an adjustable wrench or pliers, turn legs counterclockwise to raise the unit or clockwise to lower the unit - Viking VWCI5150GRSS | Installation Instructions - Page 14
Installation (cont.) 6. Check interior door openings inside the cabinet to ensure the cabinet is level. Reinstall all shelving and drawers. Take extreme care to insert sliding shelving and sliding drawers squarely into slide brackets and proper slide bracket grooves. When sliding shelving and - Viking VWCI5150GRSS | Installation Instructions - Page 15
slotted kickplate. Secure slotted kickplate by snapping the latch into the latch catch on the unit. CAUTION The slotted kickplate must be removable for servicing. The floor cannot interfere with removal. The slotted sections of the kickplate must not be covered or obstructed so as to prevent proper - Viking VWCI5150GRSS | Installation Instructions - Page 16
Installation Checklist IMPORTANT: To ensure a safe and proper installation, review below items directly with installer. □ Has all shipping tape, string and packing been removed? □ Has the unit been secured in place with the provided anti-tip bracket or is the unit 1 inch or less from a solid soffit? - Viking VWCI5150GRSS | Installation Instructions - Page 17
service agency. The name of the authorized service agency can be obtained from the dealer or distributor in your area. When you make a service the name of an authorized service agency, or if you continue to have service problems, contact Viking Range, LLC If service requires installation of parts, - Viking VWCI5150GRSS | Installation Instructions - Page 18
18 - Viking VWCI5150GRSS | Installation Instructions - Page 19
19 - Viking VWCI5150GRSS | Installation Instructions - Page 20
Viking Range, LLC 111 Front Street Greenwood, Mississippi 38930 USA (662) 455-1200 For product information, call 1-888-845-4641 F20868C EN UL C UL (010115)
-
 1
1 -
 2
2 -
 3
3 -
 4
4 -
 5
5 -
 6
6 -
 7
7 -
8
-
9
-
10
-
11
-
12
-
13
-
14
-
15
-
16
-
17
-
18
-
19
-
20
 |
 |

Installation Guide
15”W./24”W.
Undercounter Refrigeration