Vivitar 5024 VC5024 User Manual
Vivitar 5024 Manual
 |
View all Vivitar 5024 manuals
Add to My Manuals
Save this manual to your list of manuals |
Vivitar 5024 manual content summary:
- Vivitar 5024 | VC5024 User Manual - Page 1
ViviCam 5024 Digital Camera Owner Manual © 2009 Sakar International, Inc. All rights reserved. Windows and the Windows logo are registered trademarks of Microsoft Corporation. All other trademarks are the property of their respective companies. - Vivitar 5024 | VC5024 User Manual - Page 2
photos and videos to your PC ...24 Viewing Videos ...28 Transferring photos and videos to your PC manually 29 Transferring photos and videos to your MAC manually 30 Maintenance of Your Digital Camera...30 Sakar Warranty Card...30 Appendix A: Specifications ...32 Appendix B: Troubleshooting ...33 1 - Vivitar 5024 | VC5024 User Manual - Page 3
. • Support s SD/MMC memory card (not included) up to 8GB. • 2.4 inch TFT Color LCD • PhoTags Express software for managing and enhancing your photos, add captions, send E-mail, printing and much more. What your camera includes y Digital Camera y PhoTags Express software Installation CD y USB cable - Vivitar 5024 | VC5024 User Manual - Page 4
Windows Vista To be able to download photos to your PC your will need the following minimum configuration: y Windows Vista y 800MHz processor and 512 MB of system memory y 20GB hard driver with at least 15GB of available space y Support for Super VGA graphics y Available USB Interface y CD-ROM drive - Vivitar 5024 | VC5024 User Manual - Page 5
A Quick Look at Your Camera 4 - Vivitar 5024 | VC5024 User Manual - Page 6
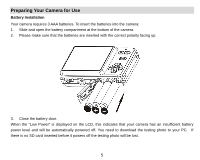
. When the "Low Power" is displayed on the LCD, this indicates that your camera has an insufficient battery power level and will be automatically powered off. You need to download the testing photo to your PC. If there is no SD card inserted before it powers off the testing photo will be lost. 5 - Vivitar 5024 | VC5024 User Manual - Page 7
use for 60s it will automatically shut off. Installing SD Memory Card Your camera has a memory card slot that enables you to insert any "SD" compatible memory card. Adding a memory card will allow you to increase the capacity of your camera before you have to transfer photos and videos to your PC - Vivitar 5024 | VC5024 User Manual - Page 8
power is turned off. Please download the images before power off .SD memory card is required for normal use 2. An external memory card is required for normal use. Your camera supports any compatible SD memory card (up to 8GB). 3. "Card inserted, change to SD card" will appear on the LCD screen - Vivitar 5024 | VC5024 User Manual - Page 9
photos or videos when the camera's internal memory is full, the camera will beep continuously. Please download the test images to your computer as soon as possible or insert an SD memory card in order to take more images! Flash Your camera has a built in flash function which enables you to take - Vivitar 5024 | VC5024 User Manual - Page 10
the flash, please change the batteries. Digital Zoom function You can magnify your subject using the digital zoom up to 8X. Use the T and W buttons to adjust the zoom. 1. Press the T button to zoom in on your subject. 2. Press the W button to zoom back out. Anti-shake function Your Digital Camera - Vivitar 5024 | VC5024 User Manual - Page 11
the LCD screen. Change Image Resolution The build-in memory allows you to take one 3.1 Mega-Pixel testing photo without SD memory card, inserted a SD memory card to get more image size selections. 1. Press the and therefore will take up more camera memory capacity than lower resolution photos. 10 - Vivitar 5024 | VC5024 User Manual - Page 12
either: 50 HZ 60 HZ 5. Press the Menu/OK button to confirm. Hyperfocal distance setting This camera is equipped with a hyperfocal distance setting. The setting is found on the left hand side of the camera. 1. For far or mountain settings push the Micro/Normal switch down. 2. For up close settings - Vivitar 5024 | VC5024 User Manual - Page 13
on the LCD accompanied by a flashing red LED light. 5. At the end of the 10 seconds the camera will automatically take the picture. 6. To use the Self Timer again simply press the Shutter button once more. Delete last photo quickly In camera mode, you can quickly review or delete the last photo you - Vivitar 5024 | VC5024 User Manual - Page 14
. In order to use this mode an SD memory card required. 1. Insert a SD memory card. 2. Power on your camera. 3. Press the MODE button to select the not use a memory card. 2. You can playback the AVI file by using Quick Time or Windows Media Player once it has been downloaded to your computer - Vivitar 5024 | VC5024 User Manual - Page 15
either: 50 HZ 60 HZ 5. Press the Menu/OK button to confirm. Playback Mode You can preview your photos in this mode. 1. Power on your camera. 2. Press the MODE button to enter the Playback Mode. 3. An icon will appear on the upper left corner of the LCD. 4. Press the MODE button - Vivitar 5024 | VC5024 User Manual - Page 16
the Shutter button to play. 3. Press the Shutter button again to stop. Delete photo and/or videos You may delete images directly from the memory card on your camera. The images can only be deleted while in the playback mode. 1. In playback mode, select a photo and press the Menu/OK button. 2. Press - Vivitar 5024 | VC5024 User Manual - Page 17
delete all of the files in your camera's memory (internal memory or SD memory card, depending on the device selection). Please be appear on the LCD once the format has completed. Print your photos Your camera supports PictBridge printing function that allows you to print photos in any time. 1. - Vivitar 5024 | VC5024 User Manual - Page 18
, make sure that you do not have the camera's USB cable attached to your computer. This will affect the install process and can cause a failed installation of the camera software and drivers. In order to install the Software and drivers to download and edit the photos and videos captured using this - Vivitar 5024 | VC5024 User Manual - Page 19
3. Please review the license terms and click the "I Agree" button to continue. 4. Let the "PhoTags Express" installer create the folder where the program will be installed to, and then click "Install". 18 - Vivitar 5024 | VC5024 User Manual - Page 20
5. Please wait while the application is being installed on your computer. 6. Once the application has been installed on your computer, click the "Finish" button to let the "PhoTags Express" installer finish the installation program. 19 - Vivitar 5024 | VC5024 User Manual - Page 21
If you selected the option for the application to start after pressing the Finish button, the application will automatically launch. If not, then in order to open the application you need to double click on the Photags Express icon on the desktop. 20 - Vivitar 5024 | VC5024 User Manual - Page 22
Support. software that is installed on your computer allows you to edit existing photos that you have on your computer as well as the photos that you have captured with your camera. 1. Plug one end of the USB cable into the USB port of the camera. 2. Plug the other end of the USB cable into a USB - Vivitar 5024 | VC5024 User Manual - Page 23
4. If the Camera is off it will automatically be turned on when the USB cable is properly connected. If you have not already opened your application then click the "PhoTags Express" icon that appears on your desktop to open the "PhoTags Express" Software. From the Main Menu screen that appears, - Vivitar 5024 | VC5024 User Manual - Page 24
Enhance your photos; Auto Enhance, Crop, Correct Red Eye, Manually Adjust and add Special Effects. Add Active Captions- add Text uploading online. Workshops feature allows you to Create Calendars, two-sided Greeting Cards and Postcards on standard photo paper... Create Photo Albums and Slide Shows - Vivitar 5024 | VC5024 User Manual - Page 25
Download photos and videos to your PC Transfer Photos and video images from your camera to your PC using PhoTags Express. Select the "Get Photos" button from the top of the PhoTags Express Main Menu screen. The Get Photos Wizard opens. 24 - Vivitar 5024 | VC5024 User Manual - Page 26
Select the device (removable disk) option in the Active Devices window on the left and then select either the "Custom" or "Express" copy radial button in the Copy methods box. CUSTOM COPY METHOD Select the "Custom" copy radial button. Click the "Next" button. Add Active Captions to your pictures. - Vivitar 5024 | VC5024 User Manual - Page 27
the C:\My Documents\ My Pictures folder with the date when the photos were taken as the folder name. Click the "Finish" button to start the download process. A photos download progress bar appears showing the number of media (videos included - Vivitar 5024 | VC5024 User Manual - Page 28
All the media - Photos and Videos on your camera are now downloaded to your computer to the selected folder. Open the "Select Photos" mode of Photags Express to get the most out of your PhoTags application select the "Show Me How" or the "?" Help Guide button found on the top right of the screen. 27 - Vivitar 5024 | VC5024 User Manual - Page 29
please refer to the Help Guide in PhoTags Express. Viewing Videos Make sure that your camera is connected to your computer with the USB cable. Open any application that will enable you to view video files (for example Windows Media Player). Videos created and downloaded should be sitting in the - Vivitar 5024 | VC5024 User Manual - Page 30
and videos to your PC manually Connect your camera to the computer correctly with USB cable, the screen will be shown a window (Removable Disk F:) as below: NOTE: Now you can download the photos and videos to your computer with two methods as below: 1. Download photos directly from windows Choose - Vivitar 5024 | VC5024 User Manual - Page 31
into an available USB port 2. A new drive should mount on the desktop which stores any photos or videos that have been taken. Maintenance of Your Digital Camera The digital camera is a delicate device. Please handle your camera with care to avoid damaging it. Sakar Warranty Card This warranty covers - Vivitar 5024 | VC5024 User Manual - Page 32
Required: When returning your defective product (postage pre-paid) for service, your package should include: 1. Copy of original bill of sale 2. A detailed written description of the problem. 3. Your return address and telephone number (Daytime) MAIL TO ADDRESS BELOW: Sakar International Attention - Vivitar 5024 | VC5024 User Manual - Page 33
resolution Lens External memory Flash Digital Zoom Self-timer Power saving Battery Transmission interface Working temperature Computer system CMOS sensor 5M (2592x1944pixels 4:3), 3M (2048x1536pixels 4:3), 2M (1920x1080pixels 16:9 ), VGA (640x480pixels 4:3) f=7.23mm, F2.8 Support SD card up to 8GB - Vivitar 5024 | VC5024 User Manual - Page 34
Appendix B: Troubleshooting Q: I have taken photos but my computer says, "No photos in camera." What do I do? A: First ensure that you have in fact taken photos. Press the Shutter/OK button a few times to take some sample photos and then try downloading them again. If you still get a "no photos" - Vivitar 5024 | VC5024 User Manual - Page 35
camera. If not, you will likely see "Digital Still Camera" camera uses SDRAM memory, which requires a constant electric current to store your photos. Should your camera lose power (for instance if the battery dies or run out of power) all stored pictures will be lost. We recommend always downloading
-
 1
1 -
 2
2 -
 3
3 -
 4
4 -
 5
5 -
 6
6 -
 7
7 -
8
-
9
-
10
-
11
-
12
-
13
-
14
-
15
-
16
-
17
-
18
-
19
-
20
-
21
-
22
-
23
-
24
-
25
-
26
-
27
-
28
-
29
-
30
-
31
-
32
-
33
-
34
-
35
 |
 |

ViviCam 5024 Digital Camera
Owner Manual
© 2009 Sakar International, Inc. All rights reserved.
Windows and the Windows logo are registered trademarks of Microsoft Corporation.
All other trademarks are the property of their respective companies.