Vivitar DVR 410N DVR 410 Camera Manual
Vivitar DVR 410N Manual
 |
View all Vivitar DVR 410N manuals
Add to My Manuals
Save this manual to your list of manuals |
Vivitar DVR 410N manual content summary:
- Vivitar DVR 410N | DVR 410 Camera Manual - Page 1
DVR 410 Digital Video Camera User's Manual © 2009 Sakar International, Inc. All rights reserved. Windows and the Windows logo are registered trademarks of Microsoft Corporation. All other trademarks are the property of their respective companies. - Vivitar DVR 410N | DVR 410 Camera Manual - Page 2
Look at Your Digital Video Camera 5 Prepare Your Digital Video Camera for Use 7 Insert SD/MMC Memory Card ...8 Starting Your Digital Video Camera...9 Video Mode ...11 Camera Mode ...14 Playback Mode...18 TV out function ...20 Install the Vivitar Experience Image Manager Software 22 Connect your - Vivitar DVR 410N | DVR 410 Camera Manual - Page 3
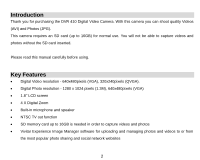
for purchasing the DVR 410 Digital Video Camera. With this camera you can shoot quality Videos (AVI) and Photos (JPG). This camera requires an SD card (up to 16GB) for normal use. You will not be able to capture videos and photos without the SD card inserted. Please read this manual carefully before - Vivitar DVR 410N | DVR 410 Camera Manual - Page 4
to use the camera during driving. When not using the camera for extended periods of time, remove the batteries from the camera. What your Camera Includes Digital Video Camera TV cable Strap Built-in USB connector Vivitar Experience Image Manager software Installation CD User`s Manual 3 - Vivitar DVR 410N | DVR 410 Camera Manual - Page 5
Vista To be able to download photos and videos to your PC you will need the following minimum configuration: Windows Vista 800MHz processor and 512 MB of system memory 20GB hard drive with at least 15GB of available space Support for Super VGA graphics Available USB Interface - Vivitar DVR 410N | DVR 410 Camera Manual - Page 6
Computer System Requirements for Macintosh Macintosh with Intel processor running Mac OS X v10.4.6 or later 256 MB RAM, 100 MB free disk space Display: 1024 x 768 or higher-resolution monitor QuickTime 6 or higher Internet connection A Quick Look at Your Digital Video Camera 5 - Vivitar DVR 410N | DVR 410 Camera Manual - Page 7
6 - Vivitar DVR 410N | DVR 410 Camera Manual - Page 8
Prepare Your Digital Video Camera for Use Battery Installation Your Digital Video Camera requires 3 AAA batteries (alkaline batteries are recommended). Insert the batteries into your Digital Video Camera as directed below: 1. Slide the battery cover on the front of the camera in a downward direction - Vivitar DVR 410N | DVR 410 Camera Manual - Page 9
memory card. (SD cards are not included and need to be purchased separately). Note: Power off the camera before inserting or removing the memory card. Please follow these steps to insert the memory card: 1. Locate the memory card slot on the side of your Digital Video Camera. 2. Insert the memory - Vivitar DVR 410N | DVR 410 Camera Manual - Page 10
Your Digital Video Camera Power on Press the Power button on the side of the camera to power on the camera. The LCD will light up and the Video mode will appear by default indicating that you camera is ready to use to capture videos. If you have not inserted a compatible SD memory card, a "NO CARD - Vivitar DVR 410N | DVR 410 Camera Manual - Page 11
Right and left Zoom in and out in the camera mode Camera mode, Video button mode and Playback and of the photos in playback mode. mode OK/Shutter Take Photo/ Start or Mode Shift between Camera, Video and stop to record video clips. Play and pause Playback modes. videos in Playback mode 10 - Vivitar DVR 410N | DVR 410 Camera Manual - Page 12
as an AVI video file on the memory card. 8. The amount of time that you can capture videos depends on the size of the SD memory card inserted and the video resolution selected. Note: The lower the resolution setting the more recording time is available. However videos recorded at lower resolution - Vivitar DVR 410N | DVR 410 Camera Manual - Page 13
Resolution settings Your Digital Video Camera supports 2 video resolutions - VGA and QVGA. 1. Press the Menu button in the Video mode. 2. resolution. Note: Videos captured in VGA are of a better quality than QVGA videos and therefore take up more of the camera`s memory. Frequency setting Generally - Vivitar DVR 410N | DVR 410 Camera Manual - Page 14
OK button to confirm and save the speaker status on or off. Language You can select the language in which the camera menus will display. 1. Press the Menu button in the Video mode. 2. Press the Up or Down button to select the LANGUAGE option 3. Press the OK/Shutter button to open the - Vivitar DVR 410N | DVR 410 Camera Manual - Page 15
digital video camera. 2. Press the Mode button to select and enter the Camera mode. 3. The camera icon will appear on the LCD. 4. The amount of photos that can be captured with the available memory button to capture and save your photo to the memory card. Note: The lower the resolution setting the - Vivitar DVR 410N | DVR 410 Camera Manual - Page 16
wish to choose. 5. Press the OK button to confirm and save the capture setting. 6. Press the Shutter button to capture the photo(s). Resolution settings Your Digital Video Camera supports 2 camera resolutions - 1.3M and VGA. 1. Press the Menu button in the - Vivitar DVR 410N | DVR 410 Camera Manual - Page 17
on the SD memory card. Frequency setting Generally speaking, 60HZ is for the countries such as U.S. and 50HZ for countries such as Japan. The default setting is 60HZ. Select the frequency setting that best suits your present location 1. Press the Menu button in the Camera mode. 2. Press the Up - Vivitar DVR 410N | DVR 410 Camera Manual - Page 18
OK button to confirm and save the speaker status on or off. Language You can select the language in which the camera menus will display. 1. Press the Menu button in the Video mode. 2. Press the Up or Down button to select the LANGUAGE option 3. Press the OK/Shutter button to open the - Vivitar DVR 410N | DVR 410 Camera Manual - Page 19
the LCD screen. 3. In this mode, you can view all the photos and play the video files taken with the camera and saved to the memory card. Note: if there are no photos or videos on the SD Card once inserted in the camera a "NO FILE" message will appear on the LCD screen on entering this mode. View - Vivitar DVR 410N | DVR 410 Camera Manual - Page 20
key to view the next file. Delete or Format You can delete unwanted files or format the SD memory card inserted in the camera from the Playback mode. 1. In the Playback mode, search and select the AVI video or JPEG photo file you wish to delete by pressing the Up or Down buttons. 2. Press the - Vivitar DVR 410N | DVR 410 Camera Manual - Page 21
Format option will delete all data on your SD memory card. Videos or Photos that you have not downloaded to your computer will be erased forever. Please be sure of your choice before using this function. TV out function Your Digital Video Camera supports an NTSC TV out function. This function can - Vivitar DVR 410N | DVR 410 Camera Manual - Page 22
slot. 6. The LCD screen of your Digital Video Camera will now turn off and the image will now appear on the TV screen. 7. To see a video being captured in real time on your TV, point the camera at the object and begin to record as described in the Shooting Videos section above. 8. The image being - Vivitar DVR 410N | DVR 410 Camera Manual - Page 23
Install the Vivitar Experience Image Manager Software Warning: Do not plug your camera into the computer until the software installation is complete. 1. Insert the installation CD into your CD-ROM drive. The Vivitar Experience Image Manager will begin to install. 2. Please review the license terms. - Vivitar DVR 410N | DVR 410 Camera Manual - Page 24
storage device "MSDC" will appear on the LCD, indicating that your camera is in Mass Storage Mode. Get photos and videos from your camera to your computer An SD/MMC card needs to be inserted into the camera. Do not disconnect the camera during file transfer. Doing so will cancel the transfer of any - Vivitar DVR 410N | DVR 410 Camera Manual - Page 25
2. The "Get media from device" window opens. 3. You can select to download photos, videos or both. 4. Select your camera (removable disk) from the device window. If your camera is the only USB device connected then it will be selected automatically. 5. Select a location on the computer where to - Vivitar DVR 410N | DVR 410 Camera Manual - Page 26
YouTube and Photobucket. Seamlessly transfer photos and videos from one social network to another. Edit images using automatic and manual tools. Use automatic "Geotagging" with built in Google Maps. For more details on how to use the Vivitar Experience Image Manager open the Help file or click - Vivitar DVR 410N | DVR 410 Camera Manual - Page 27
into the Videos/My Videos folder. 7. Do not disconnect the cable during transfer. Doing so will cancel the transfer of any files on their way to your computer. Transfer media from my camera to my computer manually (Using Macintosh) 1. Use the USB built-in connector on your camera to connect your - Vivitar DVR 410N | DVR 410 Camera Manual - Page 28
We recommend that you copy the images into the Pictures folder and the videos into the Movies folder. 7. Do not disconnect the cable during transfer. . On disconnecting the USB connector the camera will automatically switch off. Sakar Warranty Card This warranty covers for the original consumer - Vivitar DVR 410N | DVR 410 Camera Manual - Page 29
Attention: Service Department 195 Carter Drive Edison, NJ 08817 In the UK: Sakar / Vivitar 2D, Siskin Parkway East 4020 Middlemarch Business Park Coventry, CV3 4PE Technical Support For technical support issues please visit our website at www.vivitar.com. You can find manuals, software and FAQ - Vivitar DVR 410N | DVR 410 Camera Manual - Page 30
Internal memory External memory Lens Frequency Self Timer Digital Zoom White Balance / Exposure Speaker File Format TV out Digital Video Camera 640*480 pixels ( 30fps) / 320*240 pixels( 30fps ) 1280*1024 pixels / 640*480 pixels CMOS Sensor 1.8" TFT 24 bit RGB 1/8 sec to 1/5000 sec None SD/MMC card - Vivitar DVR 410N | DVR 410 Camera Manual - Page 31
10.4.6 or higher) Troubleshooting The Camera does not Power on camera does not take pictures. 1. The Memory is full. 2. The Memory card is not formatted correctly. ★Download the images to your computer and then delete all the images on the SD Card. ★Insert a new memory card. ★Format the memory card - Vivitar DVR 410N | DVR 410 Camera Manual - Page 32
been removed from where they were located on from the Recycle or Trash Bin. the computer. Recorded images are not saved in memory. 1. The camera was turned off before the images were saved to memory. ★If the battery low indicator appears on the LCD monitor, replace the batteries immediately. A00
-
 1
1 -
 2
2 -
 3
3 -
 4
4 -
 5
5 -
 6
6 -
 7
7 -
8
-
9
-
10
-
11
-
12
-
13
-
14
-
15
-
16
-
17
-
18
-
19
-
20
-
21
-
22
-
23
-
24
-
25
-
26
-
27
-
28
-
29
-
30
-
31
-
32
 |
 |

DVR 410
Digital Video Camera
User
’s
Manual
© 2009 Sakar International, Inc. All rights reserved.
Windows and the Windows logo are registered trademarks of Microsoft Corporation.
All other trademarks are the property of their respective companies.