Vivitar DVR 785HD Camera Manual
Vivitar DVR 785HD Manual
 |
View all Vivitar DVR 785HD manuals
Add to My Manuals
Save this manual to your list of manuals |
Vivitar DVR 785HD manual content summary:
- Vivitar DVR 785HD | Camera Manual - Page 1
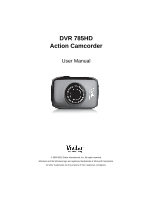
DVR 785HD Action Camcorder User Manual © 2009-2012 Sakar International, Inc. All rights reserved. Windows and the Windows logo are registered trademarks of Microsoft Corporation. All other trademarks are the property of their respective companies. - Vivitar DVR 785HD | Camera Manual - Page 2
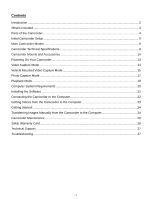
Main Camcorder Modes ...8 Camcorder Technical Specifications 9 Camcorder Mounts and Accessories 10 Powering On Your Camcorder...13 Video Capture Mode ...14 Vehicle Mounted Video Capture Mode 15 Photo Capture Mode ...17 Playback Mode...18 Computer System Requirements 20 Installing the Software - Vivitar DVR 785HD | Camera Manual - Page 3
action camcorder normally, please insert the Micro SD Memory card before use. Micro SD Memory cards are not included and need to be purchased separately. This camera is a plug and play device. You can download the pictures and videos without the software by directly accessing the memory card - Vivitar DVR 785HD | Camera Manual - Page 4
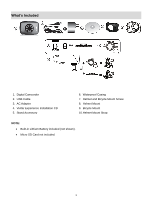
1. Digital Camcorder 2. USB Cable 3. AC Adapter 4. Vivitar Experience Installation CD 5. Stand Accessory 6. Waterproof Casing 7. Helmet and Bicycle Mount Screw 8. Helmet Mount 9. Bicycle Mount 10.Helmet Mount Strap NOTE: Built-in Lithium Battery included (not shown). Micro SD Card not included - Vivitar DVR 785HD | Camera Manual - Page 5
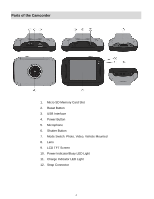
Parts of the Camcorder 1. Micro SD Memory Card Slot 2. Reset Button 3. USB Interface 4. Power Button 5. Microphone 6. Shutter Button 7. Mode Switch: Photo, Video, Vehicle Mounted 8. Lens 9. LCD TFT Screen 10. Power Indicator/Busy LED Light 11. Charge Indicator LED Light 12. Strap Connector 4 - Vivitar DVR 785HD | Camera Manual - Page 6
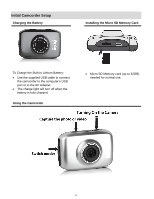
Installing the Micro SD Memory Card To Charge the Built-in Lithium Battery: Use the supplied USB cable to connect the camcorder to the computer's USB port or to the AC Adapter. The charge light will turn off when the battery is fully charged. Using the Camcorder Micro SD Memory card (up to - Vivitar DVR 785HD | Camera Manual - Page 7
once the battery level is completely exhausted and the camcorder automatically turns off after a few seconds. Micro SD Memory Card Make sure a Micro SD Memory card has been properly inserted into your camcorder. Micro SD Memory card not included. To properly insert the Micro SD Card: 1. Power off - Vivitar DVR 785HD | Camera Manual - Page 8
the card out. 5. If the card is inserted or removed while the camcorder's power is on, it may damage the card and/or any recorded data. Always confirm that the power is off before inserting the card into the camcorder. Power On Press the POWER button, located on top of the camcorder, to turn on - Vivitar DVR 785HD | Camera Manual - Page 9
camcorder's memory card. Vehicle Mounted Video Capture Mode Use this mode to capture videos with your camcorder while you are in motion and using the helmet or bicycle mount. Slide the MODE Switch to the Vehicle Mounted Capture icon to open the Vehicle Mounted Video Capture Mode. To take a video - Vivitar DVR 785HD | Camera Manual - Page 10
Balance Light Exposure Metering Auto Power Off Interface System Requirements Battery CMOS Sensor HD(1280×720)@30fps VGA (640x480)@60fps 5.1MP (2592X1944) 3.0MP (2048x1536) 1.3 MP (1280×1024) AVI (Video), JPEG (Photo) Micro SD Memory card, up to 32GB 2.0"TFT, resistive touch panel 4X Digital Zoom - Vivitar DVR 785HD | Camera Manual - Page 11
safe for use under water. 3. There are just two buttons required for recording video and images: the Shutter Button and the Power Button. 4. Remember to put the Mode Switch in your desired recording position before inserting the camcorder in the waterproof case. There is no external button for the - Vivitar DVR 785HD | Camera Manual - Page 12
4. Bar Clamp 5. Tilt Knob 1. The camcorder does not have a standard tripod mount. For all the accessories with a ¼-20 screw, the camcorder must be enclosed in with the waterproof case or in the included mounting adapter. 2. Turn the waterproof case (or mounting adapter) clockwise onto the ¼-20 screw - Vivitar DVR 785HD | Camera Manual - Page 13
both ends of the Belt and pull to tighten and then attach together with the Velcro strap. 4. Turn the Waterproof case (or mounting adapter) onto the ¼-20 screw of the Helmet Mount until secured. 5. Turn the Locking Wheel so it applies pressure to the case to keep the connection secure. 6. Loosen the - Vivitar DVR 785HD | Camera Manual - Page 14
off, you can press the POWER button to power on the camcorder. NOTE: After 2 minutes of inactivity, the camcorder LCD screen turns black to save energy. The red 'Busy' LED light is on to indicate that the camcorder is in standby mode. Simply press any button or touch the LCD screen to reactivate - Vivitar DVR 785HD | Camera Manual - Page 15
Mode The Video Capture Mode allows you to capture videos with your digital camcorder. Slide the MODE Switch to the middle, to the Video Capture icon, in order to open the Video Capture Mode. The Video Capture icon appears on the bottom of the LCD screen. Memory Capacity Memory Card Inserted Battery - Vivitar DVR 785HD | Camera Manual - Page 16
to the camcorder's Micro SD card. NOTE: When the storage capacity of the Micro SD Memory card is full, the earliest segment of video will be deleted to release the corresponding space for continuous recording. Vehicle Mounted Video Capture Mode The Vehicle Mounted Video Capture Mode allows you - Vivitar DVR 785HD | Camera Manual - Page 17
The elapsed time appears on the top left corner of the LCD screen. 5. To stop the video recording, press the Shutter button or touch the LCD screen again. 6. The video is automatically saved to the camcorder's Micro SD card. NOTE: When the storage capacity of the Micro SD Memory card is full, the - Vivitar DVR 785HD | Camera Manual - Page 18
you to capture photos with your digital camcorder. Slide the MODE Switch to the top, to the Photo Capture icon, in order to open the Photo Capture Mode. The Photo Capture icon appears on the bottom of the LCD screen. Memory Capacity Memory Card Inserted Resolution Indicator 5M 5.1MP (2592X1944) 3M - Vivitar DVR 785HD | Camera Manual - Page 19
allows you to review and delete photos and videos that you've captured with you camcorder. When you first turn on the camcorder, the camcorder will be in Capture mode by default. To enter the Playback Mode: From Photo, Video, or Vehicle Mounted Video Capture Mode touch the Playback Mode icon on the - Vivitar DVR 785HD | Camera Manual - Page 20
button. NOTE: While the video is playing the elapsed time appears on the top, left of the LCD screen and all icons disappear. Deleting Captured Images While in the Playback mode, you can delete captured videos and photos saved to the Micro SD Memory card in your camcorder by touching the DELETE icon - Vivitar DVR 785HD | Camera Manual - Page 21
Computer System Requirements To be able to download videos and photos to your computer, you will need the following minimum configuration: WINDOWS OS Microsoft® Windows XP with Service Pack 3, Windows Vista with Service Pack 1 or Windows 7 Pentium® 4 processor (or above) 1 GB of RAM, 250 MB - Vivitar DVR 785HD | Camera Manual - Page 22
then click the "Install Vivitar Experience Image Manager" button to begin the installation. NOTE: If you do not have internet access, you can still download media from the camcorder. Click the "How to transfer photos and videos from my camera to my computer" button for instructions. 5. If you have - Vivitar DVR 785HD | Camera Manual - Page 23
you can run the Vivitar Experience Image Manager from the Programs (PC) or Applications (Mac) menu on your computer. Connecting the Camcorder to the Computer 1. Use the supplied USB cable to connect your digital camcorder to your computer. 2. Power the camcorder ON. 3. The first time you connect the - Vivitar DVR 785HD | Camera Manual - Page 24
Getting Videos from the Camcorder to the Computer The Micro SD Memory card needs to be inserted. Do not from device" window opens. 3. You can select to download videos. 4. Select your camera (removable disk) from the device window. If your camera is the only USB device connected then it will be - Vivitar DVR 785HD | Camera Manual - Page 25
with built in Google Maps For more details on how to use the Vivitar Experience Image Manager open the Help file or click the "Take a Tour" button on the application's Home screen. Transferring Images Manually from the Camcorder to the Computer WINDOWS OS 1. Use the supplied USB cable to connect - Vivitar DVR 785HD | Camera Manual - Page 26
be purchased separately. 2. Using an iPad SD Card Reader: Connect the SD Card Reader to your iPad, then insert your digital camcorder's Micro SD Memory card into the slot to import photos and videos directly from your camera's SD card. NOTE: iPad SD Card Reader not included. This may be purchased - Vivitar DVR 785HD | Camera Manual - Page 27
ADDRESS BELOW: Sakar US Sakar International Attention: Service Department 195 Carter Drive Edison, NJ 08817 Sakar UK/Europe Attention: Service Department 2D, Siskin Parkway East 4020 Middlemarch Business Park Coventry, CV3 4PE Sakar Australia Return faulty camera to the Refund Counter at the store - Vivitar DVR 785HD | Camera Manual - Page 28
Q: How do I make sure I don't lose important pictures? This camcorder requires a Micro SD card for normal use. If the camera powers off nothing will happen to the images stored on the memory card. We recommend always downloading your photos and videos to your computer as soon as possible to prevent
-
 1
1 -
 2
2 -
 3
3 -
 4
4 -
 5
5 -
 6
6 -
 7
7 -
8
-
9
-
10
-
11
-
12
-
13
-
14
-
15
-
16
-
17
-
18
-
19
-
20
-
21
-
22
-
23
-
24
-
25
-
26
-
27
-
28
 |
 |
DVR 785HD
Action Camcorder
User Manual
© 2009-2012 Sakar International, Inc. All rights reserved.
Windows and the Windows logo are registered trademarks of Microsoft Corporation.
All other trademarks are the property of their respective companies.