Vivitar DVR 805HD Camera Manual
Vivitar DVR 805HD Manual
 |
View all Vivitar DVR 805HD manuals
Add to My Manuals
Save this manual to your list of manuals |
Vivitar DVR 805HD manual content summary:
- Vivitar DVR 805HD | Camera Manual - Page 1
DVR 805HD Digital Video Recorder User Manual © 2010 Sakar International, Inc. All rights reserved. Windows and the Windows logo are registered trademarks of Microsoft Corporation. All other trademarks are the property of their respective companies. - Vivitar DVR 805HD | Camera Manual - Page 2
from your Camera to Your Computer 43 Get started!...44 Transfer media from my camera to my computer manually (Using Windows 44 Transfer media from my camera to my computer manually (Using Macintosh 45 Camera Maintenance ...45 Sakar Warranty Card...46 Technical Support...47 Troubleshooting...47 1 - Vivitar DVR 805HD | Camera Manual - Page 3
. SD Memory cards are not included and need to be purchased separately. What's Included 1. Digital Video Recorder 2. Lithium Battery 3. USB cable 4. TV Cable 5. HDMI Cable 6. Vivitar Experience Image Manager software Installation CD 7. AC Charger 8. Wrist Strap Note: SD Memory Card not included. 2 - Vivitar DVR 805HD | Camera Manual - Page 4
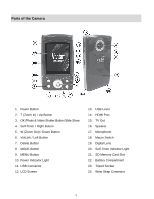
Parts of the Camera 1. Power Button 2. T (Zoom In) / Up Button 3. OK /Photo & Video Shutter Button /Slide Show 4. Self-Timer / Right Button 5. W ( Switch 19. Digital Lens 20. Self-Timer Indicator LIght 21. SD Memory Card Slot 22. Battery Compartment 23. Tripod Socket 24. Wrist Strap Connector 3 - Vivitar DVR 805HD | Camera Manual - Page 5
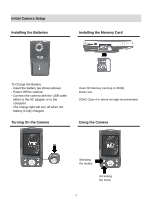
the Memory Card To Charge the Battery: - Insert the battery (as shown above). - Power Off the camera. - Connect the camera with the USB cable either to the AC adapter or to the computer. - The charge light will turn off when the battery is fully charged. Turning On the Camera Insert SD Memory card - Vivitar DVR 805HD | Camera Manual - Page 6
lithium battery has been charged and Camera?" Select "Yes" to continue or "Cancel" to exit the setup. Note: If you select "Cancel" and decide to leave the camera setup, the camera will be set to its default settings. These settings can be adjusted at any time manually using the menus in the camera - Vivitar DVR 805HD | Camera Manual - Page 7
the default ViviLink destination for photos and videos taken with your camera. The ViviLink technology allows you to quickly and easily upload your camera‟s photos and videos to the social networks of your choice with the accompanying software application. 1. First you will be asked to choose the - Vivitar DVR 805HD | Camera Manual - Page 8
while in the Photo Capture mode. Playback Mode (Photos & Videos) Use this mode to view and manage the photos and videos on your camera. After turning on your camera, press the MODE (M) button twice to open the Playback mode for photos and videos. You can scroll through the photos and videos that - Vivitar DVR 805HD | Camera Manual - Page 9
Camera Technical Specifications Image Sensor CMOS Sensor Image Resolution Video Resolution File Format 3264x2448(8MP)4:3 English, French, Spanish, Portuguese, German, Dutch, Italian USB 2.0 System Requirements Battery Windows XP and above / Mac OSX 10.5 and above BL-5B Li-ion Rechargeable - Vivitar DVR 805HD | Camera Manual - Page 10
Computer System Requirements - WINDOWS OS To be able to download photos and videos to your PC, you will need the following minimum configuration: Pentium 4 processor or above with Windows XP service pack 2, Windows Vista or Windows 7 512 MB RAM, with 100MB of free disk space 1024 x 768 - Vivitar DVR 805HD | Camera Manual - Page 11
properly into your digital camera. If your camera comes with a rechargeable lithium battery, make sure it is fully charged before the first use. Make sure an SD card has been inserted into your camera. Powering the camera ON Press the Power button to turn your camera ON. The camera will be in - Vivitar DVR 805HD | Camera Manual - Page 12
highlight the desired menu option. 4. Press the SET button to select and save the highlighted menu option. 5. If the selection can be remembered by the camera, a selection icon will appear to the right of the selected menu option. Changes made to these options will remain as is until you decide to - Vivitar DVR 805HD | Camera Manual - Page 13
the scene you would like to capture. 2. Click the T/Zoom In and W/Zoom Out buttons to better set the camera display if desired. Note: The actual shape of these buttons may vary per camera model. 3. Press the Shutter button on the right of the directional pad to start the video capture. 4. You - Vivitar DVR 805HD | Camera Manual - Page 14
. 2. Press the MODE button again to redisplay the icons on the screen Video Capture Mode Menus The following are the menus that appear in your camera‟s Video Capture Mode: 13 - Vivitar DVR 805HD | Camera Manual - Page 15
reflecting your selection will display on the LCD screen. 9. Remember that this setting will be saved by your camera until you manually change the setting or restore the camera‟s default factory settings. Image Resolution Menu The Image Resolution menu allows you to choose the desired size of the - Vivitar DVR 805HD | Camera Manual - Page 16
on the LCD screen. 9. Remember that this setting will be saved by your camera until you manually change the setting or restore the camera‟s default factory settings. White Balance Menu The White Balance feature allows your camera to adjust the coloring of the captured images depending on the type of - Vivitar DVR 805HD | Camera Manual - Page 17
the MODE button to exit the menu and return to your previous mode. 8. Remember that this setting will be saved by your camera until you manually change the setting or restore the camera‟s default factory settings. Image Sharpness Menu You can set the level of sharpness in the images taken with your - Vivitar DVR 805HD | Camera Manual - Page 18
on the LCD screen. 9. Remember that this setting will be saved by your camera until you manually change the setting or restore the camera‟s default factory settings. Language Menu You can select your camera‟s language setting by selecting the desired language from the Language menu. 1. Press the - Vivitar DVR 805HD | Camera Manual - Page 19
until you manually change the setting or restore the camera‟s default factory settings. Auto Power Off Menu You can use the Auto Power Off feature in order to conserve you camera‟s battery life. The designated time represents when your camera will automatically power off. When the digital video - Vivitar DVR 805HD | Camera Manual - Page 20
button to exit the menu and return to your previous mode. 8. Remember that this setting will be saved by your camera until you manually change the setting or restore the camera‟s default factory settings. Format Memory Card Menu You can use the Format Memory Card menu to delete all of the content - Vivitar DVR 805HD | Camera Manual - Page 21
the menu and return to the previous mode. Firmware (Factory Default Settings) Menu Use this menu to view the Firmware version on your camera or to reset your camera settings to the Factory Default Settings. 1. Press the SET button to open the menus for the current mode. 2. Press the LEFT or RIGHT - Vivitar DVR 805HD | Camera Manual - Page 22
mode by default. Press the MODE button twice to open the Playback Mode. The Playback mode will allow you to review and edit photos and videos that you‟ve already taken with you camera. Playing Videos on Your Digital Video Recorder 1. Select your Video: Once in Playback mode, press LEFT or RIGHT - Vivitar DVR 805HD | Camera Manual - Page 23
be displayed in a 3 X 3 matrix where you can scroll and select images from the thumbnails. 1. Press the W/Zoom Out button. All the images on your camera will appear in the Thumbnail View. 2. Use the UP / DOWN / LEFT / RIGHT direction buttons to scroll and select the image you wish to view. 3. Press - Vivitar DVR 805HD | Camera Manual - Page 24
the menus may vary. ViviLink Menu The ViviLink technology allows you to quickly and easily upload your camera‟s photos and videos to the social networks of your choice with the accompanying Vivitar Experience Image Manager application. 1. Press the SET button to open the menus for the current mode - Vivitar DVR 805HD | Camera Manual - Page 25
not display the lock symbol. Remember: Protected/Locked videos cannot be deleted. Delete Menu While in the Playback mode, you can delete videos from your camera using the Delete menu. 1. View the image you would like to delete. 2. Press the SET button to open the menus for the current mode. 3. Press - Vivitar DVR 805HD | Camera Manual - Page 26
the picture. 4. The picture will automatically be saved to the memory or SD card. Photo Capture Mode Quick Function Buttons Your digital camera has a four-directional pad that functions as Quick Function buttons: Button Function Left Scene Selection: Opens the Scene menu Right Down Delete - Vivitar DVR 805HD | Camera Manual - Page 27
. 2. Press the MODE button again to redisplay the icons on the screen. Photo Capture Mode Menus The following are the menus that appear in your camera‟s Photo Capture Mode: 26 - Vivitar DVR 805HD | Camera Manual - Page 28
reflecting your selection will display on the LCD screen. 9. Remember that this setting will be saved by your camera until you manually change the setting or restore the camera‟s default factory settings. Image Resolution Menu The Image Resolution menu allows you to choose the desired size of the - Vivitar DVR 805HD | Camera Manual - Page 29
An icon reflecting your selection will display on the LCD screen. 9. Remember that this setting will be saved by your camera until you manually change the setting or restore the camera‟s default factory settings. Self-Timer Menu The Self-Timer menu allows you to set a delay between the time that the - Vivitar DVR 805HD | Camera Manual - Page 30
8. An icon reflecting your selection will display on the LCD screen 9. Remember that this setting will be saved by your camera until you manually change the setting or restore the camera‟s default factory settings. Color Effect Menu You can choose to add a color effect to the images taken with your - Vivitar DVR 805HD | Camera Manual - Page 31
to exit the menu and return to your previous mode. 8. Remember that this setting will be saved by your camera until you manually change the setting or restore the camera‟s default factory settings. Multi Snapshots Menu When enabled, the Multi Snapshots feature allows you to take five rapid snapshots - Vivitar DVR 805HD | Camera Manual - Page 32
icon reflecting your selection will display on the LCD screen 9. Remember that this setting will be saved by your camera until you manually change the setting or restore the camera‟s default factory settings. Light Exposure Menu The Light Exposure setting helps you control the amount of light that - Vivitar DVR 805HD | Camera Manual - Page 33
camera until you manually change the setting or restore the camera‟s default factory settings. Silent Mode Menu You have the option of activating the camera this setting will be saved by your camera until you manually change the setting or restore the camera‟s default factory settings. Auto Power Off - Vivitar DVR 805HD | Camera Manual - Page 34
to exit the menu and return to your previous mode. 8. Remember that this setting will be saved by your camera until you manually change the setting or restore the camera‟s default factory settings. Frequency Menu The options in the Frequency menu represent the frequency of the electrical current in - Vivitar DVR 805HD | Camera Manual - Page 35
the menu and return to the previous mode. Firmware (Factory Default Settings) Menu Use this menu to view the Firmware version on your camera or to reset your camera settings to the Factory Default Settings. 1. Press the SET button to open the menus for the current mode. 2. Press the LEFT or RIGHT - Vivitar DVR 805HD | Camera Manual - Page 36
mode by default. Press the MODE button twice to open the Playback Mode. The Playback mode will allow you to review and edit photos and videos that you‟ve already taken with you camera. Viewing Photos on Your Digital Video Recorder 1. Select your Photo: Once in Playback mode, press LEFT or RIGHT - Vivitar DVR 805HD | Camera Manual - Page 37
be displayed in a 3 X 3 matrix where you can scroll and select images from the thumbnails. 1. Press the W/Zoom Out button. All the images on your camera will appear in the Thumbnail View. 2. Use the UP / DOWN / LEFT / RIGHT direction buttons to scroll and select the image you wish to view. 3. Press - Vivitar DVR 805HD | Camera Manual - Page 38
the menus may vary. ViviLink Menu The ViviLink technology allows you to quickly and easily upload your camera‟s photos and videos to the social networks of your choice with the accompanying Vivitar Experience Image Manager application. 1. Press the SET button to open the menus for the current mode - Vivitar DVR 805HD | Camera Manual - Page 39
. 8. Remember that you cannot delete or edit photos while they are locked. Delete Menu While in the Playback Mode, you can delete pictures from your camera through the Delete menu. 1. View the image you would like to delete. 2. Press the SET button to open the menus for the current mode. 3. Press - Vivitar DVR 805HD | Camera Manual - Page 40
return to the previous mode. Remember: You can view a Slide Show of all the pictures taken with your camera by pressing the UP Quick Function button while in the Photo Playback mode. Connecting the Camera to a TV The camera has an AV port to use your larger TV screen in place of the - Vivitar DVR 805HD | Camera Manual - Page 41
screen is that the camera is now not portable. 1. Connect the camera to a TV with the TV cable (supplied). Connect the black jack into the camera‟s AV slot. Connect view the recording on the TV. 7. When the camera is set to Playback mode, you can review all the stored photos and videos on the TV. - Vivitar DVR 805HD | Camera Manual - Page 42
the internet and then click the "Install Vivitar Experience Image Manager" button to begin the installation. Note: If you do not have internet access, you can still download media from the camera. Click the "How to transfer photos and videos from my camera to my computer" button for instructions. 41 - Vivitar DVR 805HD | Camera Manual - Page 43
your camera model selection and to install the application. 8. Please wait while the application is being installed on your computer. 9. Please review the license " button when the installation is complete. Click the "Launch Vivitar Experience Image Manager" to open the application. 13. On Macintosh - Vivitar DVR 805HD | Camera Manual - Page 44
from the Main menu. 2. The "Get Images from device" window opens. 3. You can select to download photos, videos or both. 4. Select your camera (removable disk) from the device window. If your camera is the only USB device connected then it will be selected automatically. 5. Select a location on the - Vivitar DVR 805HD | Camera Manual - Page 45
" with built in Google Maps For more details on how to use the Vivitar Experience Image Manager open the Help file or click the "Take the Tour" button on the application`s Home page. Transfer media from my camera to my computer manually (Using Windows) 1. Use the USB cable that came with your - Vivitar DVR 805HD | Camera Manual - Page 46
Transfer media from my camera to my computer manually (Using Macintosh) 1. Use the USB cable that came with your camera to connect your camera to your computer. 2. MSDC appears on the LCD. 3. The camera‟s device icon appears on the desktop. 4. Click on the device icon and open the DCIM folder and - Vivitar DVR 805HD | Camera Manual - Page 47
repaired at no charge for parts or problem. 3. Your return address and telephone number (Daytime) MAIL TO ADDRESS BELOW: Sakar US Sakar International Attention: Service Department 195 Carter Drive Edison, NJ 08817 Sakar UK/Europe Sakar Australia Attention: Service Department Return faulty camera - Vivitar DVR 805HD | Camera Manual - Page 48
vivitar.com. You can find manuals, software and FAQ‟s at the website. Can‟t find what you are looking for? E-mail us at [email protected] and one of our technical support team members will answer your questions. For phone support downloading them again. With test photos if the camera powers off before
-
 1
1 -
 2
2 -
 3
3 -
 4
4 -
 5
5 -
 6
6 -
 7
7 -
8
-
9
-
10
-
11
-
12
-
13
-
14
-
15
-
16
-
17
-
18
-
19
-
20
-
21
-
22
-
23
-
24
-
25
-
26
-
27
-
28
-
29
-
30
-
31
-
32
-
33
-
34
-
35
-
36
-
37
-
38
-
39
-
40
-
41
-
42
-
43
-
44
-
45
-
46
-
47
-
48
 |
 |

DVR 805HD
Digital Video Recorder
User Manual
© 2010 Sakar International, Inc. All rights reserved.
Windows and the Windows logo are registered trademarks of Microsoft Corporation.
All other trademarks are the property of their respective companies.