Vizio D65x-G4 User Manual
Vizio D65x-G4 Manual
 |
View all Vizio D65x-G4 manuals
Add to My Manuals
Save this manual to your list of manuals |
Vizio D65x-G4 manual content summary:
- Vizio D65x-G4 | User Manual - Page 1
USER MANUAL Models: D32h-F4, D43fx-F4, and D65x-G4 - Vizio D65x-G4 | User Manual - Page 2
services for • Read these instructions. shock, or component damage. your VIZIO product, visit our website at www.VIZIO the manufacturer. • Use only with the cart, stand, tripod, bracket, or • Your TV should cover user abuse or improper installations. • The power cord must be replaced when - Vizio D65x-G4 | User Manual - Page 3
with instructions. Incorrect • Using cabinets or stands recommended by the manufacturer • The wall cause the batteries to leak which can damage the remote control or injure the operator. Do not expose the television set and the supporting furniture. • Do not attempt to repair or service your TV - Vizio D65x-G4 | User Manual - Page 4
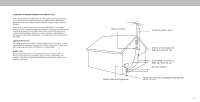
of the mast and supporting structure, grounding of unplug the TV from the wall outlet and disconnect the antenna or Remember, the screen of the coaxial cable is Service Equipment Antenna Discharge Unit (NEC Section 810-20) Grounding Conductors (NEC Section 810-21) Ground Clamps Power Service - Vizio D65x-G4 | User Manual - Page 5
For DTS patents, see http://patents.dts.com. Manufactured under license from DTS, Inc. DTS, the Symbol, DTS and the Symbol together, and DTS Studio Sound are registered trademarks and/or tradmarks of the DTS, Inc. in the United States and/or other countries. © DTS, Inc. All Rights Reserved. HDMI, - Vizio D65x-G4 | User Manual - Page 6
11 Wall-mounting the TV 13 Using the remote 14 Completing The First-Time Setup 15 Using the On-Screen Menu 16 Navigating the On-Screen Menu 16 Changing the Input Source 16 Changing the Screen Aspect Ratio 17 Adjusting the Picture Settings 18 Adjusting More Picture Settings 18 Adjusting - Vizio D65x-G4 | User Manual - Page 7
Getting to Know Your TV 1 FRONT PANEL - D32h-F4 & D43fx-F4 Remote Sensor and Power Indicator When using the remote, aim it directly at this sensor. The power indicator flashes on when the TV turns on, then goes out after several seconds. To keep the - Vizio D65x-G4 | User Manual - Page 8
Getting to Know Your TV 1 FRONT PANEL - D65x-G4 Remote Sensor and Power Indicator When using the remote, aim it directly at this sensor. The power indicator flashes on when the TV turns on, then goes out after several seconds. To keep the - Vizio D65x-G4 | User Manual - Page 9
REAR PANEL - D32h-F4 & D43fx-F4 Note: The image shown here is for illustrative purposes only and may be subject to change. The actual number of ports and their locations may vary, depending on the model. 1 HDMI - Connect an HDMI device. Component/Composite - Connect a component or composite. Audio - Vizio D65x-G4 | User Manual - Page 10
REAR PANEL - D65x-G4 Note: The image shown here is for illustrative purposes only and may be subject to change. The actual number of ports and their locations may - Vizio D65x-G4 | User Manual - Page 11
device on. Set the TV's input to match the connection you used (HDMI-1, HDMI-2, etc.). HDMI CABLE HDMI COMPONENT CABLE* R L Pr/Cr Pb/Cb Y COMPOSITE (AV) CABLE (Shared with Component input) Y L R 1 COAXIAL CABLE Coaxial Note: The actual ports and *Not applicable to D65x-G4 their locations - Vizio D65x-G4 | User Manual - Page 12
CONNECTING A DEVICE - AUDIO CABLE TYPES Your TV can be output sound to an audio device, such as a receiver or sound bar. 1. Verify that your device has audio port that matches an available port on the TV (Optical, RCA, etc). 2. Connect the appropriate cable (not included) to the TV and the device. - Vizio D65x-G4 | User Manual - Page 13
the stands by loosening and removing the screws. 4. Attach your TV and wall mount to the wall, carefully following the instructions that came with your mount. Use only with a UL-listed wall mount bracket 10 mm 200mm x 200mm 17.19 lb (7.80 kg) D65x-G4 M6 10 mm 400mm x 200mm 38.25 lbs (17.35 kg) 13 - Vizio D65x-G4 | User Manual - Page 14
- Launch SmartCast TV/Return to SmartCast TV Home Screen 13. Pic - Cycle through the different picture setting modes 14. Channel Up/Down- Change the channel to manually enter a digital sub-channel. (For example, 18-4 or 18-5) 1 Replacing the Batteries 1. Find the notch on the back of the remote. - Vizio D65x-G4 | User Manual - Page 15
on-screen instructions will guide you set up local channels. To search for local broadcast channels, make sure the cable from the antenna, wall or cable box is properly connected to your VIZIO VIZIO and Google 's respective Terms of Service and the ultimate remote. The VIZIO SmartCastTM App brings - Vizio D65x-G4 | User Manual - Page 16
• Name and adjust Inputs • Adjust TV settings TV Settings Picture Audio Network Timers Channels Closed Captions Input Settings System User Manual • View user manual NAVIGATING THE ON-SCREEN MENU To open the on-screen menu: 1. Press the Menu button on the remote. 2. Use the Arrow buttons to - Vizio D65x-G4 | User Manual - Page 17
picture so that the picture keeps its original shape. Examples include wide-screen movies and older television programs. To change the screen aspect ratio: 1. Press the Wide button on the remote picture to the edges of the screen. Since the picture the screen. A 720p image will fill a 1080p screen. - Vizio D65x-G4 | User Manual - Page 18
preferences and viewing conditions. If you save changes to the settings for a picture mode, an asterisk appears after its name (see Saving a Custom Picture Mode). To adjust the picture settings: 1. Press the Menu button on the remote. The on-screen menu is displayed. 2. Use the Arrow buttons on the - Vizio D65x-G4 | User Manual - Page 19
Exit button on the remote. Adjusting the Picture Mode Edit Settings Picture Mode Edit Settings allow you to make precise adjustments to the picture and to create picture modes to save groups of picture settings. To adjust the Picture Mode Edit settings: 1. From the PICTURE menu, use the Arrow - Vizio D65x-G4 | User Manual - Page 20
the Number Pad on your remote to enter a unique 4-digit PIN. If a system PIN is set, then lock/unlock. If no system PIN is set, then you will be prompted to set a PIN. 3. Highlight Save and press OK. 4. Press the Exit button to exit the menu screens. Lock Picture Mode Back Enter the System PIN - Vizio D65x-G4 | User Manual - Page 21
manually calibrate the TV. Calibration requires specialized training, an input with precisely set colors, and a specialized light meter. To adjust the HSB color settings to save the setting. 3. When you have finished, press the Exit button. 2. Use the Arrow buttons on the remote to highlight Off. - Vizio D65x-G4 | User Manual - Page 22
then press the Left/Right Arrow buttons until the RAMP TEST PATTERN menu is displayed. Ramp Test Pattern Off 2. Use the Arrow buttons on the remote to highlight Off. Use the Left/Right Arrow buttons to select the color for the ramp test pattern. Selecting a color immediately shows that color ramp - Vizio D65x-G4 | User Manual - Page 23
THE AUDIO SETTINGS To adjust the audio settings: 1. Press the Menu button on the remote. The on-screen menu is displayed. Audio Back 2. Use the Arrow buttons on the remote to highlight Audio and press OK. The Audio menu is displayed. 3. Use the Arrow buttons to highlight the setting you wish - Vizio D65x-G4 | User Manual - Page 24
Press the Exit button on the remote. Changing the Manual Setup Settings Advanced users can fine-tune the network settings using the Manual Setup feature. To change advanced network settings: 1. From the NETWORK menu, highlight Manual Setup and press OK. The MANUAL SETUP menu is displayed. 2. To - Vizio D65x-G4 | User Manual - Page 25
, enter your network's name (SSID), then highlight Connect and press OK. 3. Using the on-screen keyboard, enter your network's password, then highlight Connect and press OK. 4. Press the Exit button on the remote. Back Enter Acces Point Name Enter your access point name. This is used to connect to - Vizio D65x-G4 | User Manual - Page 26
the Timer When activated, the TV's timer will turn the TV off after a set period of time. 1. Press the Menu button on the remote. The on-screen menu is displayed. Timers Back 2. Use the Arrow buttons on the remote to highlight Timers and press OK. The TIMERS menu is displayed. Sleep Timer - Vizio D65x-G4 | User Manual - Page 27
Select the language for Digital Audio • Set Parental Controls Channels Find Channels Skip Channels antenna) and cable channels from an outof-the-wall connection (without a cable box). Moving the to remove, use the Up/Down Arrow buttons on the remote to highlight the channel and press OK. A P appears - Vizio D65x-G4 | User Manual - Page 28
menu is displayed. 2. Select your preferred language: English, Spanish/Video Description, French. Press OK. 3. Press the Exit button on the remote. Digital Audio Back English Spanish/ Video Description French To use the Analog Audio feature: 1. From the Channels menu, highlight Analog Audio - Vizio D65x-G4 | User Manual - Page 29
TV directly from the wall (no cable box). screen menu is 2. displayed. 3. Use the Arrow buttons on the remote to highlight Channels and 4. press OK. The CHANNELS menu is displayed. 5. Use the Arrow buttons on the remote to highlight Parental Controls and press OK. 6. Enter your set System PIN. To set - Vizio D65x-G4 | User Manual - Page 30
remote. The on-screen menu is displayed. 2. Use the Arrow buttons on the remote remote to highlight the setting you wish to change, then use the Left/Right Arrow buttons to change the setting: • Caption Style - Choose As Broadcast to keep default settings or Custom to manually change each setting - Vizio D65x-G4 | User Manual - Page 31
example, the closed caption text is green, the background is black, and the window is red. Text Background CLOSED CAPTION TEXT SAMPLE Window CLOSED CAPTIONS SCREEN LAYOUT 31 - Vizio D65x-G4 | User Manual - Page 32
Source. To change the name of an input: 1. Press the Menu button on the remote. The on-screen menu is displayed. 2. Use the Arrow buttons on the remote to highlight Input Settings and press OK. The INPUT SETTINGS menu is displayed. 3. Highlight the input device that you want to rename and press OK - Vizio D65x-G4 | User Manual - Page 33
screen menu language • Set time zone and local settings • Adjust the CEC settings • Adjust the power mode settings • Adjust to preserve Aspect Ratio or fill the screen • Name the TV • Review on the remote. The on-screen menu is displayed. 2. Use the Arrow buttons on the remote to highlight System - Vizio D65x-G4 | User Manual - Page 34
(ARC) input with the included remote, without any programming. Using CEC, your VIZIO TV remote can control: • Power On/Off • Volume • Mute Not all HDMI devices support CEC. See your device's user manual for details. To enable, disable, or adjust CEC settings: 1. Set up your audio device and connect - Vizio D65x-G4 | User Manual - Page 35
on the remote to highlight Mobile Devices and press OK. The list of paired devices appears. 4. Highlight a device name to delete it and press OK. 5. Use the Left/Right Arrows to select Yes or No when asked to confirm. Accessibility settings VIZIO is committed to providing intuitive, user-friendly - Vizio D65x-G4 | User Manual - Page 36
restore the TV to the factory default settings, all changes you have made to the settings will be lost! This includes any wireless or picture settings To restore the TV to its factory default settings: 1. Press the Menu button on the remote. The on-screen menu is displayed. 2. Use the Arrow buttons - Vizio D65x-G4 | User Manual - Page 37
& ADMIN menu. If you have trouble enabling or disabling Viewing Data, please contact VIZIO customer service by emailing [email protected] or calling (855) 472-8817. For more information, see https://www.vizio.com/viewingdata and review VIZIO's privacy policy at https://www.vizio.com/privacy 37 - Vizio D65x-G4 | User Manual - Page 38
3 USING THE INFO WINDOW The Info Window can be displayed by pressing the Info button on the remote: • Press the Info button one time to display the TV name, current input, aspect ratio, network name, and time. Current Input Aspect Ratio Network Name - Vizio D65x-G4 | User Manual - Page 39
screen. SmartCast TV makes finding something to watch more fun - discover new shows and movies. Plus, you can quickly set up and adjust settings right on the TV using the included remote ) on your remote -OR- • Select SmartCast from the list of inputs. Home Movies TV Shows Support Extra 1 Discover - Vizio D65x-G4 | User Manual - Page 40
is WatchFree? VIZIO WatchFree™ takes your cord-cutting entertainment experience one step further! With the simple press of a button, enjoy free streaming TV with over 100 channels to choose from - live news, movies, sports, comedy, music and more. A built-in on-screen guide makes finding something - Vizio D65x-G4 | User Manual - Page 41
must be formatted as FAT32. • Files on the USB thumb drive must end in a supported file extension ( .mp3, .jpg, etc). • The player is not designed to play media 2. The TV will recognize the USB stick. Use the Arrow Keys on the remote to select the content you'd like to play. -OR- 3. Select USB from - Vizio D65x-G4 | User Manual - Page 42
this button and press OK to return to the previous screen. Connected Sources displays connected USB devices. Music USB1: folder. You can browse files and folders using the Arrow and OK buttons on the remote. Toggle between viewing all content and only viewing folders. Page 1 of 1 Page - Vizio D65x-G4 | User Manual - Page 43
this button and press OK to return to the previous screen. Connected Sources displays connected USB devices. Current Folder Video your USB thumb drive has more files than can be displayed on a single screen, the page information is displayed here. 4 Folder Contents/Playlist This area displays - Vizio D65x-G4 | User Manual - Page 44
OK to return to the previous screen. Back Button Highlight and press OK Adjust Slideshow Settings View Music Files Start Slideshow Sort: Name A-Z View: Thumbnails Settings Browse Music File using the Arrow and OK buttons on the remote. H.jpg I.jpg Page 1 of 1 Page Information If your USB thumb - Vizio D65x-G4 | User Manual - Page 45
Troubleshooting & Technical Support Do You Have Questions? Find Answers At SUPPORT.VIZIO.COM Find help with: • New Product Setup • Connecting Your Devices • Technical Problems • Product Updates • And More Live Chat Support Available You can also contact our award-winning support team at: Phone: (877 - Vizio D65x-G4 | User Manual - Page 46
A Take A Moment To Register Your Product At VIZIO.COM/PRODUCT-REGISTRATION Why Register? Customized Support Get assistance quickly with your information on-hand. News & Offers Take advantage of the latest news and special offers from VIZIO. Safety & Satisfaction Stay up to date with important - Vizio D65x-G4 | User Manual - Page 47
on the screen. • Ensure all cables are securely attached to the TV. • Ensure all devices are connected correctly. Devices differ; see your device's user manual for details. • Adjust Brightness, Contrast, or Backlight. See Adjusting the Picture Settings. • Press the INPUT button on the remote to - Vizio D65x-G4 | User Manual - Page 48
and follow the on-screen instructions to download the VIZIO SmartCast™ App. How do I change the Inputs? • Press the Input button on the back of the TV to cycle through the Inputs. • Press the Input button on the basic remote to cycle through the Inputs. • Make sure the VIZIO SmartCast™ App is - Vizio D65x-G4 | User Manual - Page 49
MOUNTING Dimensions w/ Stand Dimensions w/o Stand Weight w/ Stand Weight w/o Stand Mounting Screw Size Hole Pattern PICTURE USB Audio Output OTHER Remote Control Model Power Consumption Standby Power Voltage OSD Language Certification D32h-F4 32" 31.5" D43fx-F4 43" 42.5" D65x-G4 65" 64.5" 28.73" - Vizio D65x-G4 | User Manual - Page 50
energy, and if not installed and used in accordance with the instructions, may cause harmful interference to radio communications. However, there is a no-protection no-interference basis. Should the user seek to obtain protection from other radio services operating in the same TV bands, a radio - Vizio D65x-G4 | User Manual - Page 51
help and troubleshooting. To obtain warranty service, contact VIZIO Technical Support via email at [email protected] or via phone at 877 MY VIZIO (877-698-4946). Your Obligations Before Service There will be no charge for parts or labor during the warranty period. Replacement parts may - Vizio D65x-G4 | User Manual - Page 52
PARTICULAR PURPOSE, WILL BE LIMITED IN DURATION TO THE WARRANTY PERIOD SET FORTH ABOVE. SOME STATES AND PROVINCES DO NOT ALLOW LIMITATIONS ON DEFECTS ARE DISCOVERABLE OR LATENT), VIZIO MAY, AT ITS SOLE AND EXCLUSIVE OPTION AND IN ITS DISCRETION, REPAIR OR REPLACE YOUR PRODUCT, OR REFUND ITS - Vizio D65x-G4 | User Manual - Page 53
and restrictions apply. Information in this User Manual is subject to change without notice. To review the most updated version of this User Manual and the associated Quick Start Guide, go to http://www.vizio.com. © 2018 VIZIO, Inc. All Right Reserved. This User Manual may not be copied in whole or - Vizio D65x-G4 | User Manual - Page 54
© 2018 VIZIO INC. ALL RIGHTS RESERVED. 18070AD
-
 1
1 -
 2
2 -
 3
3 -
 4
4 -
 5
5 -
 6
6 -
 7
7 -
8
-
9
-
10
-
11
-
12
-
13
-
14
-
15
-
16
-
17
-
18
-
19
-
20
-
21
-
22
-
23
-
24
-
25
-
26
-
27
-
28
-
29
-
30
-
31
-
32
-
33
-
34
-
35
-
36
-
37
-
38
-
39
-
40
-
41
-
42
-
43
-
44
-
45
-
46
-
47
-
48
-
49
-
50
-
51
-
52
-
53
-
54
 |
 |

USER MANUAL
Models: D32h-F4, D43fx-F4, and D65x-G4