Vizio E220MV E261VA User Manual
Vizio E220MV Manual
 |
View all Vizio E220MV manuals
Add to My Manuals
Save this manual to your list of manuals |
Vizio E220MV manual content summary:
- Vizio E220MV | E261VA User Manual - Page 1
RAZOR LED™ LCD HDTV E190VA / E220VA / E260VA / E261VA - user manual - Vizio E220MV | E261VA User Manual - Page 2
. This product qualifies for ENERGY STAR in the "factory default" setting and this is the setting in which power savings will be achieved. Changing the factory default picture settings or enabling other features will increase power consumption that could exceed the limits necessary to qualify for - Vizio E220MV | E261VA User Manual - Page 3
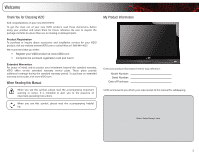
operating instructions. When you see this symbol, please read the accompanying helpful tip. My Product Information Enter your product information here for easy reference: Model Number Serial Number Date of Purchase VIZIO recommends you attach your sales receipt to this manual for safekeeping - Vizio E220MV | E261VA User Manual - Page 4
/ E220VA / E260VA / E261VA to rain or moisture, does not operate normally or has been dropped. • Unplug the power cord before cleaning your TV. • When moving your TV from an area of low temperature to an area of high temperature, condensation may form in the housing. Wait before turning on your TV - Vizio E220MV | E261VA User Manual - Page 5
TV will not be used for an extended period of time, unplug the power cord. • To reduce risk of electric shock, do not touch the connector with wet hands. • Insert batteries in accordance with instructions. Incorrect polarities may cause the batteries to leak which can damage the remote control - Vizio E220MV | E261VA User Manual - Page 6
to find out when they will turn off their analog signal and switch to digital-only broadcasting. Analog-only TVs should continue to work as before to receive low power, Class A or translator television stations and with cable and satellite TV services, gaming consoles, VCRs, DVD players, and - Vizio E220MV | E261VA User Manual - Page 7
of Contents Installing the TV 1 Inspecting the Package Contents 1 Installing the TV 1 Installing the TV Stand 1 Installing the TV on a Wall 2 Controls and Connections 3 Front Panel 3 Left Side Panel 3 Right Side Panel 3 Rear Panel 4 Remote Control 4 Replacing the Batteries 5 Completing - Vizio E220MV | E261VA User Manual - Page 8
28 Restarting the Setup App 28 Setting Up Closed Captioning 29 Changing the Appearance of Digital Closed Captions 29 Troubleshooting & Technical Support 30 The TV displays "No Signal 30 There is no power 30 The power is on, but there is no image on the screen 30 There is no sound 30 - Vizio E220MV | E261VA User Manual - Page 9
the TV stand: 1. Place the TV screen-down on a clean, flat surface. To prevent scratches or damage to the screen, place the TV on a soft surface, such as carpet, rug, or blanket. 2. Align the stand hooks with the holes on the bottom of the TV. Quick Start Guide Remote Control with Batteries - Vizio E220MV | E261VA User Manual - Page 10
scratch or damage the TV. Installing the TV on a Wall To mount your TV on a wall, you will need a wall mount. Consult the information below to find the appropriate mount for your TV model: Screw Size: Screw Length: Screw Pitch: Hole Pattern: E190VA M4 10mm 0.7mm 75mm x 75mm E220VA M4 10mm 0.7mm - Vizio E220MV | E261VA User Manual - Page 11
menu. When activated, Sensor: the sensor adjusts the brightness of the TV based on the light level in the room. (On E220VA, E260VA, and E261VA, the sensor is on the front of the TV.) Power: Turn the TV on or off. Menu: Display on-screen menu. Channel Up/Down: Change the channel. Volume Up/Down - Vizio E220MV | E261VA User Manual - Page 12
Connect coaxial cable for external antenna or cable TV. Input Wide Sleep Menu/OK Arrow Left Volume Up/Down Last Info 4 E190VA / E220VA / E260VA / E261VA Power/Standby Input (Specific) Closed Caption (CC) Exit Arrow Up Arrow Right Arrow Down Channel Up/Down Mute Number Pad Dash VR10 Remote Control - Vizio E220MV | E261VA User Manual - Page 13
Close the on-screen menu. Arrow : Navigate the on-screen menu and episode guide. Menu/OK: Display the on-screen menu or select Turn the sound off or on. When mute is activated, the TV's audio is turned off. Last: Return to the channel last viewed. Number Pad: Use the number pad to manually - Vizio E220MV | E261VA User Manual - Page 14
The first time you turn on the TV, the Setup App will guide you through each of the steps necessary to get your TV ready for use. Before you begin the first-time setup: • Your TV should be installed and the power cord should be connected to an electrical outlet. • Have your remote ready. Ensure the - Vizio E220MV | E261VA User Manual - Page 15
the remote and select the connection type (HDMI, RGB, etc) from the on-screen menu. Press OK. 6. Check the list of devices/connection types below for special instructions: Cable TV (without cable box/directly from wall) Perform a channel scan. RGB Make sure the desktop resolution on the PC is set to - Vizio E220MV | E261VA User Manual - Page 16
4 Select one of the connection types. Use the cable(s) shown to connect the TV to your device. BEST BETTER HDMI RF/ COAXIAL RGB COMPONENT GOOD COMPOSITE AV 8 E190VA / E220VA / E260VA / E261VA Select One: OR OR OR OR DIGITAL DIGITAL / ANALOG ANALOG ANALOG ANALOG Device Connection Chart - Vizio E220MV | E261VA User Manual - Page 17
TV Settings 5 From the TV Settings Menu, you can: • Change the input source • Set up channels • Change the on-screen menu language • Change the TV's date and time • Adjust the TV settings the remote. The on-screen menu is displayed. 2. Use the Arrow buttons on the remote to highlight the TV icon - Vizio E220MV | E261VA User Manual - Page 18
input. To change the signal source: 1. Press the MENU button on the remote. The on-screen menu is displayed. 2. Use the Arrow buttons on the remote to highlight the TV icon and press MENU/ OK. The TV Settings menu is displayed. 3. Use the Arrow buttons to highlight Channels and press MENU/OK. 4. Use - Vizio E220MV | E261VA User Manual - Page 19
can choose which channels can be displayed. 1. Press the MENU button on the remote. The on-screen menu is displayed. 2. Use the Arrow buttons on the remote to highlight the TV icon and press MENU/ OK. The TV Settings menu is displayed. 3. Use the Arrow buttons to highlight Channels and press MENU - Vizio E220MV | E261VA User Manual - Page 20
channels are available. To scan for channels: 1. Press the MENU button on the remote. The on-screen menu is displayed. 2. Use the Arrow buttons on the remote to highlight the TV icon and press MENU/ OK. The TV Settings menu is displayed. 3. Use the Arrow buttons to highlight Channels and press MENU - Vizio E220MV | E261VA User Manual - Page 21
menu in different languages. To change the on-screen menu language: 1. Press the MENU button on the remote. The on-screen menu is displayed. 2. Use the Arrow buttons on the remote to highlight the TV icon and press MENU/ OK. The TV Settings menu is displayed. 3. Use the Arrow buttons to highlight - Vizio E220MV | E261VA User Manual - Page 22
this menu option, you can manually set the TV's date and time. To manually set the date and time: 1. Press the MENU button on the remote. The on-screen menu is displayed. 2. Use the Arrow buttons on the remote to highlight the TV icon and press MENU/OK. The TV Settings menu is displayed. 3. Use the - Vizio E220MV | E261VA User Manual - Page 23
when viewing content from the RGB port. To adjust the PC settings: 1. Press the MENU button on the remote. The on-screen menu is displayed. 2. Use the Arrow buttons on the remote to highlight the TV icon and press MENU/ OK. The TV Settings menu is displayed. 3. Use the Arrow buttons to highlight PC - Vizio E220MV | E261VA User Manual - Page 24
Your TV features an easy-to-use on-screen menu. Using this menu, you can: • Set the sleep timer • View a USB photo slideshow • Set the screen aspect ratio • Adjust the audio settings • Adjust the picture settings • Set up the parental controls • Get system info or reset to factory defaults • Set up - Vizio E220MV | E261VA User Manual - Page 25
E190VA / E220VA / E260VA / E261VA Remember: • The USB thumb drive must be formatted as FAT32 • Files on the USB thumb drive must be a supported file type • The USB thumb drive must have a minimum 1GB memory • The TV will not play media from external hard drives or mp3 players To play your USB media: - Vizio E220MV | E261VA User Manual - Page 26
6 E190VA / E220VA / E260VA / E261VA Setting the Screen Aspect Ratio The TV can display images in five different modes: Normal, aspect ratio for your content type. Areas in red will not be visible on your TV screen. Original Content Format 480p/480i (4:3) 720p (16:9) 1080p/1080i (16:9) RGB (4:3) - Vizio E220MV | E261VA User Manual - Page 27
ratio. Since the 4:3 aspect ratio is not large enough to fill the TV's screen, black bars are added to the left and right of the display image. • Wide stretches a 4:3 aspect ratio picture to the edges of the screen. Since the picture is being stretched, the display image may appear distorted. If the - Vizio E220MV | E261VA User Manual - Page 28
allow you to customize your TV's sound to match the type of programming you most often enjoy. The Equalizer Settings menu is not available when SRS TruSurroundHD is enabled. To adjust the equalizer settings: 1. Press the MENU/OK button on the remote. The on-screen menu is displayed. 2. Use the - Vizio E220MV | E261VA User Manual - Page 29
levels for your TV's built-in speakers can be adjusted to your liking. To adjust the bass and treble levels, you must disable SRS TruSurroundHD and change the Equalizer Settings to Off. To adjust the bass and treble levels: 1. Press the MENU/OK button on the remote. The on-screen menu is displayed - Vizio E220MV | E261VA User Manual - Page 30
audio formats, or your TV is not connected to an audio receiver, VIZIO recommends you set this option to Auto. This option only affects audio output from the coaxial or optical port. To select the digital output mode: 1. Press the MENU/OK button on the remote. The on-screen menu is displayed. 2. Use - Vizio E220MV | E261VA User Manual - Page 31
the MENU/OK button on the remote. The on-screen menu is displayed. 2. Use the Arrow buttons to highlight Audio and press MENU/OK. 3. Use the Arrow buttons to highlight Reset Audio Mode and press MENU/OK. 4. The TV displays "Are you sure you want to RESET Audio Settings to the factory defaults?" Use - Vizio E220MV | E261VA User Manual - Page 32
or disable the ambient light sensor • Reset the picture mode settings Changing the Picture Mode Your TV display can be adjusted to suit your preferences and viewing conditions. To change the picture mode: 1. Press the MENU/OK button on the remote. The on-screen menu is displayed. 2. Use the Arrow - Vizio E220MV | E261VA User Manual - Page 33
sensor is enabled, you will be unable to manually change the TV's brightness settings. To enable or disable the ambient light sensor: 1. Press the MENU/OK button on the remote. The on-screen menu is displayed. 2. Use the Arrow buttons to highlight Picture and press MENU/OK. 3. Use the Arrow buttons - Vizio E220MV | E261VA User Manual - Page 34
. 26 E190VA / E220VA / E260VA / E261VA Setting the Parental Controls The TV's parental controls allow you to prevent the TV from displaying certain channels or programs without a password. To access the Parental Control menu: 1. Press the MENU button on the remote. The on-screen menu is displayed - Vizio E220MV | E261VA User Manual - Page 35
and save it in a secure location. 5. Press the EXIT button on the remote. Resetting the Content Locks To reset the content locks to the factory-default settings: 1. From the Parental Controls menu, highlight RESET LOCKS and press OK. The TV displays, "Are you sure you want to RESET ALL LOCKS - Vizio E220MV | E261VA User Manual - Page 36
set up the TV tuner. To access the Setup App: 1. Press the MENU button on the remote. The on-screen menu is displayed. 2. Use the Arrow buttons on the remote to highlight the Help icon and press MENU/OK. The Help menu is displayed. 3. Highlight Start Setup Wizard and press MENU/OK. 4. Use the Number - Vizio E220MV | E261VA User Manual - Page 37
you are viewing is not being broadcast with closed captions, the TV will not display them. To activate or deactivate closed captions: 1. Press the MENU button on the remote. The on-screen menu is displayed. 2. Use the Arrow buttons on the remote to highlight the CC icon and press OK. The Closed - Vizio E220MV | E261VA User Manual - Page 38
a problem when using your TV, try to fix the issue using this troubleshooting guide. If, after using this troubleshooting guide, you are still experiencing an issue with your TV, contact VIZIO's Support Department. Quality customer support and service are integral parts of VIZIO's commitment - Vizio E220MV | E261VA User Manual - Page 39
E190VA / E220VA / E260VA / E261VA A The display image does not cover the entire screen. • If you are in RGB mode (computer), ensure that H-Size and V-Position in the on-screen menu are set correctly. • If you are using TV, AV1, or Component with 480i input, press the WIDE button on the remote to - Vizio E220MV | E261VA User Manual - Page 40
2 1 1 1 1 1 English, Spanish, French Optical Digital Audio Out, 3.5mm 2 3W SRS TruSurround HD SRS TruVolume E220VA 22" Class 21.53" 20.60 x 14.10 x 5.10" 20.60 x 14.10 x 2.27" 9.2 lbs 8.2 lbs Edge Lit LED 60 Hz 1920 x 1080 20,000:1 5 ms 250 nits 2 1 1 1 1 1 English, Spanish, French Optical Digital - Vizio E220MV | E261VA User Manual - Page 41
Ambient Light Sensor: Power Consumption: Voltage Range: E190VA Yes 22W 100~240 VAC @ 50/60Hz E220VA Yes 26W 100~240 VAC @ 50/60Hz E260VA Yes 40W 100~240 VAC @ 50/60Hz B E261VA Yes 40W 100-132 VAC 33 - Vizio E220MV | E261VA User Manual - Page 42
power surges, signal issues, damages from shipping, acts of God, any type of customer misuse, modifications or adjustments, as well as installation and set-up issues or any repairs attempted by anyone other than by a VIZIO authorized service center. Products with unreadable or removed serial numbers - Vizio E220MV | E261VA User Manual - Page 43
interface cables and AC power cord, if any, must be used in order to comply with the emission limits. 3. The manufacturer is not responsible for any radio or TV interference caused by unauthorized modification to this equipment. It is the responsibilities of the user to correct such interference - Vizio E220MV | E261VA User Manual - Page 44
Notes 36 - Vizio E220MV | E261VA User Manual - Page 45
E190VA / E220VA / E260VA / E261VA 37 - Vizio E220MV | E261VA User Manual - Page 46
E190VA / E220VA / E260VA / E261VA 38 - Vizio E220MV | E261VA User Manual - Page 47
- Vizio E220MV | E261VA User Manual - Page 48
SHOWN ARE THE PROPERTY OF THEIR RESPECTIVE OWNERS. IMAGES USED ARE FOR ILLUSTRATION PURPOSES ONLY. VIZIO, THE V LOGO, WHERE VISION MEETS VALUE, AND OTHER VIZIO TRADEMARKS ARE THE INTELLECTUAL PROPERTY OF VIZIO INC. PRODUCT FEATURES AND SPECIFICATIONS ARE SUBJECT TO CHANGE WITHOUT NOTICE. © 2011
-
 1
1 -
 2
2 -
 3
3 -
 4
4 -
 5
5 -
 6
6 -
 7
7 -
8
-
9
-
10
-
11
-
12
-
13
-
14
-
15
-
16
-
17
-
18
-
19
-
20
-
21
-
22
-
23
-
24
-
25
-
26
-
27
-
28
-
29
-
30
-
31
-
32
-
33
-
34
-
35
-
36
-
37
-
38
-
39
-
40
-
41
-
42
-
43
-
44
-
45
-
46
-
47
-
48
 |
 |

E190VA / E220VA / E260VA / E261VA
–
USER MaNUaL
RAZOR LED
™
LCD HDTV