Vizio GV52LFHDTV10A User Manual
Vizio GV52LFHDTV10A Manual
 |
View all Vizio GV52LFHDTV10A manuals
Add to My Manuals
Save this manual to your list of manuals |
Vizio GV52LFHDTV10A manual content summary:
- Vizio GV52LFHDTV10A | User Manual - Page 1
VIZIO GV52L FHDTV10A User Manual Dear VIZIO Customer, Congratulations on your new VIZIO GV52L FHDTV10A LCD Television purchase. Thank you for your support. For maximum benefit of your set, please read these instructions before making any adjustments, and retain them for future reference. We hope - Vizio GV52LFHDTV10A | User Manual - Page 2
or when it will not be used for long period of time. This will protect the GV52L FHDTV10A from damage due to power surges. • Do not attempt to repair or service the product yourself. Opening or removing the back cover may expose you to high voltages, the risk of electric shock, and other hazards. If - Vizio GV52LFHDTV10A | User Manual - Page 3
VIZIO GV52L FHDTV10A User Manual Television Antenna Connection Protection External Television Antenna Grounding If an outside antenna/satellite dish or cable system is to be connected to the TV, make sure that the antenna or cable system is electrically grounded to provide some protection against - Vizio GV52LFHDTV10A | User Manual - Page 4
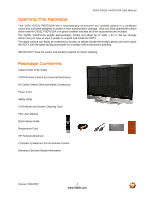
shipping. Package Contents VIZIO GV52L FHDTV10A VIZIO Remote Control by Universal Electronics AV Cable (Yellow, Red and White Connectors) Power Cord Safety Strap VIZIO Bezel and Screen Cleaning Cloth This User Manual Quick Setup Guide Registration Card VIP Services Brochure 2 (Double A) Batteries - Vizio GV52LFHDTV10A | User Manual - Page 5
VIZIO GV52L FHDTV10A User Manual Additional Certified Accessories for the VIZIO GV52L FHDTV10A are sold separately Wall Mounts High Definition Cables Extra or replacement Remote VIZIO also offers Installation Services and Extended Warranty Services for your VIZIO GV52L FHDTV10A To purchase or - Vizio GV52LFHDTV10A | User Manual - Page 6
VIZIO GV52L FHDTV10A User Manual Preparing Your LCD HDTV for Wall Mounting The VIZIO GV52L FHDTV10A can either be kept on the stand base or mounted on the wall for viewing. If you choose to mount the GV52L FHDTV10A on the wall, please follow the instructions below for removing the stand base. To - Vizio GV52LFHDTV10A | User Manual - Page 7
VIZIO GV52L FHDTV10A User Manual To remove the speakers If you wish to remove the attached speakers as well and use your Home Theatre System for the audio, please follow the procedure below. 1. Unplug the speaker wires from the GV52L FHDTV10A at the rear of the TV set by carefully pulling down on - Vizio GV52LFHDTV10A | User Manual - Page 8
VIZIO GV52L FHDTV10A User Manual Relocate Detachable Speakers If you decide to relocate or place speaker's assemblies away from the TV set, it is recommendable to follow the procedure or steps shown below. 1. Select the place and then measure the distance from new location to the TV set. 2. Make - Vizio GV52LFHDTV10A | User Manual - Page 9
GV52L FHDTV10A User Manual Table of Contents Chapter 1 Basic Controls and Connections 11 1.1 Front Bezel ...11 1.2 Right Side Panel Controls ...11 1.3 Left Side Connections ...12 1.4 Rear Panel Connections ...12 1.5 VIZIO Universal Remote Control ...15 1.5.1 Insertion of Batteries in the Remote - Vizio GV52LFHDTV10A | User Manual - Page 10
VIZIO GV52L FHDTV10A User Manual 4.4.6 Speakers ...45 4.5 DTV / TV Tuner Setup...45 4.5.1 Tuner Mode ...45 4.5.2 Auto Search...45 4.5.3 Skip Channel ...45 4.5.4 Digital Audio Out...46 4.5.5 Time Zone ...46 4.5.6 Daylight Saving...46 4.6 DTV / TV Input Setup ...47 4.6.1 Language...47 4.6.2 Sleep - Vizio GV52LFHDTV10A | User Manual - Page 11
VIZIO GV52L FHDTV10A User Manual 6.4 Component Program Codes...73 Chapter 1 Basic Controls and Connections 1.1 Front Bezel Power 'VIZIO' light - The VIZIO name lights white when powered on and orange when powered off. Remote Control Sensor - This is the window through which all of the remote control - Vizio GV52LFHDTV10A | User Manual - Page 12
VIZIO GV52L FHDTV10A User Manual 1.3 Left Side Connections 1. AV1 (S-Video) In - Connect the primary source for composite video devices, such as a VCR or video game. Use the white and red connectors to connect the external audio from the same source. Keep in mind that S-Video connections are only - Vizio GV52LFHDTV10A | User Manual - Page 13
Right Portion 6 7 VIZIO GV52L FHDTV10A User Manual 9 11 14 15 8 10 12 13 6. HDMI 3 - Connect the primary source for digital video such as a DVD multimedia player or set top box through this all digital connector. The white color band on the rear of the TV indicates this connection. - Vizio GV52LFHDTV10A | User Manual - Page 14
VIZIO GV52L FHDTV10A User Manual * For digital TV stations in your area visit www.antennaweb.org Version 10/4/2007 14 www.VIZIO.com - Vizio GV52LFHDTV10A | User Manual - Page 15
VIZIO GV52L FHDTV10A User Manual 1.5 VIZIO Universal Remote Control The VIZIO Universal Remote Control is a comprehensive remote that can be used to control up to four different components. The remote button functions are explained on the following pages. Remote LED - Blinks when the remote operates - Vizio GV52LFHDTV10A | User Manual - Page 16
VIZIO GV52L FHDTV10A User Manual Use this button for the On-Screen Display (OSD) menus. This button displays the image and system information display. Use the NaVigation Wheel to operate the On-Screen Display (OSD) after it has been activated by pressing the MENU button. Use the OK button to select - Vizio GV52LFHDTV10A | User Manual - Page 17
VIZIO GV52L FHDTV10A User Manual When CABLE is selected and the code to match your Cable Box has been entered, this button will operate the Cable Box the same as this button on your Cable Remote. When CABLE is selected and the code to match your Cable Box has been entered, this button will operate - Vizio GV52LFHDTV10A | User Manual - Page 18
VIZIO GV52L FHDTV10A User Manual 1.5.1 Insertion of Batteries in the Remote Control Insert two AA batteries into the remote control VIZIO Universal Remote Control Precautions The remote control should be kept dry and away from heat sources. Avoid humidity. If the TV responds erratically to the remote - Vizio GV52LFHDTV10A | User Manual - Page 19
I Use? The VIZIO GV52L FHDTV10A has six different ways to connect your video equipment from a basic connection to the most advanced for digital displays. Connection Quality (type) Connector Rear Panel Color Codes Description Best (digital) White HDMI (High-Definition Multimedia Interface - Vizio GV52LFHDTV10A | User Manual - Page 20
the rear of the LCD HDTV. Turn on the power to the LCD HDTV and HDTV Set-Top Box. Select HDMI using the INPUT button on the remote or side of the LCD HDTV, or directly by pressing the HDMI button on the Remote Control. The HDMI input on the LCD TV supports High-bandwidth Digital Content Protection - Vizio GV52LFHDTV10A | User Manual - Page 21
VIZIO GV52L FHDTV10A User Manual For Cable or Satellite Boxes with DVI: 1. Turn off the power to the LCD HDTV and HDTV Set-Top Box. 2. Using a HDMI-DVI cable, connect the DVI end to your HDTV Set-Top Box and the HDMI end to the HDMI Input (white color area) at the rear of the LCD HDTV. 3. - Vizio GV52LFHDTV10A | User Manual - Page 22
VIZIO GV52L FHDTV10A User Manual 2.2.2 Using Component Video Connecting your Cable or Satellite Box (Better) 1. Turn off the power to the LCD HDTV and HDTV of the TV) at the rear of the LCD HDTV. 5. Using an audio cable (white and red connectors), connect the cable to the audio output connectors - Vizio GV52LFHDTV10A | User Manual - Page 23
VIZIO GV52L FHDTV10A User Manual 2.3 Connecting Coaxial (RF) 2.3.1 Using Your Antenna or Digital Cable for DTV 1. Turn off the power to the LCD HDTV. 2. Connect the coaxial (RF) connector from your antenna or digital cable to the DTV/TV CABLE/ANTENNA connector at the rear of the LCD HDTV. 3. - Vizio GV52LFHDTV10A | User Manual - Page 24
VIZIO GV52L FHDTV10A User Manual 2.3.2 Using Your Antenna or Cable for TV 1. Turn off the power to the LCD HDTV. 2. Connect the coaxial (RF) connector from your antenna or cable to the DTV/TV CABLE/ANTENNA connector at the rear of the LCD HDTV 3. Turn on the power to the LCD HDTV. 4. - Vizio GV52LFHDTV10A | User Manual - Page 25
HDMI DVD players that have a digital interface such as HDMI (High Definition Multimedia Interface) should be connected to the HDMI input of the VIZIO GV52L FHDTV10A for optimal results. Note: To maintain the display quality, use a VIZIO certified HDMI cable available up to 10 meters or less. See - Vizio GV52LFHDTV10A | User Manual - Page 26
DVD Players with DVI: VIZIO GV52L FHDTV10A User Manual 1. Turn off the power to the LCD HDTV and DVD player. 2. Using a HDMI-DVI cable, connect the DVI end to your DVD player and the HDMI end to the HDMI Input (white color area) at the rear of the LCD HDTV. 3. Using an audio cable (white and - Vizio GV52LFHDTV10A | User Manual - Page 27
VIZIO GV52L FHDTV10A User Manual 2.4.2 Using Component Video Connecting your DVD Player (Better): 1. Turn off the power to the LCD HDTV and DVD player. of the TV) at the rear of the LCD HDTV. 5. Using an audio cable (white and red connectors), connect the cable to the audio output connectors - Vizio GV52LFHDTV10A | User Manual - Page 28
VIZIO GV52L FHDTV10A User Manual 2.4.3 Using S-Video (AV1) Connecting your DVD Player (Good): 1. Turn off the power to the LCD HDTV and DVD player. 2. Connect the S-Video jack on the rear of your DVD player to the S-Video jack in the AV1 on the left hand side of the LCD HDTV. 3. Using an - Vizio GV52LFHDTV10A | User Manual - Page 29
VIZIO GV52L FHDTV10A User Manual 2.4.4 Using Composite (AV) Video Connecting your DVD Player (Good): 1. Turn off the power to the LCD HDTV and DVD player. 2. Connect the Video (yellow color) connector on your DVD player to the Video (yellow color) connector in the AV2 input (orange - Vizio GV52LFHDTV10A | User Manual - Page 30
VIZIO GV52L FHDTV10A User Manual 2.5 Connecting Your VCR or Video Camera 1. Turn off the power to the LCD HDTV and VCR or Video Camera. 2. Connect the S-Video jack on the rear of your VCR or Video Camera to the S-Video jack in the AV1 group at the left hand side panel of the LCD HDTV. 3. - Vizio GV52LFHDTV10A | User Manual - Page 31
VIZIO GV52L FHDTV10A User Manual 2.6 Connecting an external Receiver/Amp 1. Turn off the power to the LCD HDTV and Receiver/Amp. 2. Using an audio cable (white and red connectors), connect the cable to the audio input connectors on the Receiver/Amp and connect the other end to the ANALOG OUT - Vizio GV52LFHDTV10A | User Manual - Page 32
VIZIO GV52L FHDTV10A User Manual 2.7 Connecting a PC Computer 1. Turn off the power to the LCD HDTV and PC Computer. 2. Connect a 15-pin D-Sub RGB (VGA) cable to the RGB output of your pc computer and the other end to the RGB PC input (blue area) at the rear of the LCD HDTV. 3. Connect the - Vizio GV52LFHDTV10A | User Manual - Page 33
VIZIO GV52L FHDTV10A User Manual 2.7.1 Preset PC Resolutions If connecting to a PC through the RGB PC input, set the TV timing mode to VESA 1360x768 at 60Hz for better picture quality (refer to the graphic card's user guide for questions on how to set this timing mode). Please see the table below - Vizio GV52LFHDTV10A | User Manual - Page 34
VIZIO GV52L FHDTV10A User Manual Chapter 3 Setting Up to Watch Television For 'Preparing Your LCD HDTV for Wall Mounting', see page 6. 3.1 Basic LCD HDTV Start Up 1. Connecting the Power Cable Connect the power cord to the power cord connector on the back of the LCD HDTV, and then plug the power - Vizio GV52LFHDTV10A | User Manual - Page 35
VIZIO GV52L FHDTV10A User Manual b. The Language choice screen will be displayed; the default English option is highlighted. If you wish to change the OSD language to Français or Español, press the button on the remote control to select the language you want. Press the button on the remote to go to - Vizio GV52LFHDTV10A | User Manual - Page 36
VIZIO GV52L FHDTV10A User Manual e. Press the OK button to start the search. An information panel will be displayed showing the progress of the search for analog (NTSC) and Digital ( - Vizio GV52LFHDTV10A | User Manual - Page 37
VIZIO GV52L FHDTV10A User Manual 3.2 Watching a TV Program Before you start watching TV, please make sure that any cable, satellite or off-air antenna connections are secure. Also, verify that the power on the remote, or by pressing the INPUT button on the remote or on the side of the LCD HDTV. c. - Vizio GV52LFHDTV10A | User Manual - Page 38
VIZIO GV52L FHDTV10A User Manual 3.4 Program Information Press the GUIDE button on the remote and program information for the channel you are watching will be displayed on the screen with the live program content in a small window in the lower left corner of the panel. Press the or button to scroll - Vizio GV52LFHDTV10A | User Manual - Page 39
VIZIO GV52L FHDTV10A User Manual Chapter 4 Advanced Adjustment of HDTV 4.1 Using the On Screen Display (OSD) The remote control or the control buttons on the right hand side of the TV can control all the function settings. The On Screen Display (OSD) allows you to adjust the save contrast, - Vizio GV52LFHDTV10A | User Manual - Page 40
VIZIO GV52L FHDTV10A User Manual 4.2 DTV / TV Input Picture Adjustment 4.2.1 Picture Mode When the MENU button is pressed, the On Screen Display (OSD) appears on the PICTURE menu. Press the button to highlight the affects the overall brilliance of the picture. Version 10/4/2007 40 www.VIZIO.com - Vizio GV52LFHDTV10A | User Manual - Page 41
VIZIO GV52L FHDTV10A User Manual 4.2.3 Contrast Press the button to highlight the Contrast selection. Press is too low you will not be able to see the detail in darker parts of the picture and if the brightness is too high the picture will look washed out. 4.2.5 Color Press the button to highlight - Vizio GV52LFHDTV10A | User Manual - Page 42
VIZIO GV52L FHDTV10A User Manual 4.2.7 Sharpness Press the button to highlight the Sharpness selection. Press the button to start adjusting the sharpness and the menu Press the OK button when finished. Repeat the procedure to adjust the other colors if desired. Version 10/4/2007 42 www.VIZIO.com - Vizio GV52LFHDTV10A | User Manual - Page 43
VIZIO GV52L FHDTV10A User Manual 4.3 Advanced Video Press the button to highlight the option for Advanced Video selection and press the OK button. A new menu will be the APL to counteract this effect. Press the or button to turn this feature On or Off. Version 10/4/2007 43 www.VIZIO.com - Vizio GV52LFHDTV10A | User Manual - Page 44
VIZIO GV52L FHDTV10A User Manual 4.4 DTV / TV Input Audio Adjustment 4.4.1 Volume When the MENU button is pressed, the On Screen Display (OSD) shows the PICTURE menu page. Press the button to display the AUDIO program on your TV is the Volume button on the remote or the side of the TV is pressed. - Vizio GV52LFHDTV10A | User Manual - Page 45
VIZIO GV52L FHDTV10A User Manual 4.4.5 Surround Press audio through your Home Theatre System. 4.5 DTV / TV Tuner Setup When you first used your GV52L FHDTV10A you will have setup your TV for DTV / TV channels using the Initial Setup screens the remote control. Version 10/4/2007 45 www.VIZIO.com - Vizio GV52LFHDTV10A | User Manual - Page 46
VIZIO GV52L FHDTV10A User Manual 4.5.4 Digital Audio Out Press the button to select this your area will ensure that the correct program times are shown after pressing the GUIDE button on the remote control. Press the button to highlight the Daylight Saving selection. Press the or button - Vizio GV52LFHDTV10A | User Manual - Page 47
VIZIO GV52L FHDTV10A User Manual 4.6 DTV / TV Input Setup 4.6.1 Language When the MENU button is pressed, the On Screen Display (OSD) the Digital CC selection. Press the button to select Off or Service 1 thru Service 6. 4.6.5 Digital Closed Caption Style When selecting Digital Closed Caption you - Vizio GV52LFHDTV10A | User Manual - Page 48
VIZIO GV52L FHDTV10A User Manual 4.6.6 PIP (Picture-in-Picture) Picture-in-Picture is a feature which allows you to watch two different signal inputs simultaneously. Press the button and highlight the - Vizio GV52LFHDTV10A | User Manual - Page 49
VIZIO GV52L FHDTV10A User Manual 4.7 DTV / TV been entered and accepted by the TV. When the MENU button is pressed, the On Screen Display (OSD) shows the PICTURE to highlight the Channel Block Press the button and a table shows up displaying scanned channels numbers in sequence with a figure - Vizio GV52LFHDTV10A | User Manual - Page 50
VIZIO GV52L FHDTV10A User Manual 4.7.2 TV Rating Follow the procedure in the previous section 4.7.1 to display the Parental Control menu and then press the button to highlight the TV Rating selection. Press the button and the Block TV Rating panel will be displayed. In the Block TV Rating panel you - Vizio GV52LFHDTV10A | User Manual - Page 51
VIZIO GV52L FHDTV10A User Manual menu and then press the button to highlight the Block Unrated TV selection. Press the button to turn-on or turn-off the will be Enter the new, 4-digit password using the number buttons on the remote. Enter it a second time to confirm you entered it correctly. Note: - Vizio GV52LFHDTV10A | User Manual - Page 52
VIZIO GV52L FHDTV10A User Manual 4.8 HDMI Input Picture Adjustment The Picture Adjust menu operates in the same way for the HDMI Input as for the DTV / TV input in section 4.2. The menu difference is that there is no icon along the top for DTV / TV or Parental Control adjustments. 4.9 HDMI Input - Vizio GV52LFHDTV10A | User Manual - Page 53
VIZIO GV52L FHDTV10A User Manual 4.11 Video Input Picture Adjustment The Picture Adjust menu operates in the same way for Video Inputs (Component and AV) as for the DTV / TV input in section 4.2. The menu difference is that there is no icon along the top for DTV / TV adjustments. 4.12 Video Input - Vizio GV52LFHDTV10A | User Manual - Page 54
VIZIO GV52L FHDTV10A User Manual 4.14 Video Input Parental Control The Parental Control menu operates in the same way for Video Inputs (Component and AV) as for the DTV / TV input in section 4.7. The menu difference is that there is no icon along the top for DTV / TV adjustments. 4.15 PC Input - Vizio GV52LFHDTV10A | User Manual - Page 55
VIZIO GV52L FHDTV10A User Manual 4.15.3 Brightness Press the button to highlight the Brightness selection. is too low you will not be able to see the detail in darker parts of the picture and if the brightness is too high the picture will look washed out. 4.15.4 Contrast Press the button to highlight - Vizio GV52LFHDTV10A | User Manual - Page 56
4.15.5 Color Temperature VIZIO GV52L FHDTV10A User Manual Press the button to highlight the option for Color Temperature selection. The default is COOL; this is the 9300K setting. start tuning the to the PC signal. Use the or button to adjust the tuning. Version 10/4/2007 56 www.VIZIO.com - Vizio GV52LFHDTV10A | User Manual - Page 57
VIZIO GV52L FHDTV10A User Manual 4.16 PC Input Audio Adjustment The Audio Adjust menu operates in the same way for the PC Input as for the DTV / TV input in section 4.4. The menu difference is that there are no icons along the top for DTV / TV and Parental Control adjustments. 4.17 PC Input Setup - Vizio GV52LFHDTV10A | User Manual - Page 58
VIZIO GV52L FHDTV10A User Manual 4.18 Understanding Viewing Modes Normal Mode The original 4:3 aspect ratio (1.33:1 source) is preserved, so black bars are added to the left and right of the display image. Standard TV definition 4:3 aspect ratio (1.33:1 source) the picture will fill the screen but - Vizio GV52LFHDTV10A | User Manual - Page 59
VIZIO GV52L FHDTV10A User Manual 4.18.1 Picture-In-Picture (PIP) Mode Your TV features PIP mode so you can watch two pictures at the same time. When PIP is turned on, you can display two pictures at one time. One picture is displayed as the full screen (main screen) and the other picture is - Vizio GV52LFHDTV10A | User Manual - Page 60
VIZIO GV52L FHDTV10A User Manual Position Press the button to highlight Position and press the or button to choose where on the picture you want the PIP screen positioned over the main screen. Size Press the press the or Large. button to highlight Size function and or button to choose Small - Vizio GV52LFHDTV10A | User Manual - Page 61
VIZIO GV52L FHDTV10A User Manual Component refers to the inputs commonly labeled and known as HDMI4) through which a high definition (audio and video combined) signal is transmitted using a single cable. Your TV comes equipped with four HDMI inputs, one of which will allow the user to input a signal - Vizio GV52LFHDTV10A | User Manual - Page 62
VIZIO GV52L FHDTV10A User Manual 4.18.3 How to select PIP/POP The following steps could be used as a guideline to use the features either PIP or POP which come built in to you TV the selection. 5. Screen will show the word AUDIO button to select which signal or program you want to listen. 11. If TV - Vizio GV52LFHDTV10A | User Manual - Page 63
VIZIO GV52L FHDTV10A User Manual 4.19 Programming the VIZIO Universal Remote Control You can program the remote control to work with up to four different pieces of equipment including your VIZIO GV52L FHDTV10A. Listed below are the steps for programming your Audio Tuner Amplifier, Cable Box and DVD - Vizio GV52LFHDTV10A | User Manual - Page 64
VIZIO GV52L FHDTV10A User Manual 4.19.3 Programming for DVD Player 1. Manually turn on the DVD Player. 2. Press the DVD button on the remote control. 3. Press and hold the SET button until the LED LIGHT flashes twice. 4. Find the programming code for your DVD player in the code list - Vizio GV52LFHDTV10A | User Manual - Page 65
VIZIO GV52L FHDTV10A User Manual Note: Some buttons may not function as expected on your cable or satellite remote. Typically power, volume and mute will work. Chapter 5 Maintenance and Troubleshooting 5.1 Maintenance Important 1. Make sure that the power cable is removed from the socket before - Vizio GV52LFHDTV10A | User Manual - Page 66
VIZIO GV52L FHDTV10A User Manual Problem Solution Press the Volume + (Up) key on your remote control Make sure that headphones are not connected If the screen is black. Check your input connections. Power is ON but no screen image. Make sure the video cable supplied with the TV is secured to - Vizio GV52LFHDTV10A | User Manual - Page 67
VIZIO GV52L FHDTV10A User Manual Problem Solution You switch to a different input The TV remembers the viewing mode from the last time you used a particular input and the screen size changes. (AV1, AV2, Component 1, Component 2, HDMI 1, HDMI 2, HDMI 3, HDMI 4 and TV). Tips for High-Definition - Vizio GV52LFHDTV10A | User Manual - Page 68
VIZIO GV52L FHDTV10A User Manual 5.4 Compliance Caution: Always use a power Class B digital device, pursuant to Part 15 of the FCC Rules. used in accordance with the instructions, may cause harmful interference to Consult the dealer or an experienced radio/TV technician for help. Notice: 1. 2. - Vizio GV52LFHDTV10A | User Manual - Page 69
VIZIO GV52L FHDTV10A User Manual Chapter 6 Miscellaneous Information 6.1 Specifications Specifications Panel 52" Diagonal, 16:9 Aspect Ratio Resolution 1920 x 1080 pixels Pixel (Dot) Pitch 0.600mm (H) x 0.600mm (V) Display/Signal Compatibility 1080P (Full - Vizio GV52LFHDTV10A | User Manual - Page 70
VIZIO GV52L FHDTV10A User Manual 6.2 Glossary - Standard Definitions Analog TV: Today's TV system using radio frequency waves to transmit and display pictures and sound. Aspect Ratio (4x3): Traditional TV "aspect ratio", that is, the screen's width as compared to its height. For example, a "32 inch - Vizio GV52LFHDTV10A | User Manual - Page 71
, 40, 54 Brightness, 41, 55 Color, 41 Color Temperature, 42, 56 Contrast, 41, 55 Picture Mode, 40 Sharpness, 42 Version 10/4/2007 VIZIO GV52L FHDTV10A User Manual Tint, 41 DTV Special Features Closed Caption, 46, 47 Closed Caption Style, 46, 47 Language, 45 Reset, 48 Sleep Timer, 47 DTV Tuner Setup - Vizio GV52LFHDTV10A | User Manual - Page 72
Box, 63 Using your Cable or Satellite Remote to Operate your VIZIO TV, 64 RGB Connecting your PC, 32 S S-Video Connecting your DVD Player, 28, 29 T Technical Specifications, 69 Troubleshooting Guide, 65 TV VIZIO GV52L FHDTV10A User Manual Audio Adjustment, 44 Parental Control, 49 Picture Adjustment - Vizio GV52LFHDTV10A | User Manual - Page 73
VIZIO GV52L FHDTV10A User Manual 6.4 Component Program Codes Setup Code for VCR's ABS 21972 Admiral 20048, 20209, 20060, 20039, 20047, 20104, 20020, 20062 Aiko 20278 Aiwa 20037, 20479, 20000, 20124, 20307 Alienware 21972 America Action 20278, 10180 American High 73 www.VIZIO.com Setup - Vizio GV52LFHDTV10A | User Manual - Page 74
, 20081, 20739, 20618 Pilot 20037 Pioneer 20042, 20067 Polk Audio 20081 Profitronic 20240 Proscan 20060 Protec 20072 Pulsar 20039 Qisheng 20060 , 20033, 20636, 21972 STS 20042 Version 10/4/2007 VIZIO GV52L FHDTV10A User Manual Setup Code for VCR's Sylvania 20035, 20081, 20043 - Vizio GV52LFHDTV10A | User Manual - Page 75
00775 GE 00566 General Instrument 00869 GOI 00775 Goodmans 01246 Hisense 01535 Hitachi 00819, 00222, 01250 Version 10/4/2007 VIZIO GV52L FHDTV10A User Manual Setup Code for Satellite Receivers HTS 00775 Hughes Network Systems 01142, 00749, 01749, 01442 I-Lo 01535 JVC 00775 LG - Vizio GV52LFHDTV10A | User Manual - Page 76
Image 21117 Sherwood 20770 Shinco 20717 Version 10/4/2007 VIZIO GV52L FHDTV10A User Manual Setup Code for DVD Players Shinsonic 20533 Sonic Blue Setup Code for CD Players Aiwa 30157 Burmester 30420 California Audio Labs 30029 Carver 30157, 30179 Denon 30873 DKK 30000 DMX - Vizio GV52LFHDTV10A | User Manual - Page 77
Kardon 30110 Hitachi 31273 Version 10/4/2007 VIZIO GV52L FHDTV10A User Manual Setup Code for Audio Amp/Tuners Inkel 30027 Integra 30135 JBL 30074 Wards 30014 Yamaha 30176, 31276, 31176 77 www.VIZIO.com Setup Code for TV's Addison 10092 Admiral 10093, 10463 Advent 10761, 10842 - Vizio GV52LFHDTV10A | User Manual - Page 78
10030 Firstar 10236 Fisher 10154 Fortress 10093 Fujitsu 10809, 10853 Funai 10180, 10171, 11904 Version 10/4/2007 VIZIO GV52L FHDTV10A User Manual Setup Code for TV's Furi 10145 Futuretech 10180 Gateway 11756, 11755 GE 11447, 10047, 11454, 10051, 10451, 10180, 10030, 10178 - Vizio GV52LFHDTV10A | User Manual - Page 79
10761 Princeton 10700 Prism 10051 Proscan 11447, 10047, 11922 Proton 10030, 10178 Pulsar 10017 Version 10/4/2007 VIZIO GV52L FHDTV10A User Manual Setup Code for TV's Qingdao Quasar 10250, 10051, 11924, 10650 RadioShack 10047, 10154, 10180, 10030, 10178, 11920, 11904 RCA 11447 - Vizio GV52LFHDTV10A | User Manual - Page 80
11758, 11756, 10885, 10864 Vector Research 10030 Victor 10250, 10053, 10650 Vidikron 10054 VIZIO GV52L FHDTV10A User Manual Setup Code for TV's Vidtech 10178 Viewsonic 11755, 10885, 10864 Wards 10054, 10030, 10178, 10866, 11156 Warumaia 10661 Waycon 10156 White 10463, 11909
-
 1
1 -
 2
2 -
 3
3 -
 4
4 -
 5
5 -
 6
6 -
 7
7 -
8
-
9
-
10
-
11
-
12
-
13
-
14
-
15
-
16
-
17
-
18
-
19
-
20
-
21
-
22
-
23
-
24
-
25
-
26
-
27
-
28
-
29
-
30
-
31
-
32
-
33
-
34
-
35
-
36
-
37
-
38
-
39
-
40
-
41
-
42
-
43
-
44
-
45
-
46
-
47
-
48
-
49
-
50
-
51
-
52
-
53
-
54
-
55
-
56
-
57
-
58
-
59
-
60
-
61
-
62
-
63
-
64
-
65
-
66
-
67
-
68
-
69
-
70
-
71
-
72
-
73
-
74
-
75
-
76
-
77
-
78
-
79
-
80
 |
 |

VIZIO GV52L FHDTV10A User Manual
Version 10/4/2007
1
www.VIZIO.com
Dear VIZIO Customer,
Congratulations on your new VIZIO GV52L
FHDTV10A LCD Television purchase.
Thank you
for your support.
For maximum benefit of your set,
please read these instructions before making any
adjustments, and retain them for future reference.
We hope you will experience many years of
enjoyment
from
your
new
VIZIO
GV52L
FHDTV10A Television.
For assistance
, please call 949-428-2525 or e-
mail us at
.
To purchase or inquire about accessories and
installation services for your VIZIO LCD HDTV,
please visit our website at
www.vizio.com
or call
toll free at
888-VIZIOCE (888-849-4623).
We recommend you register your VIZIO GV52L
FHDTV10A either at our website
www.vizio.com
or fill in your registration card and mail it in.
For
peace of mind and to protect your investment
beyond the standard warranty, VIZIO offers on-
site extended warranty service plans.
These
plans
give
additional
coverage
during
the
standard warranty period.
Visit our website or call
us to purchase a plan.
Write down the serial number located on the back
of your GV52L FHDTV10A.
__
__ __ __ __ __ __ __ __ __ __ __ __ __
Purchase Date _____________________
VIZIO is a registered trademark of V, Inc.
HDMI logo and “High Definition Multimedia Interface” are registered trademarks of HDMI Licensing LLC.
Manufactured under license from Dolby Laboratories
Dolby and the double-D symbol are trademarks of Dolby Laboratories