Vizio M50-C1 User Manual (English)
Vizio M50-C1 Manual
 |
View all Vizio M50-C1 manuals
Add to My Manuals
Save this manual to your list of manuals |
Vizio M50-C1 manual content summary:
- Vizio M50-C1 | User Manual (English) - Page 1
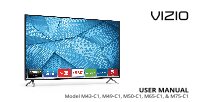
VIZIO USER MANUAL Model M43-C1, M49-C1, M50-C1, M65-C1, & M75-C1 - Vizio M50-C1 | User Manual (English) - Page 2
period. To purchase an extended warranty service plan, visit www.VIZIO.com. WHEN READING THIS MANUAL When you see this symbol, please read the accompanying important warning or notice. It is intended to alert you to the presence of important operating instructions. When you see this symbol, please - Vizio M50-C1 | User Manual (English) - Page 3
and any other cables are unplugged before moving your TV. • The mains plug or appliance coupler is used as the disconnect device, the disconnect device shall remain readily operable. • CAUTION - These servicing instructions are for use by qualified service personnel only. To reduce the risk of - Vizio M50-C1 | User Manual (English) - Page 4
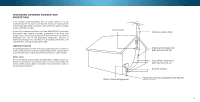
to proper grounding of the mast and supporting structure, grounding of the lead-in of time, unplug the TV from the wall outlet and disconnect the antenna screen of the coaxial cable is intended to be connected to earth in the building installation. Ground Clamp Antenna Lead In Wire Electric Service - Vizio M50-C1 | User Manual (English) - Page 5
a trademark of DTS, Inc. © DTS, Inc. All Rights Reserved. Manufactured under license from Dolby Laboratories. Dolby and the double-D symbol are trademarks of Dolby Laboratories. HDMI, the HDMI logo and High-Definition Multimedia Interface are trademarks or registered trademarks of - Vizio M50-C1 | User Manual (English) - Page 6
to View Ultra HD Content 58 What is HDMI 2.0 and HDCP 2.2 58 Adjusting the Picture Mode Edit Settings 26 Accessing the Parental Controls Menu 43 Troubleshooting & Technical Support 59 Saving a Custom Picture Mode 27 Locking/Unlocking a Custom Picture Mode 27 Enabling or Disabling Program - Vizio M50-C1 | User Manual (English) - Page 7
nothing is missing or damaged. VIZIO LED UHDTV with Stand Power Cord INPUT LIST EXIT MENU INFO BACK VOL GUIDE CH 3D 1 2 3 4 5 6 7 8 9 ENTER 0 Two-Sided Remote with Keyboard (Batteries Included) TV Stands 2 x Quick Start Guides (1 English, 1 French-Spanish) 4 x Phillips Screws - Vizio M50-C1 | User Manual (English) - Page 8
in two ways: • On a flat surface, using the included stand • On a wall, using a VESA-standard wall mount (not included) Installing the TV Stand Your TV includes a stand designed to support the weight of the TV and keep it from falling over. However, the TV can still fall over if: • It is placed on - Vizio M50-C1 | User Manual (English) - Page 9
clear of debris that can scratch or damage the TV. 3. Remove the stands by loosening and removing the screws. 4. Attach your TV and wall mount to the wall, carefully following the instructions that came with your mount. Use only with a UL-listed wall mount bracket rated for the weight/load of this - Vizio M50-C1 | User Manual (English) - Page 10
& POWER INDICATOR When using the remote, aim it directly at this sensor. The power indicator flashes on when the TV turns on, then goes out after several seconds. To keep the power indicator on as long as the TV is on, see Turning the Power Indicator On or Off on page 46. FRONT PANEL 10 - Vizio M50-C1 | User Manual (English) - Page 11
Connect USB thumb drive to play photo, music, or video. HDMI - Connect HDMI device. Ethernet - Connect Ethernet cable from home network. Coaxial SPDIF audio device, such as home audio receiver. HDMI - Connect HDMI device. Power - Press once to turn on the TV. Volume - Press the + button to increase - Vizio M50-C1 | User Manual (English) - Page 12
Change the display mode. NUMBER PAD Manually enter a channel. ENTER Confirm channel or passcode entered using the Number Pad. POWER Turn TV on or off. MENU Display the on-screen menu. INFO Display the info window. ARROW Navigate the on-screen menu. GUIDE Display the info window. CHANNEL UP/DOWN - Vizio M50-C1 | User Manual (English) - Page 13
Batteries 1. Press in on the button on the rear of the remote. 2. Remove the battery cover. 1 3. Insert two AAA batteries into the remote control. Make sure that the (+) and (-) symbols on the batteries match the (+) and (-) symbols inside the battery compartment. 4. Replace the battery cover. 13 - Vizio M50-C1 | User Manual (English) - Page 14
TV (HDMI, Component, etc.). 2. Turn the TV and your device off. 3. Connect the appropriate cable (not included) to the TV and the device. 4. Turn the TV and your device on. Set the TV's input to match the connection you used (HDMI-1, HDMI-2, etc.). 1 Maximum Resolution 2 HDCP 2.2 supported on HDMI - Vizio M50-C1 | User Manual (English) - Page 15
connecting your devices to your TV. Video signals are sent UHD* • HD Audio • Digital Connection • Audio and Video Signals COMPONENT VIDEO Y L R COMPONENT VIDEO Coaxial COAXIAL CABLE R L Pr/Cr Pb/Cb Y HDMI HDMI GOOD * High-Speed HDMI cable required for UHD resolutions BETTER BETTER BEST - Vizio M50-C1 | User Manual (English) - Page 16
(not included) to the TV and the device. 4. Turn the TV and your device on. Home Audio Receiver Note: The image shown here is for illustrative purposes only and may be subject to change. The actual number of ports and their locations may vary, depending on the model. 2 VIZIO Sound Bar RCA CABLE - Vizio M50-C1 | User Manual (English) - Page 17
DTS 5.1 Channel • Digital Connection • Audio Signal Only Optical/SPDIF DIGITAL OPTICAL AUDIO 2 HDMI CABLE HDMI technology transmits crystal-clear digital multi-channel surround audio through a single HDMI cable. Audio Return Channel-enabled (ARC) TVs allow audio to be sent over an already connected - Vizio M50-C1 | User Manual (English) - Page 18
through a separate audio connection. RCA (Audio) Your TV HDMI Cable Your Home Audio Receiver HDMI Cable Your Blu-Ray Player 2 WITH HDMI ARC With an HDMI ARC setup, the audio connection between your TV and Home Audio Receiver can be removed. The HDMI cable will transmit audio signal to and from - Vizio M50-C1 | User Manual (English) - Page 19
with a Wired or Wireless connection. Connecting to a Wired Network (Best) 1. Connect an Ethernet cable to your router and to the Ethernet port on the back of the TV. See below. 2. Use the Guided Network Setup to configure the TV. See Using Guided Setup on page 48. Connecting to a Wireless Network - Vizio M50-C1 | User Manual (English) - Page 20
turn on the TV, the Setup App will guide you through each of the steps necessary to get your TV ready for use. Before you begin the first-time setup: • Your TV to the Ethernet port on the TV. To complete the first-time setup: 1 Press the Power button on the remote. The TV powers on and the Setup App - Vizio M50-C1 | User Manual (English) - Page 21
7 Select the name of your wireless network from the list of available networks and press OK. Use the Arrow and OK buttons on the remote to review the Terms Of Service and Privacy Policy. When you are finished, highlight I Accept and press OK. 8 Enter the network password using the keyboard on the - Vizio M50-C1 | User Manual (English) - Page 22
whether you have a cable box or if you connect the TV directly to a cable from the wall. Note: Number of ports may differ by TV. Otherwise, use the Arrow and OK buttons on the remote to select the input your TV source is connected to. When you are finished, the message "Setup is complete." will - Vizio M50-C1 | User Manual (English) - Page 23
Name Inputs • Adjust TV settings • Access the Guided Setup • Access the User Manual VIZIO TV SETTINGS Picture Audio Timers Network Channels CC Closed Captions Devices System Guided Setup User Manual NAVIGATING THE ON-SCREEN MENU To open the on-screen menu, press the MENU button on the remote. Use - Vizio M50-C1 | User Manual (English) - Page 24
85 + 50 + 50 + 59 +0 +9 More Picture Picture Mode Edit Color Calibration Wide Zoom Normal Panoramic Exit 2D 3D ABC Input Wide CC Sleep Timer Picture Audio Network Settings Help FULL-SIZED AND CENTERED (OVERLAY) Wide Exit VIZIO PICTURE Picture Mode Standard Wide Auto Brightness - Vizio M50-C1 | User Manual (English) - Page 25
• Standard mode sets the picture settings to the default settings. • Calibrated mode sets the picture settings to values ideal for watching TV in a brightly-lit room. • Calibrated Dark mode sets the picture settings to values ideal for watching TV in a dark room. VIZIO PICTURE Picture Mode Auto - Vizio M50-C1 | User Manual (English) - Page 26
/ Right Arrow buttons to change the setting: • Color Temperature Adjusts the 'warmness' and 'coolness' of the white areas of the picture. Select Cool, Normal, or Computer. • Cool produces a blue-hued picture. VIZIO MORE PICTURE Color Temperature Black Detail Active LED Zones Reduce Judder Reduce - Vizio M50-C1 | User Manual (English) - Page 27
MODE menu is displayed. 2. Use either the on-screen keyboard or keyboard on your remote control to enter a name for your custom picture mode. 3. Highlight Save and press OK. 4. Press the EXIT button to exit the menu screens. VIZIO SAVE PICTURE MODE Custom1_ abc def ghi j k l mn o p q r s t u v wx - Vizio M50-C1 | User Manual (English) - Page 28
press OK. 3. Press the EXIT button to exit the menu screens. Resetting Picture Mode Reset the picture mode settings (for a preset picture mode) to the factory default values. To reset a customized preset picture mode: 1. From the PICTURE MODE EDIT menu, use the Arrow buttons to highlight Reset - Vizio M50-C1 | User Manual (English) - Page 29
turn color channels off for testing, and display color bar, flat, and ramp test patterns. The Color Tuner, 11 Point White Balance, and test patterns allow technicians to manually calibrate the TV. Calibration requires specialized training, an input with precisely set on the remote to highlight the - Vizio M50-C1 | User Manual (English) - Page 30
is displayed. Ramp Test Pattern Off 2. Use the Arrow buttons on the remote to highlight Off. Use the Left/Right Arrow buttons to highlight On to are finished, press the EXIT button. 2. Use the Arrow buttons on the remote to highlight Off. Use the Left/Right Arrow buttons to select the color for - Vizio M50-C1 | User Manual (English) - Page 31
remote to highlight Audio and press OK. The AUDIO menu is displayed. 3. Use the Arrow buttons to highlight the setting you wish to adjust, then press Left/ Right Arrow buttons to change the setting: • TV Speakers - Turns the built-in speakers on or off. VIZIO AUDIO TV and input sources and HDMI ARC - Vizio M50-C1 | User Manual (English) - Page 32
To create, modify, or replace the single custom equalizer setting: 1. Press the MENU button on the remote. The on-screen menu is displayed. 2. Use the Arrow buttons on the remote to highlight Audio and press OK. The AUDIO menu is displayed. 3. Use the Arrow buttons to highlight Equalizer and press - Vizio M50-C1 | User Manual (English) - Page 33
Timer When activated, the TV's sleep timer will turn the TV off after a set period of time. 1. Press the MENU button on the remote. The on-screen menu is displayed. 2. Use the Arrow buttons on the remote to highlight Timers and press OK. The TIMERS menu is displayed. VIZIO TIMERS Sleep Timer Auto - Vizio M50-C1 | User Manual (English) - Page 34
button on the remote. Changing the Manual Setup Settings Advanced users can fine-tune the network settings using the Manual Setup feature. To change advanced network settings: 1. From the NETWORK menu, highlight Manual Setup and VIZIO press OK. The MANUAL SETUP MANUAL SETUP menu is displayed - Vizio M50-C1 | User Manual (English) - Page 35
OK. 2. The TEST CONNECTION screen displays the connection WmideethoZodo,mnetwNoormrkal naPamnoera, msiicgnal strength, and download speed of your network connection. 3. Press the EXIT button on the remote. Exit 2D 3D ABC Input Wide CC Sleep Timer Picture Audio Network Settings Help 4 35 - Vizio M50-C1 | User Manual (English) - Page 36
channel search begins. 6. EWxitait un2tDil the p3ADaBCrtial channel search is 100% complete. Highlight Done and press OK. 7. IPnpruetss thWeideEXIT ACbBCuC tton on the remote. Input Wide CC Sleep Timer Sleep Timer Picture Audio Picture Audio Network Settings Help Network Settings Help 36 - Vizio M50-C1 | User Manual (English) - Page 37
TV scans for the channel. 4. When the TV is done scanning for the channel, press the EXIT button on the remote. VIZIO Channels on page 43. Input Wide CC To on the remote. Wide Zoom Normal Panoramic Exit 2D 3D ABC Input Wide CC Sleep Timer Picture Audio Network Settings Help 4 37 - Vizio M50-C1 | User Manual (English) - Page 38
one language. The TV's Analog Audio feature remote. VIZIO DIGITAL LANGUAGE English Español Français Exit 2D 3D ABC Input Wide CC Sleep Timer Picture Audio Wide Zoom Normal Panoramic Exit 2D 3D ABC Input Wide CC Sleep Timer Picture Audio Network Settings Help Network Settings - Vizio M50-C1 | User Manual (English) - Page 39
is not being broadcast with closed captions, the TV will not display them. To activate or deactivate closed captions: The Closed Captions menu does not appear when an HDMI input is selected. 1. Press the MENU button on the remote. The on-screen menu is displayed. 2. Use the Arrow buttons on - Vizio M50-C1 | User Manual (English) - Page 40
color-When text appears, the entire line fills with color at once. In the example below, the closed caption text is green, the background is black, and the window is red. Text Background CLOSED CAPTION TEXT SAMPLE Window CLOSED CAPTIONS - Vizio M50-C1 | User Manual (English) - Page 41
custom label using the keyboard on the remote. b. Highlight OK and press OK. c. The Input Name changes to show the custom name that you created. 5. When you have finished naming your input, press the EXIT button on the remote. Input Port VIZIO NAME INPUT HDMI-1 DVD DVD_ abc def ghi j k l mn - Vizio M50-C1 | User Manual (English) - Page 42
system information. ABC 5. When you are finished reviewing the system information, press Itnhpuet EXIW TidbeuttonCCon the remote. Sleep Timer Picture Audio Network Settings Help Changing the On-Screen Menu Language Your TV can display the on-screen menu in different languages. To change the - Vizio M50-C1 | User Manual (English) - Page 43
. The on-screen menu is displayed. 2. Use the Arrow buttons on the remote to highlight System and press OK. The SYSTEM menu is displayed. 3. Use the Arrow buttons on the remote to highlight Time & Local Settings and press OK. The menu headed by the local date and time is displayed. VIZIO TIME ZONE - Vizio M50-C1 | User Manual (English) - Page 44
it in a secure location. 5. Press the EXIT button on the remote. Resetting the Content Locks To reset the content locks to the factory-default settings: 1. From the PARENTAL CONTROLS menu, highlight Reset Locks and press OK. The TV displays, "Select Reset to restore Parental Controls to factory - Vizio M50-C1 | User Manual (English) - Page 45
. • Zoom expands images with black bars to fit the screen. Changing your TV Name Enter a custom DNLA name for your TV (Up to 10 characters long) To create a custom name for your TV: 1. Press the MENU button on the remote. The on-screen menu is displayed. VIZIO TV NAME 2. Use the Arrow buttons - Vizio M50-C1 | User Manual (English) - Page 46
on your TV enables you to control HDMI-connected devices with the included remote without any additional programming. Not all HDMI devices support CEC. See your device's user manual for details. To enable, disable, or adjust CEC settings: 1. Press the MENU button on the remote. The on-screen menu is - Vizio M50-C1 | User Manual (English) - Page 47
turn back on shortly afterward and the Setup App will begin. To restore the TV to its factory default settings: 1. Press the MENU button on the remote. The on-screen menu is displayed. 2. Use the Arrow buttons on the remote to highlight System and press OK. The SYSTEM menu is displayed. VIZIO - Vizio M50-C1 | User Manual (English) - Page 48
THE GUIDED SETUP MENU Using Guided Setup The TV's Setup App can be used to easily set up the TV channel or to connect the TV with your network. To use guided setup: 1. Press the MENU button on the remote. The on-screen menu is displayed. 2. Highlight Guided Setup and press OK. VIZIO GUIDED SETUP - Vizio M50-C1 | User Manual (English) - Page 49
be formatted as FAT32. • Files on the USB thumb drive must end in a supported file extension (.mp3, .jpg, etc.). • The player is not designed to play thumb drive to the USB port on the side of the TV. 2. Press the V button on the remote. 3. Use the Arrow buttons to highlight the Multimedia app in - Vizio M50-C1 | User Manual (English) - Page 50
and press OK to return to the previous screen. Progress Bar Displays the duration of the currently-playing song. The blue bar will lengthen as the song progresses. VIZIO Music USB1: MyFlashDrive Fab Apple Dream On files and folders using the Arrow and OK buttons on the remote. MUSIC PLAYER 50 - Vizio M50-C1 | User Manual (English) - Page 51
to the previous screen. Connected Sources Displays connected USB devices. VIZIO Video USB1: MyFlashDrive Current Folder My Videos MyFlashDrive\Video\root\My Videos # File 1 Family Vacation - California 2 26th Birthday Party 3 Summer 2012 4 Greatest Trip Ever Date - Duration 00:23:43 00:38:18 - Vizio M50-C1 | User Manual (English) - Page 52
button and press OK to return to the previous screen. VIZIO Photo USB1: Back Button Highlight and press OK to return to left column. Current Folder Displays the folder path. VIZIO_2GB\Photo\root Current Folder Start Fullscreen Slideshow Sort by Date or File Name View Thumbnails/Folders root Start - Vizio M50-C1 | User Manual (English) - Page 53
to receive product updates and to access online content. See Using the Network Connection Menu on page 34 if your TV is not yet V Button on the remote. V Button 2. Highlight a V.I.A. Plus App by scrolling left and right using the Left/Right Arrow buttons on the remote. (The highlighted App - Vizio M50-C1 | User Manual (English) - Page 54
launch the App. 4. To exit from an open App or to close the App Dock, press the Exit button on the remote. My Apps Tab Displays the apps installed on your TV. Installed Apps The Apps displayed here are also available in the V.I.A. Plus App Dock. Note: App location, appearance, and availability - Vizio M50-C1 | User Manual (English) - Page 55
, Photos and Video, Sports, Music, Social, Information, Fun and Games, Shopping, and Local TV. • Settings ( ): Displays App software information and development settings. You can also preview Apps without installing them. Simply highlight the App you wish to preview and press OK to open it. 6 Note - Vizio M50-C1 | User Manual (English) - Page 56
corner of the app icon as shown below. Deleting an App from the My Apps Tab To delete an app from your TV: 1. Use the Arrow buttons on the remote to highlight the App you wish to delete. 2. Press and hold the OK button. The following options appear: Note: App location, appearance - Vizio M50-C1 | User Manual (English) - Page 57
3. Use the Arrow buttons to move the app to the desired location and press OK to place the app.When you can move the app, it appears as shown below. Note: App location, appearance, and availability subject to change without notice. Cursor showing the location that the app will move to 6 57 - Vizio M50-C1 | User Manual (English) - Page 58
one of the following: • Netflix® or other streaming service account that offers Ultra HD content • Device with 4K Ultra HD output such as a high-performance PC WHAT IS HDMI 2.0 AND HDCP 2.2? Your M-Series TV supports the latest HDMI standards. This allows next-gen cable and satellite receivers - Vizio M50-C1 | User Manual (English) - Page 59
Troubleshooting & Technical Support Do You Have Questions? Find Answers At SUPPORT.VIZIO.COM Find help with: • New Product Setup • Connecting Your Devices • Technical Problems • Product Updates • And More Live Chat Support Available You can also contact our award-winning support team at: Phone: (877 - Vizio M50-C1 | User Manual (English) - Page 60
Why Register? Customized Support Get assistance quickly with your information on-hand. News & Offers Take advantage of the latest news and special offers from VIZIO. Safety & Satisfaction Stay up to date with important product updates and notifications. REGISTER YOUR VIZIO PRODUCT NOW 60 - Vizio M50-C1 | User Manual (English) - Page 61
the Picture Settings on page 25. VIZIO recommends selecting Calibrated. • Check all cables to ensure they are securely attached. The buttons on the remote aren't working. • Ensure you are only pressing one button at a time. • Point the remote directly at the TV when pressing a button. • Replace the - Vizio M50-C1 | User Manual (English) - Page 62
around the room or close to a window for the best signal. When I change input source, the display image changes size. • The TV remembers the viewing mode on each input source. If the viewing mode on the new input source differs from the one on the input source you switch from, the difference may be - Vizio M50-C1 | User Manual (English) - Page 63
: w/o Stand: LCD Backlight: Active LED Zones: Refresh Rate: Clear Action: Maximum Resolution: Dynamic Contrast Ratio: Pixel Pitch: Viewing Angle: HDMI Inputs: Component Video Inputs: Composite Inputs: RF Antenna Input: USB Port: Ethernet: Audio Outputs: OSD Language: Ambient Light Sensor: M43-C1 43 - Vizio M50-C1 | User Manual (English) - Page 64
Screen Size: Viewable Area: Dimensions w/ Stand: w/o Stand: Weight w/ Stand: w/o Stand: LCD Backlight: Active LED Zones: Refresh Rate: Clear Action: Maximum Resolution: Dynamic Contrast Ratio: Pixel Pitch: Viewing Angle: HDMI Inputs: Component Video Inputs: Composite Inputs: RF Antenna Input: USB - Vizio M50-C1 | User Manual (English) - Page 65
Screen Size: Viewable Area: Dimensions w/ Stand: w/o Stand: Weight w/ Stand: w/o Stand: LCD Backlight: Active LED Zones: Refresh Rate: Clear Action: Maximum Resolution: Dynamic Contrast Ratio: Pixel Pitch: Viewing Angle: HDMI Inputs: Component Video Inputs: Composite Inputs: RF Antenna Input: USB - Vizio M50-C1 | User Manual (English) - Page 66
Screen Size: Viewable Area: Dimensions w/ Stand: w/o Stand: Weight w/ Stand: w/o Stand: LCD Backlight: Active LED Zones: Refresh Rate: Clear Action: Maximum Resolution: Dynamic Contrast Ratio: Pixel Pitch: Viewing Angle: HDMI Inputs: Component Video Inputs: Composite Inputs: RF Antenna Input: USB - Vizio M50-C1 | User Manual (English) - Page 67
Screen Size: Viewable Area: Dimensions w/ Stand: w/o Stand: Weight w/ Stand: w/o Stand: LCD Backlight: Active LED Zones: Refresh Rate: Clear Action: Maximum Resolution: Dynamic Contrast Ratio: Pixel Pitch: Viewing Angle: HDMI Inputs: Component Video Inputs: Composite Inputs: RF Antenna Input: USB - Vizio M50-C1 | User Manual (English) - Page 68
units purchased as new in United States and Puerto Rico Only. VIZIO provides a warranty to the original Support will provide instructions for packing and shipping the covered Product to the VIZIO service center. NOTICE. CHECK WWW.VIZIO.COM FOR THE MOST CURRENT VERSION. purchaser of a new Product - Vizio M50-C1 | User Manual (English) - Page 69
the instructions, may be determined by turning the equipment off each area. USA: UL Canada: CSA Germany: VDE UK: VIZIO INTERNET APPLICATIONS ("VIA") TO ACCESS THIRD PARTY INTERNET PRODUCT OFFERINGS AND SERVICES ("VIA SERVICES") AND THE VIZIO SOFTWARE INSTALLED ON YOUR VIZIO HD TV. BY USING THE VIZIO - Vizio M50-C1 | User Manual (English) - Page 70
gathered periodically to facilitate the provision of software updates, product support and other services to you, including additional or different VIA Services related to the VIZIO Software and to verify compliance with the terms of this License Agreement. VIZIO and its third party providers of VIA - Vizio M50-C1 | User Manual (English) - Page 71
THE LIMITED WARRANTY ON MEDIA SET FORTH ABOVE AND TO THE MAXIMUM EXTENT PERMITTED BY APPLICABLE LAW, THE VIZIO SOFTWARE AND VIA SERVICES ARE PROVIDED "AS IS", governed by the United Nations Convention on Contracts for the International Sale of Goods, the application of which is expressly excluded. - Vizio M50-C1 | User Manual (English) - Page 72
© 2015 VIZIO INC. ALL RIGHTS RESERVED. 150205OC-US-A
-
 1
1 -
 2
2 -
 3
3 -
 4
4 -
 5
5 -
 6
6 -
 7
7 -
8
-
9
-
10
-
11
-
12
-
13
-
14
-
15
-
16
-
17
-
18
-
19
-
20
-
21
-
22
-
23
-
24
-
25
-
26
-
27
-
28
-
29
-
30
-
31
-
32
-
33
-
34
-
35
-
36
-
37
-
38
-
39
-
40
-
41
-
42
-
43
-
44
-
45
-
46
-
47
-
48
-
49
-
50
-
51
-
52
-
53
-
54
-
55
-
56
-
57
-
58
-
59
-
60
-
61
-
62
-
63
-
64
-
65
-
66
-
67
-
68
-
69
-
70
-
71
-
72
 |
 |

Model M43-C1, M49-C1, M50-C1, M65-C1, & M75-C1
USER MANUAL
VIZIO