Vizio M551d-A2R Download
Vizio M551d-A2R Manual
 |
View all Vizio M551d-A2R manuals
Add to My Manuals
Save this manual to your list of manuals |
Vizio M551d-A2R manual content summary:
- Vizio M551d-A2R | Download - Page 1
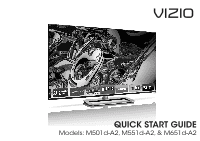
VIZIO QUICK START GUIDE Models: M501d-A2, M551d-A2, & M651d-A2 - Vizio M551d-A2R | Download - Page 2
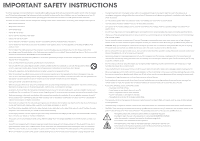
TV will not be used for an extended period of time, unplug the power cord. • To reduce risk of electric shock, do not touch the connector with wet hands. • Insert batteries in accordance with instructions. Incorrect polarities may cause the batteries to leak which can damage the remote control - Vizio M551d-A2R | Download - Page 3
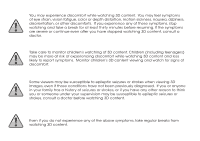
You may experience discomfort while watching 3D content. You may feel symptoms of eye strain, vision fatigue, color or depth distortion, motion sickness, nausea, dizziness, disorientation, or other discomforts. If you experience any of these symptoms, stop watching and take a break for at least - Vizio M551d-A2R | Download - Page 4
is based in the United States. We can help with: • New Product Setup • Connecting Your Devices • Technical Problems • And More Phone: (877) 878-4946 (TOLL-FREE) Email: [email protected] Web: http://store.VIZIO.com/support Hours of operation: Monday - Friday: 5 am to 9 pm (PST) Saturday - Sunday - Vizio M551d-A2R | Download - Page 5
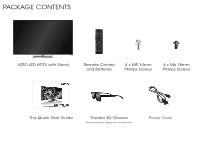
PACKAGE CONTENTS VIZIO LED HDTV with Stand INPUT LIST EXIT MENU INFO BACK VOL GUIDE CH 3D 1 2 3 4 5 6 7 8 9 ENTER 0 Remote Control and Batteries 4 x M5 14mm Phillips Screws 4 x M6 18mm Phillips Screws This Quick Start Guide Theater 3D Glasses Glasses may vary slightly from - Vizio M551d-A2R | Download - Page 6
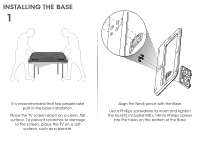
THE BASE 1 It is recommended that two people take part in the base installation. Place the TV screen-down on a clean, flat surface. To prevent scratches or damage to the screen, place the TV on a soft surface, such as a blanket. Align the Neck piece with the Base. Use a Phillips screwdriver - Vizio M551d-A2R | Download - Page 7
2 Align the Stand with the back of the TV. Use a Phillips screwdriver to insert and tighten the four(4) included M6 x 18mm Phillips screws into the holes on the back of the TV. When you are finished, place the TV on a stable, level surface. - Vizio M551d-A2R | Download - Page 8
info window. ARROW Navigate the on-screen menu. GUIDE Display the info window. V BUTTON Open the Smart TV dock. CHANNEL UP/DOWN Change the channel. 3D Turn on the 3D mode. LAST Return to the channel last viewed. DASH Use with number pad to manually enter a digital sub-channel. (For example, 18-4 or - Vizio M551d-A2R | Download - Page 9
FIRST-TIME SETUP 1 Connect the power cord to the back of the TV. Plug the power cord into an electrical outlet. - Vizio M551d-A2R | Download - Page 10
channels. These devices do not use the TV's digital tuner. If you have a high-speed internet connection, connect an Ethernet cable from your modem or router to the back of the TV as shown. For the best connection, VIZIO recommends using an Ethernet cable. However your TV also has builtin Wi-Fi. See - Vizio M551d-A2R | Download - Page 11
3 4 Turn the TV on by pressing the Power Button on the remote. The Setup App is displayed. Use the Arrow Buttons on the remote to highlight Home Use and press OK. Remove the battery cover by pressing gently on the back cover and sliding away from the remote. Insert the included batteries. Gently - Vizio M551d-A2R | Download - Page 12
0 MENU Button 2 VIZIO TV Settings Picture Audio Timers Network Tuner CC CC Devices System Guided Setup User Manual Wide Zoom Normal Panoramic Exit 2D 3D ABC User Input Wide CC Manual Sleep Timer Picture Audio Network Settings Help Press the MENU Button on the Remote Control to - Vizio M551d-A2R | Download - Page 13
INPUT LIST EXIT BACK USER MANUAL USE YOUR REMOTE Previous Page Next Page Menu Open TV Menu PAGE NUMBER 1 OF 53 To skip to page, use Number Pad, then press OK. Table of Contents Installing the TV Controls and Connections Connecting your Devices Completing the First-Time Setup Using the On- - Vizio M551d-A2R | Download - Page 14
CONNECTING YOUR DEVICES Red White Yellow Match colored connectors to colored ports. Red White Red Blue Green BACK OF TV - Vizio M551d-A2R | Download - Page 15
connectors to colored ports. Commonly-Connected Devices: Cable or Satellite Boxes COMPONENT CABLE BETTER • ANALOG • HD VIDEO (1080i)* • STEREO AUDIO Red White Red Blue Green Blu-ray™ or DVD Players HDMI CABLE BEST • DIGITAL • HD VIDEO (1080p)* • HD AUDIO * Maximum Resolution Game Consoles - Vizio M551d-A2R | Download - Page 16
displayed. VIZIO TV Settings Picture Audio Timers Network Tuner CC CC Devices System Guided Setup User Manual Wide Exit VIZIO Guided Setup ZoRoemmote NSeotrumpal Panoramic Tuner Setup Device Setup Network Setup 2D 3D ABC Input Wide CC Wide Exit Input Sleep Timer Picture Audio Sleep - Vizio M551d-A2R | Download - Page 17
do not see your SSID, you will need to enter it manually. For more information, see the TV's User Manual. Using the on-screen keyboard, enter your network's password, then highlight Connect and press OK. If you are having trouble connecting to your network, check your router placement. It should be - Vizio M551d-A2R | Download - Page 18
HOW TO VIEW 3D A. You will need: For the best 3D experience, try to view the TV straight-on, as shown here. Do not view the TV at an extreme angle, as some of the 3D effect will be lost. Sit at least 8 feet from the TV. VIZIO Theater 3D Glasses 8 Feet A. B. C. 3D-ready Player + Media - Vizio M551d-A2R | Download - Page 19
sound immersion and convenience, the VIZIO 5.1 Sound Bar sets the bar exceptionally high. It comes with a three channel sound bar, wireless subwoofer and rear satellite speakers packed with the latest in Dolby and DTS audio technology. Bluetooth connectivity lets you stream your music wirelessly - Vizio M551d-A2R | Download - Page 20
ULTRABOOK™ 14" THIN+LIGHT With uncompromising performance, and premium picture and audio quality in a remarkably thin profile, the VIZIO Thin+Light is the Ultrabook that's impossible to ignore. Ultra-responsive and ultra-portable, the VIZIO Thin+Light boots up instantly and goes wherever you do - Vizio M551d-A2R | Download - Page 21
mute is off. • Press MENU, then select Audio. Be sure TV Speakers is set to On. The TV displays "No Signal." • Be sure your connected devices are turned on. • Press the INPUT button on the remote and select the input to which your device is connected (HDMI-1, HDMI-2, Comp, etc). There are black - Vizio M551d-A2R | Download - Page 22
for a Class B digital with the instructions, may turning the equipment off and on, the user connected. • Consult the dealer or an experienced radio/TV technician responsible for any radio or TV interference caused by unauthorized modification to this equipment. It is the responsibilities of the user - Vizio M551d-A2R | Download - Page 23
VIZIO Technical Support will provide instructions for packing and shipping the covered Product to the VIZIO service center. Limitations and Exclusions VIZIO THE PERIOD OF TIME SET FORTH ABOVE. VIZIO'S TOTAL LIABILITY EXCEED THE PURCHASE PRICE OF THE PRODUCT. VIZIO SHALL NOT BE RESPONSIBLE FOR LOSS OF - Vizio M551d-A2R | Download - Page 24
© 2013 VIZIO INC. ALL RIGHTS RESERVED. 130328OC-NC
-
 1
1 -
 2
2 -
 3
3 -
 4
4 -
 5
5 -
 6
6 -
 7
7 -
8
-
9
-
10
-
11
-
12
-
13
-
14
-
15
-
16
-
17
-
18
-
19
-
20
-
21
-
22
-
23
-
24
 |
 |

VIZIO
QUICK START GUIDE
Models: M501d-A2, M551d-A2, & M651d-A2