Vizio Modèle E70u-D3 User Manual English
Vizio Modèle E70u-D3 Manual
 |
View all Vizio Modèle E70u-D3 manuals
Add to My Manuals
Save this manual to your list of manuals |
Vizio Modèle E70u-D3 manual content summary:
- Vizio Modèle E70u-D3 | User Manual English - Page 1
USER MANUAL E43u-D2, E48u-D0, E50u-D2, E55u-D0, E55u-D2, E60u-D3, E65u-D3, & E70u-D3 - Vizio Modèle E70u-D3 | User Manual English - Page 2
an electrician for replacement of the obsolete only with the cart, stand, tripod, bracket, servicing other than that contained in the operating instructions unless you are qualified to do so. • The lightning flash with arrowhead symbol within an equilateral triangle is intended to alert the user - Vizio Modèle E70u-D3 | User Manual English - Page 3
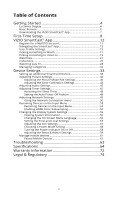
of Contents Getting Started 4 Eu-Series Display 4 Basic Remote 6 Downloading the VIZIO SmartCast™ App 7 First-Time Setup 8 VIZIO SmartCast™ App 12 Register for a MyVIZIO account 12 Navigating the SmartCast™ App 13 User Profile Settings 15 Picking something to Watch 17 Picking something to - Vizio Modèle E70u-D3 | User Manual English - Page 4
Getting Started 1 EU-SERIES DISPLAY Overview - Front Remote Sensor & Power Indicator When using the Basic Remote, aim it directly at this sensor. The power indicator lights up when the Display turns on, then goes out after severral seconds. To keep the - Vizio Modèle E70u-D3 | User Manual English - Page 5
Overview - Back 1 2 3 1 1 2 Power Button Volume Up/Down Buttons Input Button USB Ports Component Ports HDMI Port Optical/SPDIF Audio Out Port HDMI Ports 3 RCA Audio Out Ports Ethernet Port Note: The images shown here are for illustrative purposes only and may be subject to change. The actual - Vizio Modèle E70u-D3 | User Manual English - Page 6
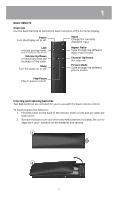
ratio modes. Channel Up/Down (Not supported) Picture Mode Cycle through the different picture modes. Play/Pause Play or pause content. Inserting and replacing batteries Two AAA batteries are included for you to use with the basic remote control. To insert/replace the batteries: 1. Find the notch - Vizio Modèle E70u-D3 | User Manual English - Page 7
Remote, download the VIZIO SmartCast on your compatible mobile device and follow the on-screen instructions to pair your device with your Eu-Series Display. The VIZIO a list of supported devices, see Google Play™ supported devices article.† iOS* • iOS 8.0 or later • Devices supported: iPhone®, iPad® - Vizio Modèle E70u-D3 | User Manual English - Page 8
new collection of Displays, displays, sound bars, and home audio speakers that can all be controlled by one ingenious app: the VIZIO SmartCast app. With the app, you can browse movies, TV shows, music and more from multiple sources or apps in one view, without having to switch back and forth between - Vizio Modèle E70u-D3 | User Manual English - Page 9
EU-SERIES DISPLAY Need help installing the Display? Refer to the printed Quick Start Guide (included) for detailed instructions on how to install your new Eu-Series Display. You can also find a digital copy on support.vizio.com. 1. Turn on the Eu-Series Display by pressing the Power button on the - Vizio Modèle E70u-D3 | User Manual English - Page 10
list and enter your password. 5. Use the tablet to name your Eu-Series Display. 6. Take a moment to read the VIZIO Terms of Service and Privacy Policy, as well as Google's Terms of Service and Privacy Policy. When you are done, tap NEXT to continue. Note: The images shown here are for illustrative - Vizio Modèle E70u-D3 | User Manual English - Page 11
you do not have one, tap Or create a new account to create a new account. Follow the on-screen instructions to complete the First-Time Setup. 9. The First-Time setup is complete. The VIZIO SmartCast™ App is displayed. Note: The images shown here are for illustrative purposes only and may be subject - Vizio Modèle E70u-D3 | User Manual English - Page 12
and even live TV* together in one simply aggregated screen, making it easy to discover and enjoy movies, shows, music and more. REGISTER FOR A MYVIZIO ACCOUNT 1. Launch the VIZIO SmartCast™ app. 2. Tap Create an Account to register for a MyVIZIO account. Follow the on-screen instructions to complete - Vizio Modèle E70u-D3 | User Manual English - Page 13
of the SmartCast™ app is displayed. Menu Search Device Power Change Aspect Ratio Device Settings Device Input Change Picture Modes Volume Controls Device Menu The Device Menu is available and may be subject to change. The actual on-screen image and text may vary, depending on the model. 13 - Vizio Modèle E70u-D3 | User Manual English - Page 14
content categorized into TV Shows, Movies, Music, Live TV, Kids, and Live Streams. You can also access these categorizes by tapping the button in the top left corner. OR Note: The images shown here are for illustrative purposes only and may be subject to change. The actual on-screen image and text - Vizio Modèle E70u-D3 | User Manual English - Page 15
3 USER PROFILE SETTINGS Every user can register their very own user profile (MyVIZIO, Facebook, or Google), keeping their personalized watchlists and collections. To illustrative purposes only and may be subject to change. The actual on-screen image and text may vary, depending on the model. 15 - Vizio Modèle E70u-D3 | User Manual English - Page 16
Name, Last Name, E-mail Address, and password by tapping on each of them. To edit profile settings: 1. From the Profile page, tap Edit Profile. You can edit the Profile Color, Profile Name, only and may be subject to change. The actual on-screen image and text may vary, depending on the model. 16 - Vizio Modèle E70u-D3 | User Manual English - Page 17
the SmartCast app, it's time for you pick and choose something to watch. 1. Tap on TV Shows, Movies, Live TV, Kids, or Live Steam from the Home page. 2. Depending on which category you pick, the and may be subject to change. The actual on-screen image and text may vary, depending on the model. 17 - Vizio Modèle E70u-D3 | User Manual English - Page 18
Select a source and tap the play button. D) Your title begins playing on your display. The Device Menu is displayed − allowing you to control your display settings and content. A B C D Note: The images shown here are for illustrative purposes only and may be subject to change. The actual on - Vizio Modèle E70u-D3 | User Manual English - Page 19
a title by tapping the search icon . Note: The images shown here are for illustrative purposes only and may be subject to change. The actual on-screen image and text may vary, depending on the model. 19 - Vizio Modèle E70u-D3 | User Manual English - Page 20
a source and tap the play button. Your content begins playing on your SmartCast device. The Device Menu is displayed − allowing you to control your device settings and content. A B C Note: The images shown here are for illustrative purposes only and may be subject to change. The actual on - Vizio Modèle E70u-D3 | User Manual English - Page 21
(My Watchlist) where you can easily access them whenever you want. You can also set alerts to notify you when new episodes are available to watch. To add content to a watchlist: 1. From the Home page, tap on TV Shows, Movies, Kids, or Live Streams. 2. Tap on the title you want to add - Vizio Modèle E70u-D3 | User Manual English - Page 22
watchlist. 4. The Add to Watchlist menu appears. Here you can set an alert for the title, alerting when it will be aired. Tap on Set Alert to turn the notification on. Alert Types: New Airings Only and may be subject to change. The actual on-screen image and text may vary, depending on the model. 22 - Vizio Modèle E70u-D3 | User Manual English - Page 23
, and the content begins to play. Note: The images shown here are for illustrative purposes only and may be subject to change. The actual on-screen image and text may vary, depending on the model. 23 - Vizio Modèle E70u-D3 | User Manual English - Page 24
. button on each title to edit Note: The images shown here are for illustrative purposes only and may be subject to change. The actual on-screen image and text may vary, depending on the model. 24 - Vizio Modèle E70u-D3 | User Manual English - Page 25
3 COLLECTIONS Add movies, and TV shows to your Collections, to build personally categorized lists of content. To add content to a Collections list: 1. shown here are for illustrative purposes only and may be subject to change. The actual on-screen image and text may vary, depending on the model. 25 - Vizio Modèle E70u-D3 | User Manual English - Page 26
, and the content begins to play. Note: The images shown here are for illustrative purposes only and may be subject to change. The actual on-screen image and text may vary, depending on the model. 26 - Vizio Modèle E70u-D3 | User Manual English - Page 27
remove the title from the collection. Note: The images shown here are for illustrative purposes only and may be subject to change. The actual on-screen image and text may vary, depending on the model. 27 - Vizio Modèle E70u-D3 | User Manual English - Page 28
a cable, satellite, or over-the-air TV connection, you can use the VIZIO SmartCast App to search, discover, and browse live TV channels. To set up a TV connection to the SmartCast App: 1. From the Home page, tap on the button and select Live TV. 2. The VIZIO SmartCast App automatically scans for any - Vizio Modèle E70u-D3 | User Manual English - Page 29
3. If you chose Add a Channel Lineup for an Unsupported Device, follow the on-screen instructions to complete the setup. A B C D Note: The images shown here are for illustrative purposes only and may be subject to change. The actual on-screen image and text may vary, depending on the model. 29 - Vizio Modèle E70u-D3 | User Manual English - Page 30
to your Favorites and Watchlists. To browse through the Live TV broadcast schedule: 1. From the Home page, tap on Live TV or select Live TV from the menu. OR 2. Tap on the schedule button only and may be subject to change. The actual on-screen image and text may vary, depending on the model. 30 - Vizio Modèle E70u-D3 | User Manual English - Page 31
watchlist, see Watchlists on page 21. Note: The images shown here are for illustrative purposes only and may be subject to change. The actual on-screen image and text may vary, depending on the model. 31 - Vizio Modèle E70u-D3 | User Manual English - Page 32
remove, and rearrange the content categories on the Home page to your preference. All but the Movies and TV Shows categories can be removed. To add or remove a category: 1. From the Home page, tap and may be subject to change. The actual on-screen image and text may vary, depending on the model. 32 - Vizio Modèle E70u-D3 | User Manual English - Page 33
Device Settings 3 SETTING UP ADDITIONAL SMARTCAST DEVICES To add additional SmartCast devices: 1. From the Home page, tap on the button and select Device Settings. 2. The VIZIO Devices menu is displayed. Tap ADD NEW DEVICE and follow the on-screen instructions to pair your SmartCast device. 33 - Vizio Modèle E70u-D3 | User Manual English - Page 34
a SmartCast device: • From the VIZIO Devices menu, tap on the button and tap Remove to remove the SmartCast device from the SmartCast App. To modify SmartCast device settings: • From the VIZIO Devices menu, tap on the SmartCast device listed. See VIZIO SmartCast Display Settings on page for - Vizio Modèle E70u-D3 | User Manual English - Page 35
3 To change your SmartCast device name: • From the Display Settings menu, tap on Device Name and enter a new name. Tap Save when you are done. 35 - Vizio Modèle E70u-D3 | User Manual English - Page 36
In addition to letting you browse, watch, and listen to content, the VIZIO SmartCast App lets you adjust your SmartCast Display settings directly from the App. To access the Picture settings menu: • From the Display Settings menu, tap on Picture. The Picture menu is displayed. OR • From the Device - Vizio Modèle E70u-D3 | User Manual English - Page 37
mode To adjust the picture settings: • Picture Mode • Standard mode sets the picture settings to the default settings. • Calibrated mode sets the picture settings to values ideal for watching TV in a brightly-lit room. • Calibrated Dark mode sets the picture settings to values ideal for watching - Vizio Modèle E70u-D3 | User Manual English - Page 38
non-HD (high definition) content; however, it will not produce detail that does not otherwise exist. • Tint • Adjusts the hue of the picture. This setting is useful in adjusting the flesh tones in the picture. If flesh appears too orange, reduce the level of color before adjusting tint. • Color - Vizio Modèle E70u-D3 | User Manual English - Page 39
the backlight. The adjustment is controlled by the content on the screen. Swipe left to Disable and right to Enable. • Reduce Color Space for the source. Video sources uses YCbCr. PCs use RGB. • Gamma • Set the shape of the Gamma curve. Use lower Gamma values for bright room conditions and higher - Vizio Modèle E70u-D3 | User Manual English - Page 40
picture mode. Inputs assigned to that custom picture mode will be set to Calibrated picture mode. (Available after a custom picture mode is saved) the Picture Mode Edit menu, select Save Picture Mode. 2. Use the on-screen keyboard to enter a name for your custom picture mode. 3. Tap Save when - Vizio Modèle E70u-D3 | User Manual English - Page 41
be locked/unlocked with a unique PIN to prevent accidental changes to their settings. To lock all custom picture modes: 1. From the Picture Mode Edit right to lock a picture mode. (Swipe left to unlock) 2. Use the on-screen number pad to enter your 4-digit PIN. 3. Make any desired changes to the - Vizio Modèle E70u-D3 | User Manual English - Page 42
Inputs assigned to a deleted custom picture mode become assigned to the Calibrated picture mode. To delete custom picture modes: 1. From the Picture the custom picture mode. Resetting a Picture Mode Reset the picture mode settings (for a preset picture mode) to the factory default values. To reset - Vizio Modèle E70u-D3 | User Manual English - Page 43
Tests allow you to turn display SMPTE, Flat, Ramp, and Uniformity Analyzer test patterns. Adjusting the Color Tuner Settings To adjust the color tuner: 1. From the Color Calibration menu, tap Color Tuner. The Color Tuner menu is displayed. 2. Tap Color Tuner, the Color Tuner submenu is displayed - Vizio Modèle E70u-D3 | User Manual English - Page 44
3 Enabling/Disabling Calibration Tests To enable/disable calibration tests: 1. From the Color Calibration menu, tap Calibration Tests. The Calibration Tests menu is displayed. 2. Select the test pattern you wish to enable. Adjust settings with switches by swiping left to disable and right to enable. - Vizio Modèle E70u-D3 | User Manual English - Page 45
3 ADJUSTING AUDIO SETTINGS To access the Audio settings menu: • From the Display Settings menu, tap on Audio. The Audio menu is displayed. OR • From the Device Menu, tap on the button. The Display Settings menu is displayed. Then tap on Audio to access the Audio menu. 45 - Vizio Modèle E70u-D3 | User Manual English - Page 46
audio system. Select PCM or Bitstream. • Analog Audio Out - Sets the volume control properties for the RCA connector when connected to a home theater audio system. Select Variable if you are controlling the volume with the TV's volume controls, or select Fixed if an external audio device (sound bar - Vizio Modèle E70u-D3 | User Manual English - Page 47
3 ADJUSTING TIMER SETTINGS To access the Timers settings menu: • From the Display Settings menu, tap on Timers. The Timers menu is displayed. OR • From the Device Menu, tap on the button. The Display Settings menu is displayed. Then tap on Timers to access the Timers menu. 47 - Vizio Modèle E70u-D3 | User Manual English - Page 48
, the display's sleep timer will turn the display off after a set period of time. To activate the sleep timer: 1. From the not want the sleep timer to activate, select Off. Setting the Auto Power Off Feature To help save energy, your display is set by default to turn off after 10 minutes without a - Vizio Modèle E70u-D3 | User Manual English - Page 49
3 ADJUSTING NETWORK SETTINGS To access the Network settings menu: • From the Display Settings menu, tap on Network. The Network menu is displayed. OR • From the Device Menu, tap on the button. The Display Settings menu is displayed. Then tap on Network to access the Network menu. 49 - Vizio Modèle E70u-D3 | User Manual English - Page 50
screen keyboard to enter your network's password, then tap CONNECT. Changing the Manual Setup Settings Advanced users can fine-tune the network settings using the Manual Setup feature. To manually change the settings: 1. From the Network menu, tap Manual Setup. The Manual to save any changes. 50 - Vizio Modèle E70u-D3 | User Manual English - Page 51
the display's MAC address in the router's settings. To find the display's MAC address: 1. From the Network menu, tap Manual Setup. The Manual Setup menu is displayed. 2. Find the MAC is displayed. 2. Use the on-screen keyboard to enter your network's name (SSID) and password, then tap CONNECT. 51 - Vizio Modèle E70u-D3 | User Manual English - Page 52
3 Testing your Network Connection To test your network connection: 1. From the Network menu, tap Test Connection. The Test Connection menu is displayed. 2. When the test is complete, your connection results are displayed. 52 - Vizio Modèle E70u-D3 | User Manual English - Page 53
3 RENAMING DEVICES ON THE INPUT MENU To access the Inputs menu: • From the Display Settings menu, tap on Inputs. The Inputs menu is displayed. OR • From the Device Menu, tap on the button. The Display Settings menu is displayed. Then tap on Inputs to access the Inputs menu. 53 - Vizio Modèle E70u-D3 | User Manual English - Page 54
the input you want to rename. The rename window appears. 3. Use the on-screen keyboard to enter your custom label. When you are done tap Save. Enabling HDMI a HDMI 2.0 device, HDMI Color Subsampling needs to be enabled to support 4K resolution at 60hz. To enable/disable HDMI Color Subsampling: 1. - Vizio Modèle E70u-D3 | User Manual English - Page 55
3 CHANGING THE DISPLAY SYSTEM SETTINGS To access the System Settings menu: • From the Display Settings menu, tap on System. The System menu is displayed. OR • From the Device Menu, tap on the button. The Display Settings menu is displayed. Then tap on System to access the System menu. 55 - Vizio Modèle E70u-D3 | User Manual English - Page 56
the display settings: • From the System menu, tap System Information. The System Information menu is displayed. • System Information • Network Information • ULI Information • Service Reset - For service technician use only • Service Check - For service technician use only Changing the On-Screen Menu - Vizio Modèle E70u-D3 | User Manual English - Page 57
enables you to control HDMI-connected devices with the included Tablet Remote without any additional programming. Not all HDMI devices support CEC. See your device's user manual for details. To ensure the correct time is displayed, set the display's time zone: 1. From the System menu, tap CEC. The - Vizio Modèle E70u-D3 | User Manual English - Page 58
On or Off The power indicator on the front of your display normally does not glow when the display is on. You can change this setting if you prefer the indicator to be on. To turn the power indicator light on or off: • From the System menu, swipe the Power Indicator - Vizio Modèle E70u-D3 | User Manual English - Page 59
, enable/disable Smart Interactivity, and enable/disable the Store Demo. To set a system PIN code: 1. From the Reset & Admin menu, tap Set System PIN Code. 2. Use the on-screen number pad to enter a PIN code. Tap SAVE to continue. 3. Confirm your PIN by entering it again. Tap Submit when you are - Vizio Modèle E70u-D3 | User Manual English - Page 60
3 To turn Smart Interactivity on or off: • From the Reset & Admin menu, tap Smart Interactivity. Tap Off or On. To enable/disable the Store Demo: • From the Reset & Admin menu, tap Store Demo. Tap Disable or Enable. 60 - Vizio Modèle E70u-D3 | User Manual English - Page 61
3 MANAGE MOBILE DEVICES To access the Mobile Devices menu: • From the Display Settings menu, tap on Mobile Devices. The Mobile Devices menu is displayed. OR • From the Device Menu, tap on the button. The Display Settings menu is displayed. Then tap on System to access the System menu. 61 - Vizio Modèle E70u-D3 | User Manual English - Page 62
3 Paired Mobile Devices The Mobile Devices menu provides a list of mobile devices paired to the display. You can use this menu to delete a pair device from display. To delete a paired device: 1. From the Mobile Devices menu, tap the button next to the device you want to delete. 2. A confirmation - Vizio Modèle E70u-D3 | User Manual English - Page 63
Troubleshooting A Do You Have Questions? Find Answers At SUPPORT.VIZIO.COM Find help with: • New Product Setup • Connecting Your Devices • Technical Problems • Product Updates • And More Live Chat Support Available You can also contact our award-winning support team at: Phone: (877) 698-4946 (TOLL - Vizio Modèle E70u-D3 | User Manual English - Page 64
B Screen Size: Viewable Area: Dimensions w/ Stand: Dimensions w/o Stand: Weight w/ Stand: w/o Stand: LCD Remote Control: Certifications: Voltage Range: Power Consumption: Standby Power: E43u-D2 43" Class 42.51" 38.39 x 24.54 x 8.23" (97.50 x 62.33 x 20.90 cm) 38.39 x 22.38 x 3.39" (97.50 - Vizio Modèle E70u-D3 | User Manual English - Page 65
B Screen Size: Viewable Area: Dimensions w/ Stand: Dimensions w/o Stand: Weight w/ Stand: w/o Stand: LCD Backlight: Active LED Zones: 2.0) 1 RCA Stereo Out English, French, Spanish Yes XRT132 Basic Remote CSA-US, CSA, ICES-003, FCC Class B, Dolby Digital Plus, HDMI 1.4 120V @ 60Hz 120W < 0.5W 65 - Vizio Modèle E70u-D3 | User Manual English - Page 66
B Screen Size: Viewable Area: Dimensions w/ Stand: Dimensions w/o Stand: Weight w/ Stand: w/o Stand: LCD Backlight: Port: Audio Outputs: OSD Languages: Ambient Light Sensor: Remote Control: Certifications: Voltage Range: Power Consumption: Standby Power: E50u-D2 50" Class 49.51" 44.42 x 28.10 x - Vizio Modèle E70u-D3 | User Manual English - Page 67
B Screen Size: Viewable Area: Dimensions w/ Stand: Dimensions w/o Stand: Weight w/ Stand: w/o Stand: LCD Backlight: Active LED Zones: 2.0) 1 RCA Stereo Out English, French, Spanish Yes XRT132 Basic Remote CSA-US, CSA, ICES-003, FCC Class B, Dolby Digital Plus, HDMI 1.4 120V @ 60Hz 120W < 0.5W 67 - Vizio Modèle E70u-D3 | User Manual English - Page 68
B Screen Size: Viewable Area: Dimensions w/ Stand: Dimensions w/o Stand: Weight w/ Stand: w/o Stand: LCD Backlight: Port: Audio Outputs: OSD Languages: Ambient Light Sensor: Remote Control: Certifications: Voltage Range: Power Consumption: Standby Power: E55u-D2 55" Class 54.64" 49.09 x 30.75 - Vizio Modèle E70u-D3 | User Manual English - Page 69
B Screen Size: Viewable Area: Dimensions w/ Stand: Dimensions w/o Stand: Weight w/ Stand: w/o Stand: LCD Backlight: Light Sensor: Remote Control: Certifications: Voltage Range: Power Consumption: Standby Power: E60u-D3 60" Class 60.00" 53.50 x 33.50 x 10.60" (135.90 x 85.02 x 27.00 cm) 53.50 x 31. - Vizio Modèle E70u-D3 | User Manual English - Page 70
B Screen Size: Viewable Area: Dimensions w/ Stand: Dimensions w/o Stand: Weight w/ Stand: w/o Stand: LCD Backlight: Active Outputs: OSD Languages: Ambient Light Sensor: Remote Control: Certifications: Voltage Range: Power Consumption: Standby Power: E65u-D3 65" Class 64.50" 57.50 x 35.70 x 10.60" - Vizio Modèle E70u-D3 | User Manual English - Page 71
B Screen Size: Viewable Area: Dimensions w/ Stand: Dimensions w/o Stand: Weight w/ Stand: w/o Stand: LCD Backlight: Audio Outputs: OSD Languages: Ambient Light Sensor: Remote Control: Certifications: Voltage Range: Power Consumption: Standby Power: E70u-D3 70" Class 69.50" 61.77 x 38.48 x 12.98" - Vizio Modèle E70u-D3 | User Manual English - Page 72
in its original packaging or in packaging that affords an equal degree of protection. VIZIO Technical Support will provide instructions for packing and shipping the product to the VIZIO service center. ALL USER DATA AND DOWNLOADED APPLICATIONS STORED ON A PRODUCT WILL BE DELETED IN THE COURSE OF - Vizio Modèle E70u-D3 | User Manual English - Page 73
PARTICULAR PURPOSE, WILL BE LIMITED IN DURATION TO THE WARRANTY PERIOD SET FORTH ABOVE. SOME STATES AND PROVINCES DO NOT ALLOW LIMITATIONS ON DEFECTS ARE DISCOVERABLE OR LATENT), VIZIO MAY, AT ITS SOLE AND EXCLUSIVE OPTION AND IN ITS DISCRETION, REPAIR OR REPLACE YOUR PRODUCT, OR REFUND ITS - Vizio Modèle E70u-D3 | User Manual English - Page 74
apply. Information in this Quick Start Guide is subject to change without notice. To review the most updated version of this Quick Start Guide and the associated User Manual, go to http://www.vizio.com. © 2016 VIZIO, Inc. All Right Reserved. This Quick Start Guide may not be copied in whole or - Vizio Modèle E70u-D3 | User Manual English - Page 75
instructions user is encouraged to try to correct the interference by one or more of the following measures: • Reorient or relocate the receiving antenna user seek to obtain protection from other radio services operating in the same TV bands, a radio license is required. Please consult Industry Canada - Vizio Modèle E70u-D3 | User Manual English - Page 76
© 2016 VIZIO INC. ALL RIGHTS RESERVED. 160413OC-US-NC
-
 1
1 -
 2
2 -
 3
3 -
 4
4 -
 5
5 -
 6
6 -
 7
7 -
8
-
9
-
10
-
11
-
12
-
13
-
14
-
15
-
16
-
17
-
18
-
19
-
20
-
21
-
22
-
23
-
24
-
25
-
26
-
27
-
28
-
29
-
30
-
31
-
32
-
33
-
34
-
35
-
36
-
37
-
38
-
39
-
40
-
41
-
42
-
43
-
44
-
45
-
46
-
47
-
48
-
49
-
50
-
51
-
52
-
53
-
54
-
55
-
56
-
57
-
58
-
59
-
60
-
61
-
62
-
63
-
64
-
65
-
66
-
67
-
68
-
69
-
70
-
71
-
72
-
73
-
74
-
75
-
76
 |
 |
USER MANUAL
E43u-D2, E48u-D0, E50u-D2, E55u-D0, E55u-D2, E60u-D3, E65u-D3, & E70u-D3