Vizio PX75-G1 User Manual
Vizio PX75-G1 Manual
 |
View all Vizio PX75-G1 manuals
Add to My Manuals
Save this manual to your list of manuals |
Vizio PX75-G1 manual content summary:
- Vizio PX75-G1 | User Manual - Page 1
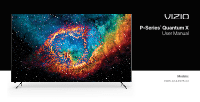
P-Series® Quantum X User Manual Models: PX65-G1 & PX75-G1 - Vizio PX75-G1 | User Manual - Page 2
Picture Settings 15 Adjusting More Picture Settings 15 Adjusting the Color Temperature 16 Adjusting the Picture Mode Edit Settings 16 Saving a Custom Picture Mode 16 Locking/Unlocking a Custom Picture Mode 17 Deleting a Custom Picture and Technical Support 41 Help Topics 42 Specifications 44 Regulatory - Vizio PX75-G1 | User Manual - Page 3
To purchase or inquire about accessories and installation services for your VIZIO product, visit our website at www .VIZIO .com or call toll free at (877) 698-4946 . We recommend that you register your VIZIO product at www .VIZIO .com . WHEN READING THIS MANUAL TIP: When you see this symbol, please - Vizio PX75-G1 | User Manual - Page 4
changes substantially . • CAUTION: These servicing instructions are for use by qualified service personnel only . To reduce the risk of electric set to a suitable support . • NEVER place the television set on cloth or other materials that may be located between the television set and supporting - Vizio PX75-G1 | User Manual - Page 5
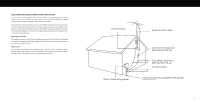
70, provides information with regard to proper grounding of the mast and supporting structure, grounding of the lead-in wire to an antenna discharge installation . Ground Clamp Antenna Lead In Wire Electric Service Equipment Antenna Discharge Unit (NEC Section 810-20) Grounding Conductors ( - Vizio PX75-G1 | User Manual - Page 6
works. Copyright © 1992-2015 Dolby Laboratories . All rights reserved . The terms HDMI, HDMI High-Definition Multimedia Interface, and the HDMI Logo are trademarks or registered trademarks of HDMI Licensing Administrator, Inc . For DTS patents, see http://patents .dts .com . Manufactured - Vizio PX75-G1 | User Manual - Page 7
Getting to Know Your TV FRONT PANEL Remote Sensor and Power Indicator When using the remote, aim it directly at this sensor . The power indicator flashes on when the TV turns on, then goes out after several seconds. To keep the power indicator on, see Turning the Power Indicator On or Off on page 32 - Vizio PX75-G1 | User Manual - Page 8
image shown here is for illustrative purposes only and may be subject to change . The actual number of ports and their locations may vary, depending on the model . HDMI Connect an HDMI device Component/Composite Connect a component or composite Audio Out Connect to an RCA device, such as sound - Vizio PX75-G1 | User Manual - Page 9
matches an available port on the TV (HDMI, Composite, etc .) . 2 . Connect the appropriate cable (not included) to the TV and the device . 3 . Turn the TV and your device on . 4 . Set the TV's input to match the connection you used (HDMI-1, HDMI-2, etc .) . HDMI CABLE HDMI COMPONENT CABLE Y Pb - Vizio PX75-G1 | User Manual - Page 10
sure the mount you choose is capable of supporting the weight of the TV . To install to the wall by carefully following the instructions that came with your mount . Use only ports and their locations may vary, depending on the model . Screw Size: Hole Depth: Hole Pattern: Weight w/o Stand: PX65-G1 - Vizio PX75-G1 | User Manual - Page 11
Pad Manually enter a channel Pic Cycle through the different picture setting modes Enabled/disable talk back feature* Dash Use with number pad to manually regulations where you live. For more information please visit: www.vizio.com/environment WARNING: Keep the remote control batteries away from - Vizio PX75-G1 | User Manual - Page 12
port on the TV . The first time you turn on the TV, the on-screen instructions will guide use . Where is you VIZIO TV located? USA Mexico Canada 3 . Choose your country VIZIO TV Located? Family Room Living Room Master Bedroom Game Room 5 . Name your TV . Add Custom Location Let's set - Vizio PX75-G1 | User Manual - Page 13
the picture settings • Adjust the audio settings • Adjust the network settings • Set up timers • Adjust the channel settings • Set up closed captioning • Name and adjust Inputs • Adjust TV settings TV Settings Picture Audio Network Timers Channels Closed Captions Input Settings System User Manual - Vizio PX75-G1 | User Manual - Page 14
you wish to view . Some programs have black bars on the top or sides of the screen so that the picture keeps its original shape . Examples include changed for Ultra HD content or HDR content . *Available aspect ratio settings may vary by input source . Panoramic mode is only available for standard - Vizio PX75-G1 | User Manual - Page 15
buttons to change the setting: More Picture • Color Temperature - Change the white balance of the picture . Refer to the section on Adjusting the Color Temperature on page 16. Color Temperature Black Detail Active Full Array® Calibrated Off Medium • Black Detail - Adjusts the average - Vizio PX75-G1 | User Manual - Page 16
you wish to adjust, then press OK to change the setting: • Save Picture Mode - Save a custom picture mode . • Lock Picture Mode - Prevent changes to custom picture modes . • Reset Picture Mode - Reset the picture mode settings to factory default values . Only available on customized preset modes - Vizio PX75-G1 | User Manual - Page 17
. TIP: Inputs assigned to a deleted custom picture mode become assigned to the Calibrated picture mode . To delete a custom picture mode: Menu > Picture > Picture Mode Edit > Delete Picture Mode > Delete To delete the user created Custom 1 picture mode, select the Delete button. Delete Cancel - Vizio PX75-G1 | User Manual - Page 18
Balance, and test patterns allow technicians to manually calibrate the TV . Calibration requires specialized training, an input with precisely set colors, and a specialized light meter . To access the color tuner table: Menu > Picture > Color Calibration > Color Tuner To turn color channels off - Vizio PX75-G1 | User Manual - Page 19
Tests > Ramp Test Pattern Ramp Test Pattern Off To show or hide the Uniformity Analyzer Test Pattern: Menu > Picture > Color Calibration > Calibration Tests > Uniformity Analyzer Test Pattern Uniformity Analyzer Test Pattern Off 1 . Use the Navigation buttons on the remote to highlight Off - Vizio PX75-G1 | User Manual - Page 20
Audio Out - Changes the type of processing for digital audio out and HDMI ARC output when connected to a home theater audio system . Select Auto Back function is enabled, digital audio out must be set to PCM . • Analog Audio Out - Sets the volume control properties for the RCA connector when - Vizio PX75-G1 | User Manual - Page 21
on your router may require you to enter the TV's MAC address . To change advanced network settings: Menu > Network > Manual Setup > DHCP > Off 1 . Use the Navigation and OK buttons to adjust each setting: • IP Address - The IP address assigned to the TV . • Subnet Mask - The subnet Exit 2D - Vizio PX75-G1 | User Manual - Page 22
want the sleep timer to activate, change the setting to Off. Setting the Auto Power Off Feature To help save energy, your TV is set by default to turn off after 10 minutes video or audio signal . This feature can be deactivated . To set the Auto Power Off feature: Menu > Timers > Auto Power Off - Vizio PX75-G1 | User Manual - Page 23
use the TV's Channels menu to: • Find channels • Select channels to skip • Select analog audio mode • Select the language for digital audio • Set parental controls Channels Find Channels Skip Channels Analog Audio Digital Audio Parental Control Stereo English Scanning for Channels The TV may need - Vizio PX75-G1 | User Manual - Page 24
LISTENING TO ALTERNATE AUDIO Changing the Analog Audio Language Some analog over-the-air (free) and cable channels broadcast programs in more than one language . The TV's Analog Audio feature allows you to listen to audio in an alternate language using Secondary Audio Programming (SAP) . WARNING: - Vizio PX75-G1 | User Manual - Page 25
video cable or a coaxial cable, such as a VCR, satellite or cable box, or DVR . TIP: Other devices have their own parental control settings . Enabling or Disabling Program Ratings To manage program content according to its rating, you must first enable the Program Rating feature . To enable or - Vizio PX75-G1 | User Manual - Page 26
Right Navigation buttons to change the setting: • Caption Style - Choose As Broadcast to keep default settings or Custom to manually change each setting . • Text Style - Change Captions menu does not appear when an HDMI input is selected . Closed captions are available when using the tuner or a composite - Vizio PX75-G1 | User Manual - Page 27
same color - When text appears, the entire line fills with color at once. In the example, the closed caption text is green, the background is black, and the window is red . Text Background Window CLOSED CAPTION TEXT SAMPLE 3 27 - Vizio PX75-G1 | User Manual - Page 28
the image to fill the screen . • Picture Position* - move the vertical and horizontal position of the picture in relation to the screen . • Hide out if not available . Input Name Input Settings TV HDMI-1 HDMI-2 HDMI-3 COMP Blu-ray Cable Box HDMI-3 Game Console Custom Name TIP: You cannot rename - Vizio PX75-G1 | User Manual - Page 29
updates • View system information • Change the on-screen menu language • Set time zone and local settings • Adjust the CEC settings • Adjust the power mode settings • Adjust to preserve aspect ratio or fill the screen • Name the TV • Review and maintain the list of paired devices System Check for - Vizio PX75-G1 | User Manual - Page 30
included remote, without any programming . Using CEC, your VIZIO TV remote can control: • Power On/Off • Volume • Mute WARNING: Not all HDMI devices support CEC . See your device's user manual for details . To enable, disable, or adjust CEC settings: Set up your audio device and connect it to the - Vizio PX75-G1 | User Manual - Page 31
OK . TV Name Living Room TV Mobile Devices Djae's Tablet Ana's Phone Work iPad Accessibility Settings VIZIO is committed to providing intuitive, user-friendly products . Your new VIZIO TV offers several accessibility features that can help you with easy navigation. To access the Accessibility - Vizio PX75-G1 | User Manual - Page 32
off and on • Create a system pin code to lock content and picture settings • Turn USB power on or off. • Enable or disable program offers VIZIO Privacy Policy Store Demo On Always On • Start or stop the store demo mode Restoring the TV to Factory Default Settings All of the on-screen menu settings - Vizio PX75-G1 | User Manual - Page 33
set a system pin to lock content and picture trouble enabling or disabling Viewing Data, please contact VIZIO Customer Support by going to support.vizio.com and selecting Contact Us . For more information, see https://www .vizio .com/viewingdata and review VIZIO's privacy policy at https://www .vizio - Vizio PX75-G1 | User Manual - Page 34
USING THE INFO WINDOW Press the INFO button one time to display: • TV name • Current input • Picture mode • Audio type • Network name • Time TV Name Current Input Living Room HDMI-1 Picture Mode Audio Type* Network Name Normal Stereo HomeWiFi 5:00 pm Time *When TV speakers are off and Dolby - Vizio PX75-G1 | User Manual - Page 35
SHOWS WATCHFREE SUPPORT EXTRAS Cast LIVING ROOM TV Control your TV with the SmartCast Mobile™ App Download the VIZIO SmartCast www.vizio.com/smartcastapp on your device to download: With SmartCast Mobile, you can: • Power on/off devices, play/pause content, and modify advanced settings, all - Vizio PX75-G1 | User Manual - Page 36
, sports, comedy, music and more . • Navigate through channels, organized by genre, with an intuitive on-screen guide . • Watch 1000's of free movies from major studios . • Watch the best of internet TV . • No logins, subscriptions or transactions fees . How to Launch WatchFree To launch and begin - Vizio PX75-G1 | User Manual - Page 37
drive must be formatted as FAT32. • Files on the USB flash drive must end in a supported file extension ( .mp3, .jpg, etc) . • The player is not designed to play To display your USB media: 1 . Connect your USB flash drive to the USB port on the side of the TV. 2 . The TV will recognize the USB . Use - Vizio PX75-G1 | User Manual - Page 38
Playing USB Media: Music 4 Back Button Highlight this button and press OK to return to the previous screen . Now Playing Information Displays song title, album title, and artist name . Progress Bar Displays the duration of the currentlyplaying song . The bar will lengthen as the song progresses - Vizio PX75-G1 | User Manual - Page 39
Playing USB Media: Video Back Button Highlight this button and press OK to return to the previous screen . Connected Sources Displays connected USB devices . Current Folder Video USB1: MyFlashDrive My Videos MyFlashDrive\Video\root\My Videos # File 1 Family Vacation - California 2 26th Birthday - Vizio PX75-G1 | User Manual - Page 40
Slideshow Sort by Date or File Name View Thumbnails/Folders Adjust Slideshow Settings View Music Files Photo USB1: MyFlashDrive root Start Slideshow Sort: Name A-Z View: Thumbnails Settings Browse Music File Name: D 1920x1080 Resolution: 1920x1080 Size: 1607270KB Photo Information Displays - Vizio PX75-G1 | User Manual - Page 41
A Take a moment to register your product at VIZIO .COM/PRODUCT-REGISTRATION Customized Support Get priority assistance from the VIZIO Support team . News and Offers Stay up-to-date with product news and take advantage of exclusive offers. Updates and Enhancements Be first to know about - Vizio PX75-G1 | User Manual - Page 42
your device's user manual for details . • Adjust Brightness, Contrast, or Backlight . See Adjusting the Picture Settings on page 15 . The image quality is not good . • For the best image quality, view high-definition programs using digital sources. Connect your devices with HDMI cables . • If you - Vizio PX75-G1 | User Manual - Page 43
TV channels? • If you subscribe to cable or satellite, simply connect an HDMI cable (not included) to the receiver . • If you use external antennas to or off. • Open the VIZIO SmartCast Mobile app on your phone or tablet . • Click on: Control > Your TV/Device Name > Settings Icon > System > Reset - Vizio PX75-G1 | User Manual - Page 44
Refresh Rate Cinemawide® Black Bar Detection INPUTS / OUTPUTS HDMI Inputs Component Video Input Composite Video Input Ethernet Input RF Antenna Input USB Audio Output OTHER Remote Control Power Consumption Standby Power Voltage OSD Language Certification PX65-G1 65" 64.5" PX75-G1 75" 74.5" 56 - Vizio PX75-G1 | User Manual - Page 45
and used in accordance with the instructions, may cause harmful interference to radio complies with FCC/ISED radiation exposure limits set forth for an uncontrolled environment . radio services operating in the same TV bands, a radio license is required . Please consult Industry Canada's document - Vizio PX75-G1 | User Manual - Page 46
Before obtaining warranty service, you may visit www .vizio .com for additional help and troubleshooting . To obtain warranty service, contact VIZIO Customer Support by going to support.vizio.com and selecting Contact Us . You can also call Customer Support: US - (855) 209-4106 Canada - (877) 878 - Vizio PX75-G1 | User Manual - Page 47
PARTICULAR PURPOSE, WILL BE LIMITED IN DURATION TO THE WARRANTY PERIOD SET FORTH ABOVE . SOME STATES AND PROVINCES DO NOT ALLOW LIMITATIONS the greatest extent permitted by applicable law . General No employee or agent of VIZIO may modify this warranty . If any term of this warranty, other than the - Vizio PX75-G1 | User Manual - Page 48
is subject to change without notice . To review the internet service, and device capabilities . most updated version of this User Manual and the associated Quick Start Guide, go to http://www .vizio .com . Battery Disposal © 2019 VIZIO, Inc. All Rights Reserved. Caution: This product may be
-
 1
1 -
 2
2 -
 3
3 -
 4
4 -
 5
5 -
 6
6 -
 7
7 -
8
-
9
-
10
-
11
-
12
-
13
-
14
-
15
-
16
-
17
-
18
-
19
-
20
-
21
-
22
-
23
-
24
-
25
-
26
-
27
-
28
-
29
-
30
-
31
-
32
-
33
-
34
-
35
-
36
-
37
-
38
-
39
-
40
-
41
-
42
-
43
-
44
-
45
-
46
-
47
-
48
 |
 |
Models:
PX65-G1 & PX75-G1
P-Series
®
Quantum X
User Manual