Vtech Storytime With Sunny User Manual
Vtech Storytime With Sunny Manual
 |
View all Vtech Storytime With Sunny manuals
Add to My Manuals
Save this manual to your list of manuals |
Vtech Storytime With Sunny manual content summary:
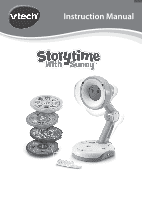
- Vtech Storytime With Sunny | User Manual - Page 1
Instruction Manual - Vtech Storytime With Sunny | User Manual - Page 2
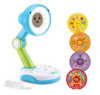
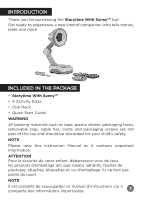
• Disk Rack • Quick Start Guide WARNING All packing materials such as tape, plastic sheets, packaging locks, removable tags, cable ties, cords and packaging screws are not part of this toy and should be discarded for your child's safety. NOTE Please save this Instruction Manual as it contains - Vtech Storytime With Sunny | User Manual - Page 3
Unlock the Packaging Locks Rotate the packaging locks 90 degrees counterclockwise. Pull out the packaging locks and discard. Remove Sunny's protective cover by pulling upwards. GETTING STARTED Battery Removal and Installation 1. Make sure the unit is turned Off. 2. Find the battery cover located - Vtech Storytime With Sunny | User Manual - Page 4
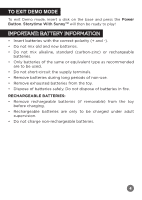
TO EXIT DEMO MODE To exit Demo mode, insert a disk on the base and press the Power Button. Storytime With SunnyTM will then be ready to play! IMPORTANT: BATTERY INFORMATION • Insert batteries with the correct polarity (+ and -). • Do not mix old and new batteries. • Do not mix alkaline, standard ( - Vtech Storytime With Sunny | User Manual - Page 5
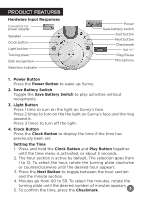
PRODUCT FEATURES Hardware Input Responses Connector for power adapter Speaker Clock button Light button Turning plate Disk recognition Selection indicator Power Save battery switch Exit button Next button Checkmark Vol +/Play/Pause Microphone 1. Power Button Press the Power Button to wake up Sunny - Vtech Storytime With Sunny | User Manual - Page 6
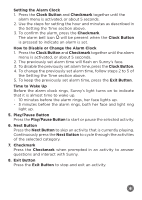
Setting the Alarm Clock 1. Press the Clock Button and Checkmark together until the alarm menu is activated, or about 5 seconds. 2. Use the steps for setting the hour and minutes as described in the Setting the Time section above. 3. To confirm the alarm, press the Checkmark. The alarm bell icon will - Vtech Storytime With Sunny | User Manual - Page 7
9. Power Adapter In addition to being battery powered, Storytime With SunnyTM can be connected to a wall outlet via power adapter (not included). The power adapter does not charge the toy. If there are no batteries installed in the unit, it will only be playable when the toy is plugged in. 10. - Vtech Storytime With Sunny | User Manual - Page 8
mindfulness. Disk 2 - You and I - Friendship, laughter and imaginative play. Disk 3 - Stories and Songs - Listen, laugh, get up and groove. Disk 4 - Silly Games - Fun problem-solving and creative games. Attaching the Disk Rack To attach the disk storage to the base, insert the round part of the rack - Vtech Storytime With Sunny | User Manual - Page 9
Connecting the Adapter (Not Included) • Make sure the unit is turned Off. • Connect the adapter to the Power Adapter Port of the unit. • Plug the adapter into a power socket. Note: The use of an adapter will override the batteries. Safety Information When Using Power Supply for Toys • VTech - Vtech Storytime With Sunny | User Manual - Page 10
the product. TROUBLESHOOTING If for some If the problem persists, please call our Consumer Services Department at 1-800-521-2010 in the U.S., 1-877-352-8697 in Canada, or by going to our website vtechkids.com and filling out our Contact Us form located under the Customer Support - Vtech Storytime With Sunny | User Manual - Page 11
installation. This equipment generates, uses and can radiate radio frequency energy and, if not installed and used in accordance with the instructions, may cause harmful interference to radio communications. However, there is no guarantee that interference will not occur in a particular installation - Vtech Storytime With Sunny | User Manual - Page 12
Visit our website for more information about our products, downloads, resources and more. vtechkids.com vtechkids.ca Read our complete warranty policy online at vtechkids.com/warranty vtechkids.ca/warranty TM & © 2021 VTech Holdings Limited. All rights reserved. IM-546200-003 Version:0
-
 1
1 -
 2
2 -
 3
3 -
 4
4 -
 5
5 -
 6
6 -
 7
7 -
8
-
9
-
10
-
11
-
12
 |
 |

Instruction Manual