Weber Genesis E-310 LP Owner Manual
Weber Genesis E-310 LP Manual
 |
View all Weber Genesis E-310 LP manuals
Add to My Manuals
Save this manual to your list of manuals |
Weber Genesis E-310 LP manual content summary:
- Weber Genesis E-310 LP | Owner Manual - Page 1
GAS GRILL LP GAS GRILL OWNER'S GUIDE Guía del propietario del asador de gas licuado de propano - Pg 20 Guide de l'utilisateur du grill à gaz PL - Pg 34 E/S -310/320, EP -310/320 #89#50505000 YOU MUST READ THIS OWNER'S GUIDE BEFORE OPERATING YOUR GAS GRILL ƽ DANGER If you smell gas: 1. Shut off gas - Weber Genesis E-310 LP | Owner Manual - Page 2
use. See instructions in this manual for correct procedures. ƽ Do not operate the Weber® gas barbecue if there is a gas leak present. ƽ Do not use a flame to check for gas leaks. ƽ Combustible materials should never be within 24 inches (61 cm) of the back or sides of your Weber® gas barbecue. ƽ Do - Weber Genesis E-310 LP | Owner Manual - Page 3
ORIGINAL PURCHASER of this Weber® gas grill that it will be free as set out in this owner's manual. Porcelain-enameled shroud, 25-years in accordance with the printed instructions accompanying it. connection with entrer en contact avec le Représentant du Service clientèle le plus proche grâce aux - Weber Genesis E-310 LP | Owner Manual - Page 4
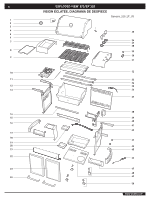
4 1 2 3 4 5 6 7 8 9 10 11 12 13 14 15 16 17 18 19 20 21 22 EXPLODED VIEW E/S/EP 310 VISION ÉCLATÉE, DIAGRAMA DE DESPIECE Genesis_310_LP_US 23 24 25 26 27 28 29 30 31 32 33 34 35 36 37 38 39 40 41 42 43 44 45 46 47 WWW.WEBER.COM® - Weber Genesis E-310 LP | Owner Manual - Page 5
LIST E/S/EP 310 LISTA DEL bastidor Panneau du cadre droit 6. Warming Rack Rejilla de calentamiento Grille de réchauffage 23. Control Knob Perilla de control Bouton de Roulette 12. Rear Frame Support Soporte posterior del bastidor Support arrière du cadre 29. Right Side Table Mesa lateral derecha - Weber Genesis E-310 LP | Owner Manual - Page 6
6 EXPLODED VIEW E/S/EP 320 VISION ÉCLATÉE, DIAGRAMA DE DESPIECE Genesis_320_LP_US 1 2 3 4 25 5 6 7 26 27 28 8 29 30 9 31 10 32 11 33 34 12 35 13 36 37 38 14 15 39 40 16 41 42 17 18 43 19 20 44 21 45 22 46 23 47 48 24 49 50 WWW.WEBER.COM® - Weber Genesis E-310 LP | Owner Manual - Page 7
múltiple Tuyau du collecteur 9. Cooking Grates Parrillas de cocción Grilles de cuisson 26. Bezel #3 Moldura decorativa #3 Plaque indicatrice N° avant droite 14. Rear Frame Support Soporte posterior del bastidor Support arrière du cadre 31. Right Side Table Mesa lateral derecha Tablette lat - Weber Genesis E-310 LP | Owner Manual - Page 8
LP) gas supply is easy to use and gives you more cooking control than charcoal fuel. ƽ WARNING: Do not use the barbecue within 24 inches of combustible materials to the back or sides of the grill. ƽ WARNING: The entire cooking box gets hot when in use. Do • These instructions Service - Weber Genesis E-310 LP | Owner Manual - Page 9
. GAS INSTRUCTIONS IMPORTANT LP CYLINDER INFORMATION Failure to follow these DANGER statements exactly may result in a fire causing death or serious injury. ƽ DANGER ƽ NEVER store a spare LP Cylinder under or near this barbecue. ƽ NEVER fill the tank beyond 80% full. Your Weber® gas grill is - Weber Genesis E-310 LP | Owner Manual - Page 10
GAS INSTRUCTIONS 1) Pass the regulator hose through the side and could cause a leak. You will need: LP cylinder, a soap and water solution and a rag gas and tighten the fitting. Turn the gas back on and recheck with the soap and water solution. If leak does not stop, contact the Customer Service - Weber Genesis E-310 LP | Owner Manual - Page 11
GAS INSTRUCTIONS GAS INSTRUCTIONS leaks. If your grill has a side burner make sure the side burner is off. grows, there is a leak. 11 2 11 4 310 Check: 1) Hose-to-manifold connection. ƽ WARNING: If turn OFF the gas. DO NOT OPERATE THE GRILL. Contact the Customer Service Representative in your - Weber Genesis E-310 LP | Owner Manual - Page 12
GAS INSTRUCTIONS Check: GAS INSTRUCTIONS 1) Hose to manifold connection. 2) Side burner hose to manifold connection and side burner hose to side burner gas line connection. 3) Side burner hose to side burner connection, side the gas. DO NOT OPERATE THE GRILL. Contact the Customer Service - Weber Genesis E-310 LP | Owner Manual - Page 13
GAS INSTRUCTIONS 13 SAFE HANDLING TIPS FOR LIQUID PROPANE GAS CYLINDERS 13 ƽ WARNING: Replacement LP tanks must match the regulator connection supplied with this barbecue. • Liquid Propane (LP) gas is a petroleum product as are gasoline and natural gas. LP gas is a gas at regular temperatures - Weber Genesis E-310 LP | Owner Manual - Page 14
14 OPERATING INSTRUCTIONS MAIN BURNER LIGHTING 1) Open the lid. 2) Make sure all burner gas from the LP cylinder. If this should occur, turn OFF the LP tank valve and burner control knobs. Start over. MAIN BURNER MANUAL LIGHTING 2 TE /OFF APAGAD ARRE O 1 1 5 46 2 7 5 4 2 7 *The grill - Weber Genesis E-310 LP | Owner Manual - Page 15
OPERATING INSTRUCTIONS OPERATING INSTRUCTIONS ƽ DANGER MAIN BURNER MANUAL LIGHTING When the "excess gas flow control" feature is activated, a small amount of gas is still flowing to the burners. After turning OFF the cylinder and burner control knobs, wait at least 5 minutes for the gas to clear - Weber Genesis E-310 LP | Owner Manual - Page 16
side burner control valve, main burners and gas supply at source. b) Wait 5 minutes to let the gas clear before you try again. PROBLEM Burners burn with a yellow or orange flame, in conjunction with the smell of gas. TROUBLESHOOTING Refer to "Lighting Instructions". Refill LP cylinder. Straighten - Weber Genesis E-310 LP | Owner Manual - Page 17
PROBLEM Side Burner does not light. Flame is low in "HI" position. Push button ignition does not work. SIDE BURNER TROUBLESHOOTING CHECK Is gas supply off? Turn supply on. CURE 17 17 The excess flow safety device, which is part of the barbecue to cylinder connection, may have activated. - Weber Genesis E-310 LP | Owner Manual - Page 18
becomes damaged or cannot be cleaned, please contact the Customer Service Representative in your area using the contact information on our web ports when cleaning. REPLACING MAIN BURNERS 1) Your Weber® gas barbecue must be OFF and cool. 2) Turn gas OFF at source. 3) To remove control panel: (a) - Weber Genesis E-310 LP | Owner Manual - Page 19
the manifold support bracket to Slide the burner assembly out from under the guide screw and washer (a) in the corners of place. ƽ WARNING: After reinstalling the gas lines, they should be leak checked still fails to light, contact the Customer Service Representative in your area using the contact - Weber Genesis E-310 LP | Owner Manual - Page 20
gas propano licuado E/S-310/320, EP-310/320 ##0809050505 DEBE LEER ESTA GUÍA DEL PROPIETARIO ANTES DE PONER A FUNCIONAR LA BARBACOA DE GAS ƽ PELIGRO Si huele a gas: 1. Cierre el suministro de gas siga cuidadosamente todos los procedimientos en este manual para verificar que no existan fugas. Haga - Weber Genesis E-310 LP | Owner Manual - Page 21
la tapa y espere cinco minutos antes de tratar de volver a encender la barbacoa, usando las instrucciones de encendido en este manual. ƽ No use carbón o piedra pómez en su barbacoa de gas Weber®. ƽ No se incline sobre la barbacoa abierta o coloque las manos o dedos en el borde delantero de la caja - Weber Genesis E-310 LP | Owner Manual - Page 22
de licuado extra (de repuesto) debajo o cerca de la barbacoa de agua. gas Weber®. • Esta barbacoa de gas Weber® está diseñada para ser usada solamente con gas propano licuado (LP). No la use con gas natural (suministrado a través de ƽ ADVERTENCIA: El cilindro de propano licuado usado con - Weber Genesis E-310 LP | Owner Manual - Page 23
de gas portátiles, usted deberá cumplir con la más reciente edición de NOM. INSTRUCCIONES SOBRE EL GAS GENERAL INSTRUCTIONS INFORMACIÓN Por favor asegúrese de que su estación de llenado llene su cilindro de gas propano licuado midiendo el peso o el volumen. Pídale al ƽ PELIGRO personal de - Weber Genesis E-310 LP | Owner Manual - Page 24
24 INSTRUCCIONES SOBRE EL GAS GAS INSTRUCTIONS PARA CONECTAR LA MANGUERA AL CILINDRO: 1) Pase mano. Nota: Este es un nuevo tipo de conexión. Se aprieta hacia la derecha y no permitirá que el gas fluya a menos que la conexión esté apretada. La conexión sólo requiere apretarse a mano. ƽ ADVERTENCIA: - Weber Genesis E-310 LP | Owner Manual - Page 25
GAS GAS INSTRUCTIONS GAS ƽ PELIGRO No utilice una llama abierta para comprobar si existen fugas de gas gas, deberá verificar que no hayan fugas de gas gas gas Weber® Durante el transporte y manejo alguna conexión de la línea de gas CIERRE el gas. NO OPERE el gas. NO gas, CIERRE el suministro de gas - Weber Genesis E-310 LP | Owner Manual - Page 26
26 INSTRUCCIONES SOBRE EL GAS Revise: GAS INSTRUCTIONS 1) La conexión de la manguera al múltiple. 2) La conexión de la manguera del quemador lateral al múltiple y la conexión de la manguera del quemador lateral a la línea de conexión de gas del quemador lateral. 3) La conexión de la manguera - Weber Genesis E-310 LP | Owner Manual - Page 27
INSTRUCCIONES SOBRE EL GAS 27 GAS INSTRUCTIONS 27 SUGERENCIAS PARA EL MANEJO SEGURO DE LOS CILINDROS DE GAS PROPANO LICUADO CILINDRO(S) DE PROPANO LICUADO • Cada vez que se reconecte un cilindro de propano licuado, se debe revisar que la unión por donde se - Weber Genesis E-310 LP | Owner Manual - Page 28
de cada quemador y gírela en la dirección de las agujas del reloj a la posición OFF. Cierre el suministro de gas en la fuente del mismo. ENCENDIDO MANUAL DEL QUEMADOR PRINCIPAL 2 TE /OFF APAGAD 1 O 1 ARRE 5 46 *La barbacoa ilustrada puede tener ligeras diferencias con respecto al modelo - Weber Genesis E-310 LP | Owner Manual - Page 29
INSTRUCCIONES DE OPERACIÓN 29 ƽ PELIGRO Cuando se activa el control de exceso de flujo, una pequeña 29 ENCENDIDO MANUAL DEL QUEMADOR PRINCIPAL cantidad de gas sigue fluyendo a los quemadores. Después de cerrar la válvula del tanque y las perillas de control de los quemadores, espere por lo menos - Weber Genesis E-310 LP | Owner Manual - Page 30
MANUAL DEL QUEMADOR LATERAL ƽ PELIGRO El no abrir la tapa mientras se esté encendiendo el quemador lateral, o no esperar 5 minutos para que el gas dirección de las agujas del reloj). 3) Abra la válvula de suministro de gas. 4) Coloque un cerillo en el portacerillos y enciéndalo. 5) Aguante el - Weber Genesis E-310 LP | Owner Manual - Page 31
las arañas y demás insectos. Pueden crear sus nidos en la sección del venturi (1) del tubo quemador. Esto bloquea el flujo normal de gas, y puede causar que el gas fluya hacia atrás por la válvula de aire de combustión. Esto puede resultar en un fuego en y alrededor de las aberturas para el - Weber Genesis E-310 LP | Owner Manual - Page 32
lo largo del tubo quemador, siga las instrucciones de limpieza del quemador. PROCEDIMIENTO PARA LA LIMPIEZA DEL QUEMADOR PRINCIPAL CIERRE EL SUMINISTRO DE GAS. Retire el múltiple (vea "Reemplace los quemadores principales"). Revise la parte interna de cada quemador con una linterna. Limpie la parte - Weber Genesis E-310 LP | Owner Manual - Page 33
esté correctamente ensamblado. ƽ ADVERTENCIA: Después de reinstalar las líneas de gas y antes de usar el asador, deberá verificarse que no haya fugas ón. (Vea el paso: "Verificación de que no existen fugas de gas") OPERACIÓN DEL SISTEMA DE ENCENDIDO CROSSOVER® Si el sistema de encendido Crossover - Weber Genesis E-310 LP | Owner Manual - Page 34
Mode d'emploi du grill à gaz PL E/S -310/320, EP -310/320 #89#50505000 VOUS DEVEZ LIRE CE MODE D'EMPLOI AVANT D'UTILISER VOTRE GRILL A GAZ ƽ DANGER S'il le revendeur. NOTE A L'INTENTION DE L'INSTALLATEUR: Les présentes instructions doivent être remises au propriétaire et le propriétaire devrait - Weber Genesis E-310 LP | Owner Manual - Page 35
troubles de la reproduction. ƽ N'utilisez ce barbecue que si toutes les pièces sont en place. Cet appareil doit être correctement assemblé conformément aux instructions de montage. ƽ N'intégrez pas ce modèle de grill corriger le problème vous-même. 3. Appelez votre service incendie. WWW.WEBER.COM® - Weber Genesis E-310 LP | Owner Manual - Page 36
Products Co. POUR UNE INSTALLATION AU CANADA Les présentes instructions, bien que généralement acceptables, ne sont pas nécessairement conformes la disponibilité des grilles de cuisson et des barres Flavorizer® de rechange, veuillez entrer en contact avec le Représentant du Service clientèle de - Weber Genesis E-310 LP | Owner Manual - Page 37
graisse accumulée ressemblent à des éclats de peinture. INSTRUCTIONS RELATIVES AU GAZ INFORMATIONS IMPORTANTES RELATIVES A LA BOUTEILLE 1 vous permet d'effectuer un raccordement rapide et totalement sécurisé entre votre grill à gaz et votre bouteille de propane liquide. Cela élimine le risque de - Weber Genesis E-310 LP | Owner Manual - Page 38
GAS INSTRUCTIONS Pour connecter le tuyau à la bouteille de gaz : 1) Faites passer le tuyau du régulateur à travers l'ouverture du panneau latéral à l'intérieur du placard inférieur. 2) Localisez la pince de retenue (a) sur le tuyau du régulateur. Fixez-la dans la fente (b) au dessous du support - Weber Genesis E-310 LP | Owner Manual - Page 39
GAS INSTRUCTIONS à la détection des fuites. Si votre grill est équipé d'un brûleur latéral GRILL. Veuillez entrer en contact avec le Représentant du Service client PAS LE GRILL. Veuillez entrer en contact avec le Représentant du Service clientèle grill de l'illustration présente de légères différences - Weber Genesis E-310 LP | Owner Manual - Page 40
AU GAZ Vérifiez : GAS INSTRUCTIONS 1) Le raccord entre le tuyau et le collecteur. 2) vous avez resserré le raccord, fermez le gaz (OFF). N'UTILISEZ PAS LE GRILL. Veuillez entrer en contact avec le Représentant du Service clientèle le plus proche grâce aux coordonnées à votre disposition sur - Weber Genesis E-310 LP | Owner Manual - Page 41
RELATIVES AU GAZ 41 GAS INSTRUCTIONS 41 ASTUCES POUR UNE MANIPULATION SANS DANGER DES BOUTEILLES DE GAZ un tuyau de rechange agréé par Weber®. Veuillez entrer en contact avec le Représentant du Service clientèle le plus proche grâce aux coordonnées à votre disposition sur notre site Internet. - Weber Genesis E-310 LP | Owner Manual - Page 42
42 INSTRUCTIONS RELATIVES A L'UTILISATION ALLUMAGE DU BRULEUR PRINCIPAL 1) Ouvrez le couvercle allumer à l'aide d'une allumette. ALLUMAGE DU BRULEUR PRINCIPAL 5 1 2 7 6 *Il est possible que le grill de l'illustration présente de légères différences par rapport au modèle acheté. 5 3 4 7) Une - Weber Genesis E-310 LP | Owner Manual - Page 43
43 OPERATING INSTRUCTIONS ƽ DANGER ALLUMAGE partir du BRULEUR 1. 2 46 7 *Il est possible que le grill de l'illustration présente de légères différences par rapport au modè par Weber®. Veuillez entrer en contact avec le Représentant du Service clientèle le plus proche au moyen des coordonnées à - Weber Genesis E-310 LP | Owner Manual - Page 44
essayer à nouveau. 320 PROBLEME Les brûleurs produisent une flamme jaune de la bouteille de gaz. Consultez les "Instructions pour l'allumage". Le brûleur ne pour le préchauffage. Les grilles de cuisson et les barres Flavorizer contact avec le Représentant du Service clientèle le plus proche grâ - Weber Genesis E-310 LP | Owner Manual - Page 45
PROBLEME de la bouteille de gaz. Consultez les "Instructions pour l'allumage". Le tuyau d'alimentation en combustible entrer en contact avec le Représentant du Service clientèle le plus proche grâce aux 2) Câble de raccordement à la terre 3) Brûleur Grille du brûleur latéral Cache du brûleur latéral - Weber Genesis E-310 LP | Owner Manual - Page 46
anti-araignées/insectes sont propres, remettez les brûleurs en place. Si la Grille anti-araignées/insectes se détériore ou ne peut pas être nettoyée, veuillez entrer en contact avec le Représentant du service clientèle le plus proche à l'aide des coordonnées à votre disposition sur notre site - Weber Genesis E-310 LP | Owner Manual - Page 47
vers vous, levez dans le même temps le collecteur pour relâcher les supports du collecteur du cadre. (b). 5) Faites glisser l'ensemble du brûleur hors ne s'allume pas, veuillez entrer en contact avec le Représentant du Service clientèle de votre région grâce aux coordonnées de notre site - Weber Genesis E-310 LP | Owner Manual - Page 48
48 WWW.WEBER.COM® - Weber Genesis E-310 LP | Owner Manual - Page 49
49 WWW.WEBER.COM® - Weber Genesis E-310 LP | Owner Manual - Page 50
50 WWW.WEBER.COM® - Weber Genesis E-310 LP | Owner Manual - Page 51
51 WWW.WEBER.COM® - Weber Genesis E-310 LP | Owner Manual - Page 52
52 WWW.WEBER.COM® - Weber Genesis E-310 LP | Owner Manual - Page 53
53 WWW.WEBER.COM® - Weber Genesis E-310 LP | Owner Manual - Page 54
to make any repair to gas carrying or gas burning components without contacting WeberStephen Products Co., Customer Service Department. Your actions, if you Silhouette , Smokey Joe, Weber, Compact Grill Configuration, Botswana; Weber, Canada; Smokey Joe, Genesis, China; Kettle Silhouette , Denmark; - Weber Genesis E-310 LP | Owner Manual - Page 55
èle avez-vous acheté? 1. Genesis® E-310™ 2. Genesis® S-310™ 3. Genesis® E-320™ 4. Genesis® S-320™ 7. Have you ever owned a Weber® grill before? / ¿Ha tenido alguna vez antes un asador Weber®? / Avez-vous déjà possédé un grill Weber® auparavant ? 1. Yes Number of Weber® gas grills owned: Sí Número de - Weber Genesis E-310 LP | Owner Manual - Page 56
Si vous avez besoin de pièces de rechange ou si vous avez des questions sur le montage, l'utilisation ou l'entretien de votre grill, veuillez consulter le Service Client de Weber. For purchases made in Canada: Para compras hechas en Canadá: Pour les achats effectués au Canada: Product Registration
-
 1
1 -
 2
2 -
 3
3 -
 4
4 -
 5
5 -
 6
6 -
 7
7 -
8
-
9
-
10
-
11
-
12
-
13
-
14
-
15
-
16
-
17
-
18
-
19
-
20
-
21
-
22
-
23
-
24
-
25
-
26
-
27
-
28
-
29
-
30
-
31
-
32
-
33
-
34
-
35
-
36
-
37
-
38
-
39
-
40
-
41
-
42
-
43
-
44
-
45
-
46
-
47
-
48
-
49
-
50
-
51
-
52
-
53
-
54
-
55
-
56
 |
 |
YOU MUST READ THIS OWNER’S GUIDE
BEFORE OPERATING YOUR GAS GRILL
±
DANGER
If you smell gas:
1. Shut off gas to the appliance.
2. Extinguish any open flames.
3. Open lid.
4. If odor continues, keep away from the
appliance and immediately call your gas
supplier or your fire department.
Leaking gas may cause a fire or explosion
which can cause serious bodily injury or
death, or damage to property.
±
WARNING:
1. Do not store or use gasoline or other
flammable liquids or vapors in the
vicinity of this or any other appliance.
2. An LP cylinder not connected for use
shall not be stored in the vicinity of this
or any other appliance.
±
WARNING: Follow all leak-check
procedures carefully in this manual prior
to barbecue operation. Do this even if the
barbecue was dealer-assembled.
NOTICE TO INSTALLER: These instructions
must be left with the owner and the owner
should keep them for future use.
THIS GAS APPLIANCE IS DESIGNED FOR
OUTDOOR USE ONLY.
89555 02/20/08 LP
US ENGLISH
GAS GRILL
#00000
#89555
±
WARNING: Do not try to light this
appliance without reading the “Lighting
Instructions” section of this manual.
LP GAS GRILL OWNER’S GUIDE
E/S -310/320, EP -310/320
Guía del propietario del asador de gas licuado de propano - Pg 20
Guide de l’utilisateur du grill à gaz PL - Pg 34